
These are the risks of clipping draws with carabiner gates facing the wrong way.
The post Does It Really Matter Which Way Your Quickdraws Face? appeared first on Climbing.
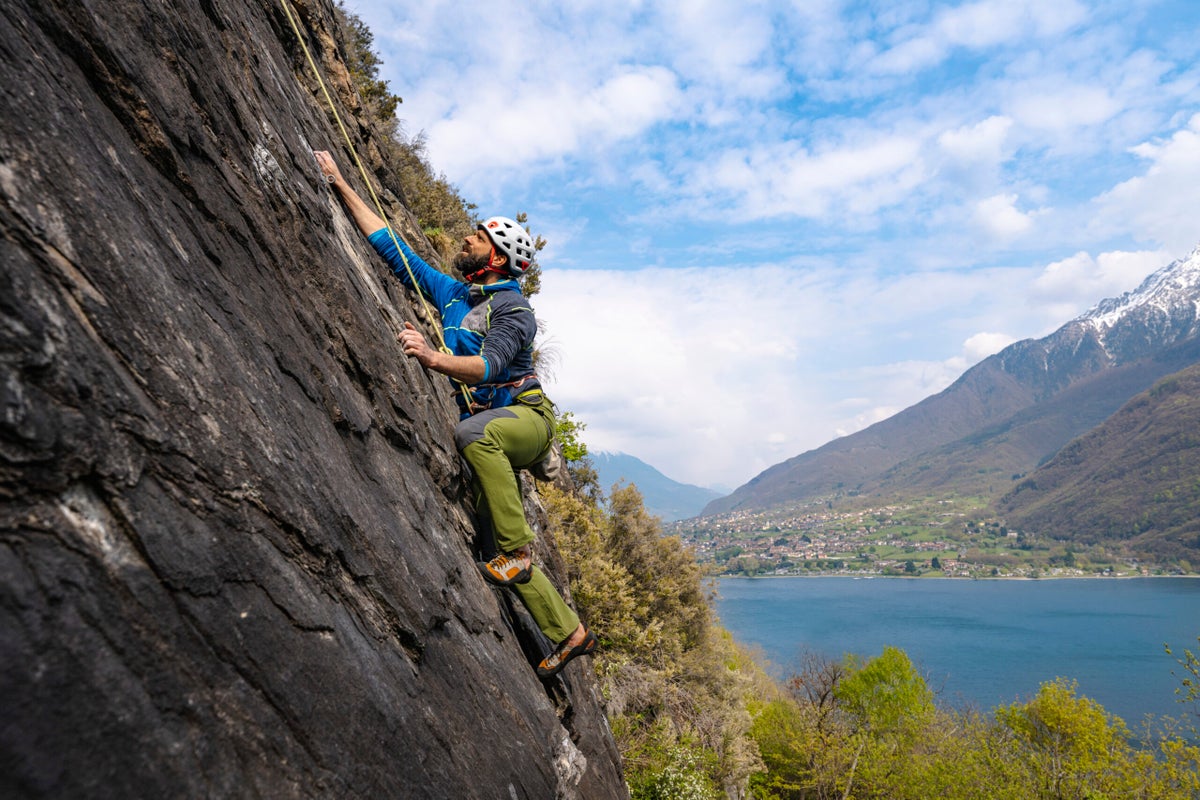
]]>You may have heard the maxim “Face your quickdraws away from your direction of travel.” That is, if you clip a bolt and the sequence heads left, both your bolt-side and rope-side carabiner gates should face right. Perhaps you’ve heard this about draws clipped to pitons, too, as well as to traditional pro. But why should this be? Want more than the reasoning of, “This is just how it’s done”? Since we haven’t seen a rash of accidents from climbers facing their draws the wrong way, we decided to dig a bit deeper.
The right way to clip quickdraws to bolts
Which way should the quickdraw’s bolt-side carabiner face?
According to Mountaineering: The Freedom of the Hills (Ninth Edition), we clip quickdraws with the top carabiner gate facing away from the direction of travel so that this carabiner doesn’t rotate on the bolt hanger as you climb past—at which point, the rope applies tension to the draw, possibly reorienting the carabiner such that the gate contacts the hanger. “In the case of a sudden fall, the gate can then open and potentially unclip …” the authors write.
Jeff Jaramillo, Head of Gear Education and Outreach at WeighMyRack, has never seen this happen on lead—nor have I—but he did witness it once while someone was slingshot toproping a pitch. The climber was on the clipped-in side of the rope. As the belayer took in slack, the tension on the toprope caused a draw’s top gate to open against a hanger.
Another reason to clip the draw’s top carabiner facing away from the direction you’re going is to avoid “nose-clipping” (aka “nose-hooking”). Per the American Alpine Institute, nose-clipping can happen when “the nose of the carabiner gets stuck on the bolt with the gate holding it in place.” If you fall, you load the carabiner along its minor axis—its weakest orientation—potentially leading to catastrophic failure. Again, Jaramillo says this is rare, given that modern bolt hangers are made of thicker metal that reduces the chance of the carabiner’s nose sticking, compared to the skinny old hangers from the 1980s. But it can happen, especially with spinner bolts. On a route at the Red River Gorge, a friend of Jaramillo’s had clipped correctly, but the loose hanger rotated the carabiner into a nose-clipped scenario.
Which way should the quickdraw’s rope-side carabiner face?
We face the rope-side carabiner away from our direction of travel to avoid a back-clipping situation. As anyone who’s taken an (anxiety-inducing) gym lead test recalls, back-clipping occurs when, per Freedom of the Hills, “…the leader’s end of the rope is clipped so that it travels behind—rather than in front of—the carabiner.” With back-clipping, the rope can form a twisted byte that can then unclip itself in a fall. Instead, you want your side of the rope coming up and out of the carabiner away from the rock, which is promoted by orienting your rope-side clipper away from your direction of travel.
Do both carabiners in a quickdraw need to face the same way?
In an informative video (below) from former Black Diamond Director of Quality Kolin Powick he shows why you should rig your draws with both the bolt-side and rope-side carabiners facing the same way. Primarily, doing so helps avoid the inevitable, fumble-pumped confusion when you pull a draw off your harness and the gates are facing opposite directions: Opposed carabiners introduce the completely avoidable potentiality of accidentally nose-clipping or back-clipping.
What about draws clipped to pitons and traditional protection?
Pitons: The same rules apply—face the gates away from your direction of travel; also, beware any sort of funky interaction between the piton and the carabiner, such as a fat carabiner acting like a lever on the pin or a tiny clipper getting nose-clippedIf using a “trad draw” or “alpine draw”—a shoulder sling plus two carabiners—face the piton-side carabiner away from your direction of travel. Meanwhile, with old ring pitons, the carabiner will likely move around on the ring; do your best.
Traditional protection: Almost all cams come pre-slung, and nylon is pliable. The play that slings introduce into the system makes it unlikely you’ll experience either nose-clipping or back-clipping. However, if using a draw to clip directly into a cam’s cable loop or a nut’s wire, try to clip correctly given the added stiffness in the system.
One final thing to be aware of with either a quickdraw or alpine draw? Jaramillo cautions that the top (protection-side) carabiner can get pinned against the edge of a crack and open. “But this is easily avoidable,” he says. “Just extend the sling in a different way, move the piece, or place a second piece”
Drawing conclusions
In the end, carabiner-gate management comes down to situational awareness, both from the climber and the belayer. This holds especially true on traversing climbs. “There’s so much on the belayer to be watching out and be ready for the next thing that’s going to happen,” says Jaramillo.
So, if that top carabiner nose-clips or the bottom one self-unclips, what’s the plan?
The post Does It Really Matter Which Way Your Quickdraws Face? appeared first on Climbing.
]]>
The fine art of sending your dream routes without really trying.
The post Topropers Unite! How to Convince Others to Haul You Up appeared first on Climbing.
]]>I suck. After 25 years of climbing, I have elevated passionate mediocrity to an art form. I have never even considered climbing the Nose, never led a pitch of ice, and barely pierced the ceiling of 5.12a sport routes. I boulder like a wounded walrus. There is no real excuse for being this terrible. During the past quarter-century, climbing has been an important part of my life. I have climbed as part of my job teaching at a boarding school for much of that time and my wife gives me ample hall passes. My scarecrow-like physique favors climbing; there have been few serious injuries in my life, and no detours to locales with no rock. Still, I’m just not that good.
I have charged through 25 years with unwavering enthusiasm and the misguided belief that enough daydreaming and obsessive guidebook-reading in the bathroom would improve my climbing. My hopes of breaking into the inner circle of climbing bro-dom remained unrealized. Yearly I watched climbers with a fraction of my experience climb harder, longer, tougher routes. A student I had taught to climb fired a 5.13d. Another student climbed the Nose on El Cap and the Supercanaleta on Fitz Roy. It was time to stop talkin’ and start chalkin’. The problem was getting up a résumé route without risking my neck.
I worked all my usual tricks for a select classic in Rocky Mountain National Park: stronger partner, sequencing to land the easy pitches, plenty of excuses ready if I failed. However, karma caught up with me. We were three pitches up Spearhead when my lead petered out in a smooth slab with TCUs behind crispy flakes for pro. I noodled up and down searching for a way out. This was the moment when gravity met ego. The problem was that I had taught my partner to climb. Even though he now climbed grades harder than I, I had hoped to retain some of the old master aura. But every time the crystals crumbled under my feet the coward in me counseled retreat. I finally threw in a belay at the end of the crack. As my partner approached I tossed down the words of contrition that generally mark the end of a climbing partnership: “I don’t think I can lead the next pitch. It’s all you.”
At the moment of shame, as I handed off the rack, the unexpected happened. Instead of heaping scorn upon me, my partner smiled.
“It’s all good,” he said. “You’ve got a family, I’ll take this one.” Then he glided across some of the hardest runout climbing I’ve ever seen. That simple exchange shook me out of my self-pity and offered redemption. Getting a tow up the hard pitches was not sleazy; it was a proud act of cunning that required years of experience. It was time to embrace the idea that I was happier on toprope.
I also realized that I was not alone. Rather than being a useless poser, I was actually a member of a unique subset of the climbing community. Now it was time to spread the gospel and say, “Topropers Unite!” (TRU for short.)
“What the hell is so great about toproping?” you ask. After all, almost every one of us initially began climbing on toprope. You can, however, elevate the toproping game to the point where you achieve goals as well as TRU climbing status. The key is stealth. It’s critical to fool other climbers into thinking that you really are a “true” climber, not just a leech. Avoid clanking hexes, long underwear topped with shorts, and tube socks tucked into Fires. Most of my best routes have been done with climbers of far superior abilities, hauling my skinny butt up real routes that I could then namedrop.
My inspiration comes from a few of the patron saints of the TRU crew. The first is Edward Whymper, who achieved lasting fame getting hauled up the Matterhorn by guides who climbed circles around his tweediness. However, his accomplishment was marred by having to pay those guides. The real hero has to be Chongo, who scammed rides up numerous El Cap routes, “hitchhiking” his way to the top. I don’t have the scratch to hire a guide to haul me up climbs I could brag about. I also lack the cajones to live in the dirt and trade canned food for the right to jug fixed lines like Chongo. I am left to rely on wits, flattery and guile.
I present a few tips so that you, too, may get up the climbs of your dreams without too much heavy lifting.
1. RATIO
The key to attaining TRU status is to climb a lot, while also avoiding the dreaded sharp end as much as possible. Lounging in the gym with autobelays is not going to cut it. Get out to the crags and tie in. Just find a way to get on stacks of routes without leading. When really pressed, you must be prepared to lead to avoid sinking to boot-licking subman-ship. Aim for a camouflaging ratio of one route led for every four routes on toprope.
2. MRG
The best possible way to crank out a ton of routes without too much leading is finding a Magnanimous Rope Gun (MRG). The MRG is large-hearted, stoked to climb, and leading about three number grades harder than you. Generally the MRG is so psyched to climb that he or she won’t even notice that you aren’t leading any of the pitches. Alternatively these people may be so kind that they just charge along without pointing out that you haven’t led anything all day. They may even hand you creampuff pitches on worthy routes to keep your self-respect intact. MRGs are hard to find since they tend to be ideal partners for “true” climbers also. If you can’t find an MRG you may resort to a few of the following techniques.
3. THE STALL
Needed for when you are climbing with someone who has mistaken you for a “true” climber and expects you to lead half the pitches. This technique involves taking so long to shoe up at the sport crag that your partner can’t avoid being ready to go first. As you glance up from tightening your laces for the 11th time you note with some surprise that your partner has stacked the rope, racked the draws, tied in and is snorting with impatience at the bottom of the route. “You look ready,” you say mildly. “Why don’t you lead this one?” Your partner shoots away and your first toprope of the day is secure. Now you need to keep the momentum. You need sequencing.
4. THE SEQUENCE
This does not refer to remembering the mind-numbing beta that better climbers recite all day. No, this refers to finessing the flow of the climbing day. Now that your partner has led the first route, you are descending “tired” from the TR lap. Shake your forearms vigorously and mumble, “Nice lead. My forearms are blown right now. Why don’t you start the next one while I rest?” With any luck this sequence can get you through four or five routes before your partner really is blown from doing all the real climbing. When you hit the end of the line and your partner calls your bluff you need …
5. LOCAL KNOWLEDGE
Even if you aren’t really a local, having the goods from all those hours spent poring over the guidebook will pay dividends here. Casually mention the “classic” 5.8 just around the corner that you could lead. The key is to fire up something easily with a minimum of risk. When you’re finished your partner will probably want to get on something harder. Here the tried-and-true line, “Since I picked the last route, why don’t you lead this one?” often works. If your partner is insistent that you do your share on the sharp end, resort to point 6.
6. EXCUSES
You don’t need the overworked “hung-over” or “too reachy” or “tweaked finger/ jacked shoulder” type of excuses. These are so transparent any self-respecting “true” climber would know you were a total weenie dodging your duty. No, you need the bulletproof excuse, something like, “My kids were up all night vomiting with the flu.” The best excuses not only slip you off the hook, but elicit sympathy from your partner and any nearby onlookers. “Wow, you looked pretty good on that considering you didn’t get any sleep.” When you run out of excuses you may have to actually climb. If this happens, by all means step up and maintain your dignity and cover.
After all these years of walking the line between revealing my TRU gumby status and remaining included by “actual” climbers I have decided to come out of the shadows, though I suggest other TRU climbers keep a low profile to scam rides on the rock. Now if I could just get them to post a website with a TRU scorecard I could finally be a leader in something.
The post Topropers Unite! How to Convince Others to Haul You Up appeared first on Climbing.
]]>
Tommy Caldwell, Natalia Grossman, and a sports psychologist share how you can keep your mental health intact during a frustrating recovery.
The post Are You Injured and Spiraling? Here’s How to Handle It Like a Pro. appeared first on Climbing.
]]>When four-time Boulder World Cup Champion Natalia Grossman struggled with an LCL and popliteus tear before the Paris 2024 Olympics, she put on a brave face in keeping with her ‘smile and fight’ motto. “I tried to convince myself that I was fine and that I would be ready for the Olympics, even though I couldn’t use my leg for a while and wasn’t even bouldering,” she says. “Lying to myself was pretty hard, but I couldn’t face what was really happening.”
Injured climbers usually have two questions in mind: “How long will it take to heal?” and “When can I get back on the wall?” Frustration with injuries isn’t just the preserve of pros who rely on climbing for their career—amateurs and weekend warriors can struggle with the mental impact of not being able to do the sport they love and enjoy the lifestyle it brings.
Whether you’re suffering from a minor finger injury or a major bone break, here are some tips and strategies from pro climbers and a sports psychologist to keep your mental health intact.
Managing the injury aftermath
When Tommy Caldwell lost half of his left index finger in a table saw accident in 2001, climbing was “basically everything” to him. He was young and progressing quickly with what looked set to be a successful climbing career ahead of him. “It all seemed in jeopardy, so I jumped back in it with all I had,” he says.
Most climbers, however, struggle to find that same fire for recovery. Sport psychologist and climber Jana Unterholzner of Unblocd, an online platform providing mental skills training, says that many injured climbers effectively go through a grieving process.
“Athletes can experience injury as a loss and they actually follow the stages of grief, which are first denying the injury, then being angry, facing frustration, bargaining and then acceptance,” she says. As a result, an injured sportsperson can experience a variety of psychological changes, from low mood and irritability to depression.
Identity loss: If I can’t climb, who am I?
Compared to other sports, climbing can be a significant part of our identity and a forced break inevitably threatens it. The routines we build as climbers—centered around going to the gym, getting outside, meeting friends and reaching goals—get shaken up and we can lose sight of our purpose.
“From a psychological perspective, I think climbing is more than an identity per se—it is also our way of living and our way of connecting with the world, connecting with ourselves and regulating emotions,” says Unterholzner. “When you’re injured and you can’t let stress out on the wall or rock, suddenly that emotion regulation element falls away and brings challenges.”
Are some injuries easier to deal with mentally?
Climbing may be a whole-body sport, but one of the most common climbing ailments affects the fingers. Although objectively minor in terms of overall wellbeing, finger tweaks are no less frustrating. “They’re not necessarily easier to deal with psychologically, because when you have a broken bone, you simply can’t climb,” says Unterholzner. “But if you have a pulley strain or something else relatively minor, it can be harder to accept and easier to keep climbing, potentially delaying recovery.”
Likewise, if there’s a clear timeline such as healing from an acute bone break, the process can involve less uncertainty and mental struggle than the open-ended comeback from chronic injuries to tendons or ligaments. The circumstances leading to injury can also complicate mental recovery, such as a fall or accident. If trauma symptoms such as anxiety, flashbacks or avoidance persist, Unterholzner advises seeking professional psychological support.
Grossman experienced greater acceptance after tearing her ACL and meniscus in February. “Compared to my previous injuries, this one was just so severe that as soon as I had a diagnosis, I thought: OK, there’s no point in even trying to be ready— there is no season this season!” she says.
Occasionally, though, the outcome is better than anticipated. Caldwell—who healed from his finger amputation and went on to make the first ascent of El Capitan’s Dawn Wall in 2015—remembers surprising himself. “The injury seemed really bad from afar, but the reality was less severe than I thought,” he says. “I was therefore able to exceed my own expectations day after day and ultimately make the biggest progression I’ve ever had in climbing.”
Strategies for mental recovery
Work on your mindset while resting and rehabilitating
While there’s no “one-size-fits-all” solution, Unterholzner encourages shifting from a threat mindset to a challenge mindset. “You can reframe the injury recovery process as an opportunity for growth,” she says.
Caldwell’s experience reflects this philosophy: “There’s something liberating about starting again at the bottom and feeling that improvement day after day. If you’re super hungry, injury has a way of resetting the progression flywheel.”
Take it slow
Secondly, Unterholzner recommends goal-setting to reduce uncertainty. “Break the goals down into hope goals and realistic goals,” she says. “Taking smaller steps is really helpful, because recovery can be so uncertain and if you miss a high goal, you might think “I failed”. Reevaluating goals helps build self-trust to support a gradual recovery.
To stay motivated, Grossman created a “win wall”, where she would note small milestones from managing everyday tasks to making minor progress in physio exercises: “I love updating it as the wins get bigger and bigger— but it comes in waves.”
Write down—and share—your struggles
Another tip is to document your physical and emotional recovery. In one study, Unterholzner explains, athletes who wrote about their emotions recorded an improvement in emotion regulation, happiness—and even improved physical strength.
Following the Olympics, Grossman felt liberated through sharing her struggles openly with coaches, physios, family and friends and on social media. “Feeling your emotions and being honest with yourself, that’s something that I wasn’t able to do before Paris, but I’ve really focused on that now,” she says.
Broaden your horizons outside of climbing
One benefit of time away from climbing is the opportunity to enjoy—and even discover— other interests. Having purpose is key: “It can help to work on other areas at the gym depending on the injury, or do mental work like visualization, but it can also help to find distance and explore other areas of life,” Unterholzner says. “I like to imagine ourselves as a ball with different threads holding us up. Climbing is a really strong thread holding us in place. If that suddenly breaks down, then the other ones become even more important to keep us stable.”
Social support is also vital—something which time away from regular sessions can hinder. Caldwell remembers his late friend Hayden Kennedy musing during an ACL recovery: “I have so much time to learn the guitar, hang out with friends and pursue the things in life that climbing was getting in the way of.”
Returning to climbing
Healing physically is only half of the process. The mental hurdles of getting back on the wall can be even greater.
Trust the process: the ups and the downs
One of the biggest mental barriers when returning to climbing is the fear of re-injury, known as kinesiophobia, which more than half of sportspeople experience. “Lowering expectations is the way to go—as reaching too high too soon, comparing yourself to pre-injury levels, being overly self-critical and losing confidence are all interlinked,” Unterholzner says.
Through her multiple injuries, Grossman has learned to focus on what she can do—and that progress is not linear. “The ups and downs are all a part of it, but it’s hard to keep going when you’re not seeing progress, you’re experiencing pain, or it feels like you’re digressing,” she says.“It’s about trusting the process and celebrating the small wins.” Her latest big win was a victory in the North American Cup finals in August, marking an impressive comeback.
Caldwell’s recent Achilles injury was different to his finger amputation both in terms of the type of injury and his decreasing dependency on climbing due to family commitments. “It seemed comparatively minor at first, but the extended nature of the injury meant that I was rarely meeting my expectations, much less exceeding them,” he says. “I always thought my happiness was dependent on my ability to go climbing consistently, but my Achilles injury showed me it wasn’t. I was excited to return to climbing, but ultimately I was doing just fine without it. That’s my approach now.”
Both injuries helped him realize what he valued at the two different life stages as his priorities shifted. “The finger accident showed me how much hard climbing was important to me, while the Achilles injury showed me that I really miss the experience of big adventure.” As soon as he could, Caldwell cycled to Alaska and climbed the Devils Thumb with his longtime climbing partner Alex Honnold.
Injury struggles: a taboo topic?
Unterholzner believes that the mental impact of injuries is still a taboo topic, partly due to climbers typically harboring stubborn traits and a “mustn’t grumble” philosophy.
Grossman advocates for “holding onto hope” and staying positive. “But you should also feel those hard times, let the emotions out, don’t bottle it up,” she says.
As frustrating as injuries can be, Unterholzner emphasizes that overcoming injury-related adversity can teach resilience: “It’s quite amazing to think of an injury as an opportunity to learn skills that can help you beyond climbing.”
Ultimately, as the saying goes, absence really can make the heart grow fonder. “You sometimes understand how much you value something when you lose it for a time,” Caldwell says.
Practical tips from Unterholzner:
The RULER approach can help you work through difficult feelings during recovery.
- Recognize what you’re feeling (fear, frustration, sadness).
- Understand where it’s coming from (worry about losing strength, feeling left out, slower-than-expected progress).
- Label the emotion more clearly (e.g., “I feel frustrated because I can’t climb yet” instead of just “angry”).
- Express emotions in healthy ways (journaling, talking about it).
- Regulate with mental tools (deep breathing, music, relaxing activity).
Journaling prompts:
- How am I feeling today?
- What’s one small improvement I’ve noticed?
- What’s my biggest challenge right now?
- What’s one thing I’m grateful for in my recovery?
The post Are You Injured and Spiraling? Here’s How to Handle It Like a Pro. appeared first on Climbing.
]]>
Climbing poorly won’t ruin your reputation. Pooping like an amateur absolutely will.
The post Never Poop on a Belay Ledge and More Key Bathroom Beta for Climbers appeared first on Climbing.
]]>In the 12 years I’ve been climbing, I’ve heard countless stories about gastrointestinal emergencies. I’ve told a fair number of them myself—from that time a friend and I both got sick and had to pass a single W.A.G. Bag back and forth for 13 hours on a ridge traverse, to that time I pooped my pants in an offwidth in Eldorado Canyon. Now that I’m 32, I’ve realized two things: Poop stories are still very funny (sorry, Mom), and there’s actually no such thing as an emergency—just a lack of preparedness.
The proliferation of human waste is a serious issue that threatens access to climbing areas across the U.S. It’s also just plain gross. The good news is that, with the right kit and a little know-how, it’s an entirely preventable problem.
Here are our favorite tips, tricks, and gear for responsibly managing your human waste across the major climbing disciplines. I also offer tips on how to use the loo in arid, remote, and wintry environments.
A climber’s guide to pooping and peeing, by discipline
Cragging and bouldering
Crags and bouldering zones with short approaches tend to draw the greatest concentration of human traffic. This means it’s extra important that we all remain on our best behavior. Here’s what that looks like:
- Use the trailhead toilet. An actual toilet is your first line of defense, especially if you’re in a crowded area or fragile environment. If it’s a long walk, embrace the extra exercise.
- Dig a six-to-eight-inch hole. Digging “cat holes” works if you’re in a forested area with deep soil. I like the PACT Outdoor Bathroom Kit ($50), which comes with a shovel, just-add-water wipes, and mushroom capsules that speed up decomposition. (Reminder: Pack out the wipes and any TP. Contrary to popular belief, these items can take up to three years to decompose.)
- Carry a W.A.G. Bag. The ubiquitous W.A.G. Bag (short for “Waste Aggregation and Gelling”) is a disposable, odor-proof, leak-proof plastic pouch. Fill it up, pack it out, and toss it at the first gas station you hit on the way home. Pro tip: Local climbing organizations, climbing stewards, and ranger’s stations often pass them out for free.
Follow Leave No Trace guidelines whenever possible. Pack out all your toilet paper, wet wipes, pads, and tampons, and try to pee at least 200 feet off-trail and away from water sources.
Pro tip: Always try to use the bathroom before getting your knee hopelessly in an offwidth, as this classic climbing clip demonstrates:
Multipitch climbing
This advice can be summed up rather succinctly: Do not shit on a belay ledge. Hold it, poop into a Zip-loc, carry a W.A.G. Bag—I don’t care what you do. Just don’t drop your payload on the one place climbers are forced to hang out for hours at a time. If your partner is on the ledge beside you and you’re feeling shy, tell them to close their eyes and sing loudly. It’s a good bonding exercise. Trust me.
Peeing is a little more free-form. Try not to urinate in cracks (they’ll stink forever) or directly onto the route. But anywhere else is generally fine. Ladies, here’s some useful gear to make that easy (even with a harness on):
- Freshette Reusable Pee Funnel ($22.95)
- Kula Cloth ($20)
- Gnara Go There Pants ($168)
Big walling
In the olden days, Yosemite climbers were known to throw used W.A.G. Bags off the wall into the valley below. Later, climbers carried up sections of PVC pipe that they stuffed with used W.A.G. Bags. These “poop tubes” were relatively reliable—but prone to cracking and exploding if dropped. These days, the go-to vessel for multi-day waste containment is a soft-sided haul bag. The most popular of these is the Metolius Waste Case, according to Sam MacIlwaine, a former Yosemite Climbing Steward and Climbing associate editor.
“You hang it at the bottom of your chain of haul bags so you don’t have to smell it,” MacIlwaine says. Most people are pretty generous in sharing Waste Cases, she adds. If you don’t have one, you can typically borrow from a friend.
The unspoken rule is that if you spill your excrement, according to MacIlwaine, is that you must pause your objective until the wall is, well, poop-less. “You have to clean it. If you don’t, it will destroy your reputation in the valley forever,” she says (and she’s not exaggerating.) A few of MacIlwaine’s other tips for big wall bathrooming:
- Use a harness with detachable leg loops. That way you can make a deposit without unclipping.
- Pull the ropes up before peeing. Also pay attention to the direction the wind is blowing.
- Wait til your partner—and any other parties—are above you. Or at least on the ledge next to you. If someone’s beneath you, hold it.
- Keep tampons and wipes in a fanny pack. The top of your haulbag also works. Just make sure your period kit is accessible. Also bring a zip-top bag to pack out used tampons and wipes. These can go in the Waste Case when you have access to it next.
- Don’t drop trou in Yosemite between 12:30 and 4:30 pm. That’s when the high-powered telescopes are out.
How to responsibly dispose of waste, by climbing environment
Desert
The desert is a complicated place to use the bathroom for several reasons, the foremost of which is that things don’t really decompose. The environment is too arid. Anything you leave on or in the sand is more likely to get mummified—and therefore become a lasting monument to your irresponsibility—than to peaceably disintegrate. Plus, bushwhacking around and digging holes disturb the fragile cryptobiotic soil that desert life relies on. Shitting on-trail is a no-no. And shitting off-trail is even worse.
The third problem is that if you forget TP, there’s nothing much to wipe with. Except cactus. The fourth problem is that desert crags and towers are often remote, and bathrooms are hard to come by.
Once, while climbing Castleton Tower about a decade ago, I started to experience hints of gastrointestinal distress on the second pitch. By sheer force of will, I managed to reabsorb and carry on. Then, almost as soon as we rappelled back to the base, my partner decided it would be a great idea to climb the tower again via a different route. My belly wobbled, but all I had with me was a bagel bag. So, I puckered up and nodded reluctantly. By the time we got to the base the second time, the situation was code-red. Out came the bagel bag.
Aiming was no easy feat. The sandy rocks I elected to wipe with (and pack out) left me chafed for weeks. My advice to you? Bring a W.A.G. Bag every time you go climbing. Bring a lot of them. One per person per day is the general rule—unless you want to share.
Alpine
Like desert environments, landscapes above treeline tend to be bereft of moisture. Human waste can take years—if not decades—to break down. The soil is thin and rocky, and digging holes is next to impossible.
For those reasons, leaving waste in the alpine is typically a huge faux pas, especially in places with high visitation like Mount Whitney or Rocky Mountain National Park. There are a few exceptions in truly remote ranges where the brown falcon method is considered acceptable (for the uninitiated, this involves shitting on a flat rock, then frisbeeing it into the void). I once had a guide recommend the ol’ smear-and-throw during a Backpacker Editor’s Choice Trip in Colorado’s Weminuche Wilderness. We were at 14,000 feet, surrounded by miles of talus. He said a single lone turd wasn’t likely to have much of an impact.
That said, I pretty much always bring a W.A.G. Bag, even if I’m way out in the boonies. Altitude does strange things to the digestive tract, and you never know when you’re going to need it.
Finally, piss responsibly above treeline. Marmots, mountain goats, and other high-altitude critters are desperate for salt and will attack anything you’ve peed on. They’ve also been known to eat sweaty backpack straps and chase urinating hikers. In goat country, have a friend stand watch. Then, pee on rock rather than plant matter. That way, the goats will get their fix licking stone, rather than unnecessarily pawing up native vegetation.
Snow and ice
It doesn’t matter whether you’re alpine climbing, ice climbing, or mixed climbing. If there’s snow on the ground, digging holes is useless. Nothing is more horrifying than watching the onset of spring leave dozens of melted-out turds on the surface of god’s green earth.
If there’s a toilet nearby, use it. If not, it’s time for a W.A.G. Bag. Pro tip: Snow makes excellent wiping material. The color allows you to reliably monitor progress, and the temperature is, well, refreshing.
The post Never Poop on a Belay Ledge and More Key Bathroom Beta for Climbers appeared first on Climbing.
]]>
After a disastrous fall at the Red River Gorge, I investigated the root cause of several seemingly unexpected accidents in our sport.
The post “Nose Hooking” Broke My Partner’s Neck. Here’s How to Avoid This and More Freak Accidents. appeared first on Climbing.
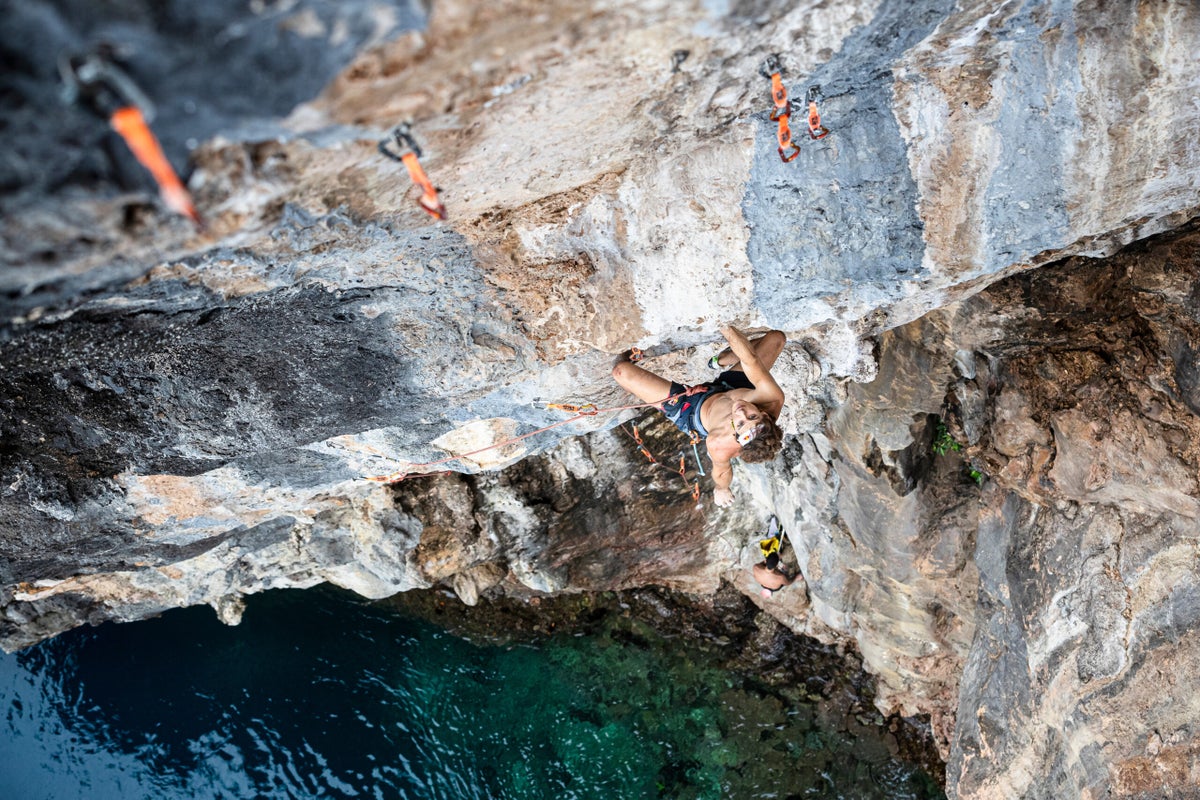
]]>This spring, my partner Harrison was hanging from a jug after pulling through the crux of Fibrulator Direct (5.11d) in the Red River Gorge. He had been projecting this single-pitch crack for weeks, and had shaken out on that hold dozens of times. But this time, when he locked off to move up, the hold snapped and sent him airborne. His highest piece of protection, a 0.4 cam, ripped out of the wall. The carabiner attached to his next cam snapped in half (a result of “nose hooking”—more on that below). His lower pieces, two 0.3s equalized with an extended alpine draw, somehow unclipped from the rope. Harrison fell 40 feet to the ground.
Over the last four decades or so, climbing gear has become increasingly stronger, more reliable, and easier to use. But it’s not infallible. Pete Takeda, the editor of Accidents in North American Climbing, explained that when gear fails to perform its intended purpose, “there’s almost always an underlying error or environmental factor that has come into play.” He doesn’t like the term “gear failure” for this reason.
With Takeda’s help and a careful look at several years of accident reports, I’ve put together a list of common ways in which gear “fails.” Some might consider these instance “freak accidents,” but there are often reasons behind these failures—and ways we can do our best to prevent them.
Unclipping
On rare occasions, a carabiner can unclip from the rope or the bolt hanger to which it is attached. This type of failure leads to unexpectedly long falls.
How it happens
A carabiner can become unclipped from the rope in several ways, but back-clipping is the most common cause. When a climber falls from above a back-clipped draw, the rope can wrap around the gate of the carabiner, unclipping from the draw.
In 2024, a rope unclipped from mussy hooks at the top of a sport climb after a climber removed a carabiner above the hooks. It is unknown whether the rope accidentally unclipped or the climber unclipped them on purpose, but it is possible that the rope loaded the hooks incorrectly as the climber weighted the anchor, causing it to become unclipped.
In much rarer instances, during sideways or very long falls, quickdraws can become unclipped from the bolt hanger if the hanger-side carabiner twists/rotates inside the dogbone, causing the carabiner to be loaded against the hanger at the gate. This type of loading was the cause of two unclipping accidents in 2024.
Prevention
The most obvious way to prevent this kind of accident is by avoiding backclipping. If you’re not confident in this skill, seek qualified instruction.
On bolted routes, quickdraws should be clipped such that the gate of the carabiner is facing away from the direction of travel. On angled bolt hangers (common on expansion or mechanical-style bolts), clipping the draw toward the nut (from the opposite side) reduces the chances of levering the gate open.
Sling breakage
Slings used for permanent anchors can break after years of wear, causing long and sometimes fatal falls.
How it happens
Nylon webbing, common in “tat” anchors in the alpine, is weakened by UV exposure, freeze/thaw cycles, precipitation, and rockfall. When an anchor has many layers of webbing, it can be difficult to assess its quality. Worn-out slings can break under bodyweight or during a fall.
Prevention
Knowing how to assess the quality of nylon webbing—and taking the time to do so—can protect you from a fatal fall. Worn webbing might appear frayed or sun-bleached; be especially vigilant in alpine environments where webbing is exposed to direct sunlight and freezing. If you’re unsure of the webbing’s quality at first glance, spinning it around to look at the “backside” or inspecting the material at the knot might provide more information. If the material in these spots, which are subject to less wear, looks brighter or less weathered, the anchor may not be safe to use.
Be wary of white or gray nylon: webbing in these colors is sold, but it’s less common, and may indicate wear. Precipitation makes descending feel urgent, but wet webbing often appears brighter—be extra careful when inspecting webbing anchors in rainy or snowy conditions.
If you decide that an anchor is unreliable, you still need to find a way down. Fresh webbing and rappel rings are lightweight and inexpensive, and carrying them will allow you to replace worn anchors. A small knife should always be part of your kit on long routes—use it to remove old, worn-out webbing once you sub in your fresh piece. Doing so will help reduce the confusing “rat’s nest” of anchor material on popular climbs.
Protection pulling out
A perfectly placed cam in bullet rock can be as inspiring as a bolt. But gear placements are more often imperfect. Bad placements equals big falls.
How it happens
If a cam is tipped-out (too small for the crack it’s placed in), unevenly cammed (in a flaring crack), or making otherwise poor contact with the rock, it can pull out under relatively low loads. Similarly, if a nut has poor surface area contact or isn’t placed in a constriction, a fall can pull it out. This is especially true of smaller pieces, which present a much smaller margin for error. Remember: the bigger the fall, the more force on your gear, making it more likely to come out if it’s not a perfect placement.
If the rock around a piece of protection is crumbly or loose, it can break under force, pulling your piece from the wall and potentially endangering your belayer too.
Prevention
Practice placing gear with a mentor or guide who can give you specific, actionable feedback. Learn to assess rock quality and avoid placing “mental” pro—pieces that will likely rip out in a fall.
Make trad anchors redundant by placing three or more solid pieces of gear, and avoid placing all of your anchor pieces behind the same block, even if it looks completely attached. Inspect your cams regularly for evidence of trigger wire fraying or sling damage.
Bolt failure
In most popular climbing areas, bolts are replaced as needed by a climbers’ coalition or access group. But bolts and hangers can pull out of the wall, especially on less popular routes.
How it happens
On two-piece mechanical or expansion bolts, the nut and washer that secures the hanger to the threaded bolt shaft can become loose with repeated loading, loosening the hanger. Left unchecked, the hanger will eventually fall off of the bolt.
The modern bolting standard is one piece glue-in bolts: they fail far less regularly since they do not come apart and they are less likely to corrode. Unfortunately, older climbing areas are more likely to have been developed with mixed-metal coatings, and those bolts can rust in their holes. In these very rare situations, the hanger may look fine but the bolt in the rock might be completely corroded. This kind of corrosion was the source of a 2010 accident in Index, Washington.
Prevention
If climbing in an area with mechanical bolts (common nearly everywhere in the United States), carry a small crescent wrench—many nut tools have built-in wrenches. Tighten bolts if you feel the hangers spinning or twisting on their bolts. If you plan to climb in a less popular area, research forums about the area to find out which routes are commonly climbed and updated.
Carabiner breakage (levering, nose hooking)
Modern carabiners are very strong in most orientations. But when loaded incorrectly they can bend out of shape or break completely.
How it happens
When levered against an edge or loaded over the nose, carabiners can break. “Nose hooking,” which occurs when the rope runs over the “nose” of the carabiner (the point where the basket meets the gate), preventing the gate from completely closing and isolating the force of the fall at this weak point. The nose of a carabiner can also get stuck on a bolt hanger, stopper wire, or sling. When nose hooked, carabiners can fail at forces as low as 2 kN. Carabiners are also weakened when levered over an edge in the rock.
Prevention
If you see a nose hooked carabiner, reorient it immediately. Several carabiners have broken due to nose hooking, including my partner Harrison’s, but also because of less-obvious levering. Levering can occur when two carabiners are clipped into the same bolt hanger (if loaded, the top carabiner is more likely to break), or, more commonly, when placing protection the carabiners can lay awkwardly against protruding rock features. Extend pieces of protection as needed to prevent levering.
Toprope solo device failure
Toprope soloing has exploded in popularity for rehearsing highball boulders, climbing multi-pitches quickly, and getting pitches in without a partner. But climbing alone is inherently risky.
How it happens
All four toprope soloing accidents reported in the ANAC during the last three years occurred when climbers used only one progress capture device. When these devices are jammed or incorrectly loaded, they can become unclipped or fail to “grab” the rope. Without a backup, climbers can fall to the ground.
Two accidents involved the use of a Petzl SHUNT, a discontinued device designed to be a rappel back-up. When the rope above the device goes slack, the SHUNT can disconnect from the rope completely. If the SHUNT is used without a backup, a disconnection here means that the climber is now free soloing.
In a separate accident, a climber using a single Petzl Micro Traxion fell 30 feet to the ground after a sling jammed in the device, blocking its teeth and preventing it from “grabbing” the rope.
Prevention
In all of these accidents, a second progress capture device would have kept the climbers safe. Redundancy is a key part of any climbing system.
It’s also critical to follow manufacturers’s instructions when using a new piece of gear. Social media personalities are constantly introducing “innovative” and efficient-seeming ways to climb, but qualified guides and gear manufacturers are far more reliable. Petzl has repeatedly discouraged climbers from using any of their products as singular protection devices when toprope soloing, and heeding this instruction could have prevented several accidents.
***
After a few months to recover from spinal surgery, Harrison’s climbing hard again. But we’re both a bit more careful, whether we’re clipping bolts or plugging gear.
The post “Nose Hooking” Broke My Partner’s Neck. Here’s How to Avoid This and More Freak Accidents. appeared first on Climbing.
]]>
Traveling to another country? Want to avoid sandbagging yourself? Hint: 5.8 and 8a are very different…
The post International Climbing Grades: Everything You Need to Know appeared first on Climbing.
]]>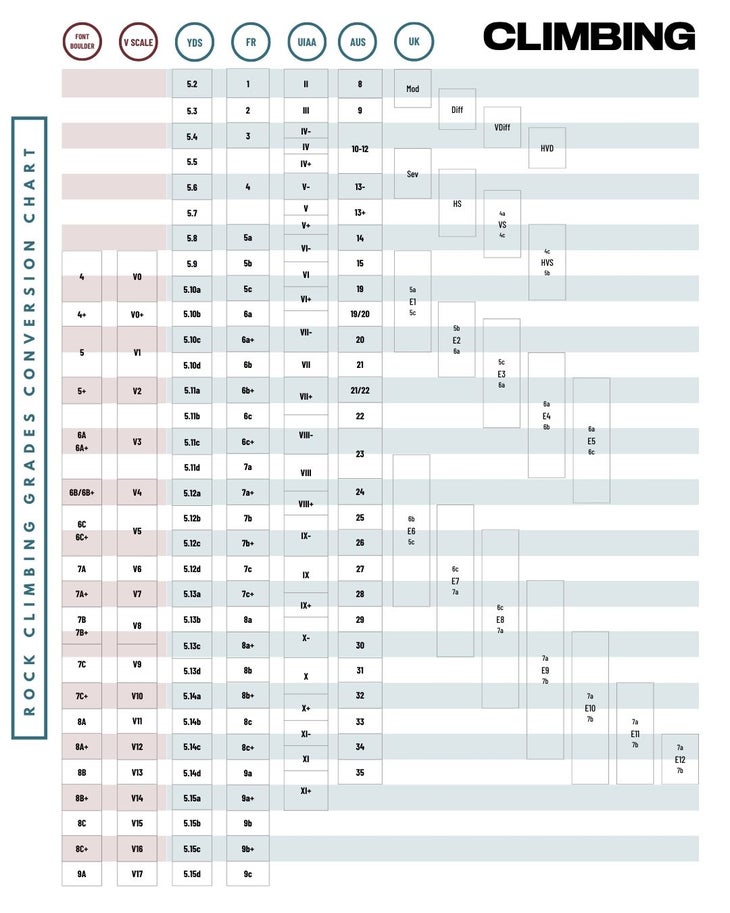
Yosemite Decimal System
The Yosemite Decimal System (YDS) evolved from a rating system that was originally designed to give hikers and scramblers a clear rating of difficulty from off-trail walking to hands-on rock climbing. Class 1 referred to a flat or slightly uneven walk, while Class 5 described a steep, challenging rock climb that should only be attempted with a rope and protection. Climbers eventually added a decimal to Class 5 ratings (5.8, 5.9) to better describe the difficulty of climbing within. Be aware: up until the early 1960s, the highest formal Class 5 grade was 5.9. This does not mean climbers in 1950 were unable to climb harder than that! They simply hadn’t thought of a way to express difficulty beyond 5.9. As a result, some “5.9” climbs first done in the ‘50s are being retroactively graded 5.10 or even 5.11.
Nowadays, climbers use double-digit decimal grades to illustrate higher difficulty (5.10), and often add a letter from a-d for even further clarity (5.10a, 5.10b). The YDS is an open-ended grading system and currently tops out at 5.15d.
North American Commitment Grade
North American Commitment Grades take into account both the crux technical difficulties of a climb and its seriousness and/or remoteness. For example: El Capitan’s Free Rider (5.13a; 3,000ft), in the very accessible Yosemite Valley, and the North Howser Tower’s All Along the Watchtower (5.12-; 3,000ft), in the far less accessible Bugaboos, both receive “Grade VI” commitment. The former is more technically difficult while the latter is overall a more serious endeavor due to the alpine environment, lack of fixed anchors, and complex approach and descent.
- I/II: Half a day for the fifth class portion of the route.
- III: Most of a day of fifth class climbing.
- IV: A full day of fifth class climbing.
- V: Can only be done in a day if climbing very quickly with intention. Otherwise, it requires a bivouac on route.
- VI: Two-plus days of climbing, or speed-climbing tactics.
- VII: Remote walls, typically Himalayan. The largest routes on Earth.
French Alpine System
Like the North American Commitment Grade, the French Alpine System presents a grade which factors in the route’s overall “seriousness”; everything from the length and difficulty of the approach, the crux climbing, complexity of descent, objective hazard, altitude, and commitment level (i.e. how easy is it to rappel the route?).
- F: Facile/easy. Rocky scrambling or low-angle snow slopes and simple glacier travel.
- PD: Peu Difficile/a little difficult. Some technical climbing (rock scrambling or easy ice climbing) and possibly complex glacier travel.
- AD: Assez Difficile/fairly hard. Steeper rock or ice climbing, or long snow/ice slopes above 50 degrees.
- D: Difficile/difficult. Sustained, challenging rock/ice/snow climbing.
- TD: Très Difficile/very difficult. A long route, sometimes remote, with mainly technical climbing and perhaps poor protection or objective hazard.
- ED: Extrêmement difficile/extremely difficult. Often graded as ED1, ED2, ED3, these are the most serious alpine climbs imaginable with constant technical climbing from start to finish.
Aid Grades
Note: when the aid grade begins with a “C” (i.e. C2), that means the route can be climbed “cleanly” (without a piton hammer) to avoid damaging the rock with your hammer’s blows.
- A1: Simple aid. Every piece is solid and is easy to place.
- A2: Moderate aid. Every piece is solid, but it may be difficult to place (i.e. a clever nut placement, or a blind piton).
- A2+: Some pieces may not be trustworthy and could fail under bodyweight. Up to 10-meter fall potential. Clean falls.
- A3: Difficult aid. Many bodyweight-only placements in a row. Up to 15-meter fall potential.
- A3+: A3 difficulties but with dangerous fall potential (a ledge, or possible swing).
- A4: Hard, committing aid. Up to a 30-meter ledge-fall potential.
- A4+: Even more serious; more bodyweight placements that are even harder to sniff out.
- A5: Extreme aid. A full pitch of bodyweight-only placements.
Mixed Grades (M-Grade)
These routes are climbed using crampons and ice tools on rock features as well as on ice. When Mixed Grades were first introduced, it was all but a given that a “mixed” pitch would involve ice climbing—usually a hanging dagger—at some point. As mixed climbing has become more popular, the subset of “sport drytooling” has gained traction too: climbing bare rock, with ice climbing equipment, but with no actual ice in sight. These routes are prefaced with a “D” instead of “M.”
As a general rule in the more moderate M Grades, to ascertain how a mixed pitch will relate to a rock pitch, you can add four numbers to the Mixed Grade to get a comparable YDS grade (i.e. M4 = 5.8).
- M1-3: Easy. Low angle. A 5.7 climbing experience.
- M4: Slabby to vertical with some technical dry tooling.
- M5: Low angle dry tooling with brief overhangs, or sustained vertical dry tooling.
- M6: Vertical to overhanging with difficult dry tooling, or tenuous, insecure pick holds.
- M7: Overhanging, powerful, and technical dry tooling.
- M8: Large overhangs requiring powerful and technical dry tooling. Longer sections of sustained dry tooling.
- M9: Either continuously slightly overhanging with marginal or technical holds, or a juggy roof of several body lengths.
- M10: At least 10 meters of horizontal rock or 30 meters of overhanging dry tooling with powerful moves and few rests.
- M11-15: A ropelength of overhanging gymnastic climbing, or sustained cave climbing.
Water Ice and Alpine Ice Grades
Water ice grades are highly dynamic and a given route’s grade can change week to week and even day to day. In contrast, alpine ice does not form seasonally—it is glacial ice that exists year round—and as a result it is typically far denser, and predictable.
The WI acronym implies seasonal water ice while AI implies Alpine Ice and is typically easier than a WI grade with the same number (AI5 = WI4).
- WI1: Low angle ice. With good crampon balance, no tools are required.
- WI2: Sustained 60 degree ice with steeper bulges.
- WI3: Sustained 70 degree ice with possible long bulges of 80-90 degrees; reasonable rests and good stances for placing screws.
- WI4: Sustained 80 degree ice with sections of 90 degree ice broken up by rests.
- WI5: A ropelength of 85-90 degree ice offering infrequent stances to rest. Or a shorter pitch of thin or rotten ice with poor protection.
- WI6: A ropelength of 90 degree ice with no rests, or a shorter pitch even more overhanging/tricky than WI5.
- WI6+: A ropelength of overhanging ice with no rests, or a shorter pitch even more overhanging/tricky than WI6.
- WI7: A controversial grade. Many ice climbers don’t believe WI7 really “exists.” However, a WI7 would theoretically be even more extreme than WI6: constantly overhanging, unstable ice columns/daggers, solid protection is nearly impossible to find.
Alaska Grades
Alaska Grades are, unsurprisingly, never applied outside of Alaska, but are nevertheless a popular grading choice in the area. Alaska Grades aim to encompass both the technical difficulties of a route in addition to the inherent remoteness and challenging weather (storms, extreme cold) that Alaska is known for.
- 1: A simple, glaciated mountaineering route.
- 2: Still non-technical, but climbers may be exposed to altitude, poor weather, and exposed walking/scrambling. (Think: Denali’s standard route: the West Buttress.)
- 3: Some technical climbing, but not sustained.
- 4: More technical climbing, often multiple pitches in a row. Potentially still straightforward to bail from.
- 5: Sustained technical climbing. Retreat would be difficult from high on the route.
- 6: Sustained technical climbing for thousands of vertical feet—good luck bailing. The hardest routes in Alaska.
Scottish Winter Grades
Like Alaska Grades, Scottish Winter Grades are region-specific. Scottish Winter Grades are often expressed with both a Roman numeral as well as an Arabic number. The Roman numeral provides an overall grade, and on routes below IV most climbers will just use that. Above IV, climbs will often receive a second, technical grade (the Arabic number) which describes the crux section. For North Americans unfamiliar with this system, a good rule of thumb is to subtract one from the Scottish Grade’s Arabic number to get the M-grade equivalent. For example: IX 9 is relatively well-protected M8 mixed climbing. IX 8 is more dangerous/runout M7.
- I: Snow gullies and low-angle rock ridges.
- II: Steeper gullies where two ice tools will likely be required for upward progress. Beware of steep cornice exits.
- III: Moderate rock routes, ice gullies, or steeper rock buttresses.
- IV: 60-70 degree ice with short, vertical steps; longer pitches up to 70 degrees; or mixed routes climbed with ice tools.
- V: Sustained ice to 80 degrees or mixed climbs with continuous technical moves. Protection may not always be solid.
- VI: Vertical ice and/or sustained, technical mixed routes.
- VII: Like VI, but longer, harder sections of technical climbing, and less frequent protection.
- VIII-XII: The hardest routes in Scotland.
Russian Grades
Note: the Roman numeral grades are UIAA technical ratings (see graph above).
- 1B: Hiking and scrambling, with a short, simple section of roped climbing.
- 2A: Several pitches of easy roped climbing.
- 2B: A multi-pitch route with II+ or III climbing.
- 3A: A multi-pitch route with one or more pitches of III climbing.
- 3B: A multi-pitch route with one or more pitches of III+/IV climbing. A full day.
- 4A: A full-day route with IV+ climbing.
- 4B: A full-day route with sustained IV+ climbing, or a section of V+.
- 5A: A long, technical route that may require 1-3 days to complete. Multiple pitches of V climbing.
- 5B: A long route that takes, at minimum, two days to complete. Some VI+ climbing.
- 6A and 6B: Multi-day routes with VI or harder climbing.
The post International Climbing Grades: Everything You Need to Know appeared first on Climbing.
]]>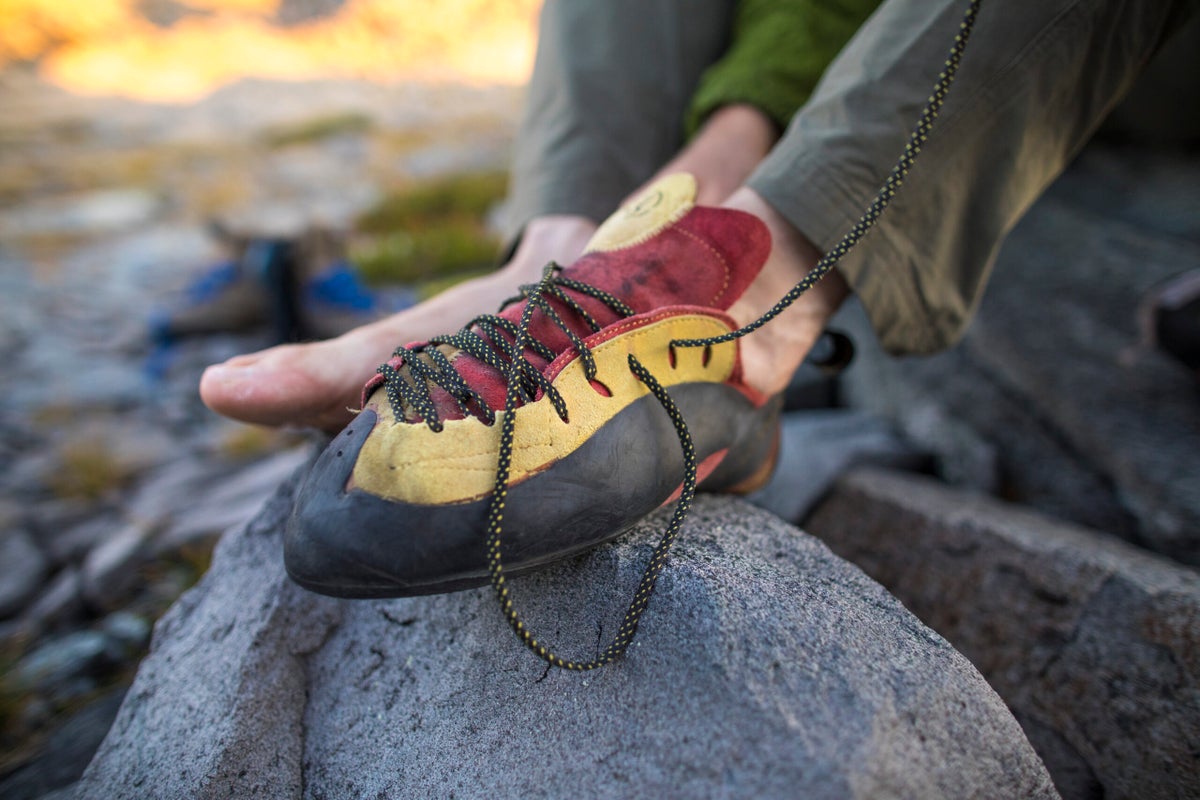
Proven strategies for preventing and removing odors from your shoes
The post Your Partner Thinks Your Climbing Shoes Stink. Here Are 7 Ways to Fix That. appeared first on Climbing.
]]>Everyone knows that smelly climbing shoes are a surefire way to stink up your tent and scare away prospective climbing partners. Even the dirtiest dirtbags don’t want their feet to reek of the aged cheese Céüse climbers house between burns.
Unfortunately, stinky shoes are an all too common problem among climbers. A couple culprits? An intentionally tight fit and durable design that’s incompatible with breathability. It also doesn’t help that most climbers opt out of socks while climbing.
There are three stages when it comes to fighting foul odors in climbing shoes:
- Prevention: Don’t let your shoes get smelly in the first place.
- Removal: Get rid of odors already embedded in your shoes—for good.
- Cover-up: Mask the foulness when you’re in a pinch and don’t want to torment your belayer.
How to prevent stinky climbing shoes in the first place
Start climbing with clean, dry feet
Don’t set yourself up for failure by putting dirty, sweaty, or already smelly feet into climbing shoes. Before you start climbing, clean and dry your feet. If you can’t wash your feet before a climbing session, bring some wipes along in your pack. For a more sustainable option, try bringing a couple reusable wipes or cloths and dousing them with a bit of water and/or a couple drops of essential oils and give your feet a wipe down.
If you’re particularly prone to foot sweat and odors, this can also be an effective strategy on longer multi-pitch routes or big walls. Clean off your feet—and air them out—between pitches! One or two wipes adds minimal weight and bulk in a pack.
Let your shoes air out in between sessions
Storing your shoes in an enclosed pack or bag lets sweat, bacteria, and smells fester. The solution? Air your shoes out whenever you’re not climbing. As soon as you can, remove your shoes from your pack or bag and store them in a well-ventilated area. Hint: The trunk of your car or a small closet is not a well ventilated-area. If possible, hang them up to dry with a carabiner on a hook in a mud room, open gear closet, covered porch, or other airy spot.
Surrender your ego and wear socks
One of the reasons climbing shoes become so notoriously rank is that there’s no barrier between your sweaty foot and the shoe. While many climbers would rather give off heinous stenches than be caught wearing socks with climbing shoes, socks will help absorb sweat and prevent smells from developing. In fact, this nine-year-old, who recently became the youngest to send 5.14b (in socks), refuses to climb without socks. If you go this route, choose ultra-thin socks that won’t interfere with fit or performance for most climbers. Competitive, high-level, or dedicated slab climbers, however, might feel otherwise.
How to remove odors from your climbing shoes
Powder your shoes
When you air out those shoes, sprinkle some baking soda over the soles, shake them up, and let that sodium bicarbonate sit overnight—or until your next session. Baking soda is absorbent and can help neutralize those send-induced smells.
If baking soda isn’t cutting it, try On Your Toes foot powder, which promises to banish the funk for up to six months. Though if you’re really struggling with shoe odors, you might powder your shoes once a month, every few sessions, or when you notice the smell returning.
Put a banana in your shoes
Not an actual banana, but a boot banana. Co-designed by a climbing instructor, these moisture-absorbing shoe inserts soak up sweat and wipe out odors with a mix of minerals, salts, and essential oils. Also, like actual bananas, they turn brown when they’re reaching the end of their lifespan (this means it’s time to grab a new pair). Stick them in your climbing shoes after each session to soak up any unsavory smells.
Try vinegar
If powders and inserts have not quelled the smell, it’s time to introduce some acid to kill any pesky bacteria. Mix equal parts water and distilled white vinegar. Then use this solution to spray your shoes. Let it sit for a few hours before rinsing and air-drying. For a more aggressive intervention, scrub the shoes with this vinegar solution and a cleaning brush or microfiber cloth—or soak the shoes in a water-vinegar solution. While some have also resorted to hydrogen peroxide to banish bacteria, hydrogen peroxide can be corrosive, so it’s less than ideal, as it could damage your shoe’s materials.
How to mask stinky climbing shoes
Apply essential oils
Let’s say you accidentally left your shoes in your pack and are now about to go on a climbing date. Or you are heading to the crag in a couple hours and don’t have time for prevention or odor removal measures. If you need a quick cover-up for those stinky shoes, try spritzing some essential oils into the shoe. Lemon or lavender are always pleasant. Tea tree oil, while pungent, will likely be the most effective in obscuring stenches. You can mix essential oils with water and spray on your shoes, or buy a pre-diluted essential oil spray designed specifically for shoes, like this one.
What not to do to make your shoes smell better
There are some things you should never resort to when it comes to fighting the stink, no matter how bad those shoes reek. In your attempt to air out your shoes, never leave them out in the sun. While short spells under UV rays at the crag are fine, storing them under the sun or leaving them in sunny spots for extended periods can damage your shoes.
Another shoe taboo? Putting your shoes in the washing machine. Scarpa cautions that you should never put climbing shoes in the washing machine, because it can cause damage to shoe materials. Instead, wash your shoes by hand.
When all else fails …
Lastly, if after all of these measures your shoes still smell, consider recycling them instead of chucking them in the trash. You can recycle your shoes through the GotSneakers shoe recycling program, or order a Trashie Bag and throw your shoes in with any old clothes you no longer want.
And if you’re ready to start a clean slate when it comes to climbing shoes, check out some of our shoe picks and don’t forget to follow our odor prevention tips to keep them fresh.
The post Your Partner Thinks Your Climbing Shoes Stink. Here Are 7 Ways to Fix That. appeared first on Climbing.
]]>
Year-round climbing may keep you sharp, but foregoing an "off season" comes at a price.
The post Stuck Climbing the Same Grade? You May Just Need a Break. appeared first on Climbing.
]]>In the days before climbing gyms were widely accessible, the end of rock climbing season loomed dark. Climbers had limited options once the spring and fall seasons waned; you could head out to suffer in subpar conditions or stash the rope and dangle from hangboards until send temps returned.
Modern accessibility to climbing gyms has totally eliminated the “climbing season” by providing the space to continue trying hard regardless of the weather. Year-round climbing is fantastic for rapid skill development, and allows continuous training at a high intensity, but it also eliminates seasonal variation in training patterns and ensures there’s never an “off season.” Unfortunately, unlimited access to continuous training often comes at a price. Eventually, progress begins to plateau, your list of sore body parts keeps growing, and climbing becomes more monotonous than fun. Having a sustainable relationship with climbing requires intentionality in balancing climbing specific training with cross training and recovery. If you’ve been trying hard for a while, but feeling a bit stagnant, taking a season off of climbing might be just the solution for unlocking your next big send.
The problem: Climbing at the same intensity year round stunts your progress and increases risk of injury
Many climbers get hooked on the sport because initial progress happens so quickly: You spend a few days flailing up V0s, and soon you’re projecting V2s. However, initial progress slows down as the body adapts to the stimulus, and requires a stronger stimulus to continue improving. (5) Many climbers attempt to increase the stimulus by increasing training frequency and intensity—with positive results, initially—but that can lead to fatigue and overuse injury if training variation and recovery periods aren’t sufficient. (4) Overuse injuries are the most common climbing related injury and athletes who have more experience, climb more frequently and climb at a higher level are at an increased risk due to increased stress on the body. (1, 10, 11) In other words: climbing hard is hard on the body and once you’ve been climbing regularly for a while, your body needs variation in training frequency, intensity, and activity to continue progressing.
The solution: Seasonal variation in training type and intensity
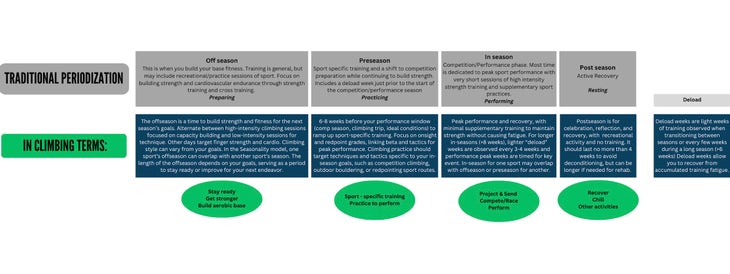
Many sports follow a training structure called periodization to build variation into a training program. Periodization is the intentional sequencing of different training phases or seasons, each designed to stimulate specific adaptations, and the program culminates in a period of peak performance (think “competition season”). Each phase alternates periods of training overload with periods of recovery to promote gains and reduce injury risks.
Periodized training works well for athletes with consistent schedules, clear goals, and a predictable timeframe for peak performance, such as a competition season. However, the structure can feel too rigid for climbers who have variation in their schedules, goals, or performance windows—outdoor climbers, multi-sport athletes, and athletes with busy schedules, for example. For this I propose a more organic training structure: Seasonality. Seasonality is structured variation in activity and intensity influenced by personal goals, life circumstances, and weather conditions. Rather than attempting to train for everything at the same time or struggling to stick to a training plan that doesn’t suit your schedule, thinking in seasons can provide perspective on the choice to modify your climbing routine or step away to focus on “off season” pursuits that serve as a building block for the next “climbing season.”
Reintroducing seasonality to a sport that is now always in season is a simple way to find the balance needed to maximize performance and longevity in the sport. This chart provides a breakdown of the focus and goals of each season.
It can feel counterintuitive to decrease climbing frequency in the “Off Season” when your goal is to improve your climbing performance. Each season provides training benefits that build on each other to improve performance. Knowing that there is another season around the corner is reassuring when it feels scary to change your routine for something you’ve dedicated so much time to. The length of a season can vary, but is a period of time that has meaning to you and your pursuits: A semester, the winter months, the youth sport climbing season, the 16 weeks leading up to a marathon, etc.
Recommendations for training
Building Seasonal Variation
To incorporate seasonal variation into your training, start by identifying your peak performance window—your “In Season.” This is the period you will be performing at your absolute best, whether that’s for a climbing trip, competition series, or ideal send temps. Once you’ve pinpointed that window, work backwards.
The six weeks or so leading up to your In Season is your “Preseason”—a phase focused on ramping up sport-specific training and sharpening your skills. Everything before that is your “Off Season,” the time to build your physical and mental base through general conditioning, strength work, or other activities. This structure—Off Season, Preseason, In Season—can be customized to fit your goals, lifestyle, and other activities. Here are a few possible options:
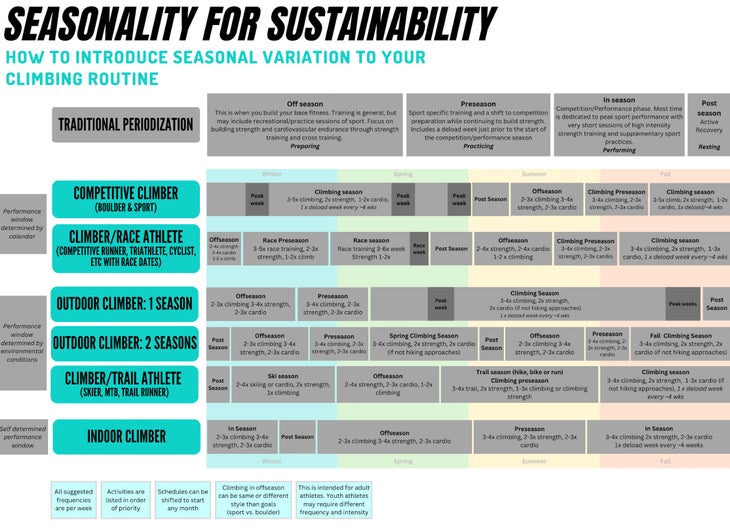
Respect the Off Season
The “Off Season” is often misunderstood by climbers. Many treat it like the “Post Season,” spending months doing minimal activity at low intensity. In reality, the Off Season is the time to prioritize consistent cross training to build a strong foundation for improved in-season performance. While different cross training activities vary in how they transfer to climbing, the key is choosing something you enjoy or find meaningful. Although cross training alone may not directly improve climbing ability, climbing performance depends heavily on motor and perceptual skills (9), which can be developed through many activities. Strength, endurance, problem-solving, and movement skills are all highly transferable to climbing.
- Aerobic activities (running, biking, hiking, skiing, rowing, swimming) improve cardiovascular fitness which aids rapid recovery between attempts and is linked to sport climbing ability, which has similar aerobic demands to cycling. (2,7) Cardiovascular fitness also improves stamina for long days—like tough approaches or multi-round comps.
- Anaerobic activities (strength training, martial arts, kickboxing, HIIT) build muscle and explosive power, which support climbing performance and injury prevention. Heavy load training and plyometrics support bone density and tendon health. Strength training and sports that have high demand on the upper body (ie. boxing) may have similar demands to climbing, (7) making them more transferable.
- Mobility/proprioception (yoga, Pilates, dance) improves body awareness, balance, and mobility, helping access demanding positions and enhancing movement on the wall.
- Creative activities (art, building, music) support climbing’s cognitive and creative demands, such as recalling, or solving, intricate sequences.
Cross training during the Off and Preseasons trains your body to tolerate harder climbing In Season. Find something that brings you joy and try it out for a season.
Climbing less is okay
It can be scary to climb less or step away to prioritize other activities during the Off Season. When you’ve worked hard to get to the level that you’re at, you may be anxious about losing strength and skin or “forgetting” how to climb. Trust the process—taking time during the Post Season or Off Season to recover and prioritize cross training will set you up for greater success in future seasons.
Generally, 3-4 weeks of relative rest in the Post Season is considered the ideal amount of time to recover while avoiding excessive detraining. (5) The “relative” part of “relative rest” is important; continue moving recreationally and in daily activities, but at lower intensity than during training periods. Aim to meet general exercise guidelines: two sessions of strength training for all major muscle groups, and 150-300 minutes of aerobic exercise (75-150 min if the exercise is high intensity) every week.
As another comfort to rest-adverse climbers, a recent study found that participants who trained, took 10 weeks off, and resumed training saw the same strength gains—and even greater long-term strength gains—compared to those who trained continuously. (6)
Key indicators your climbing will benefit from seasonal variation
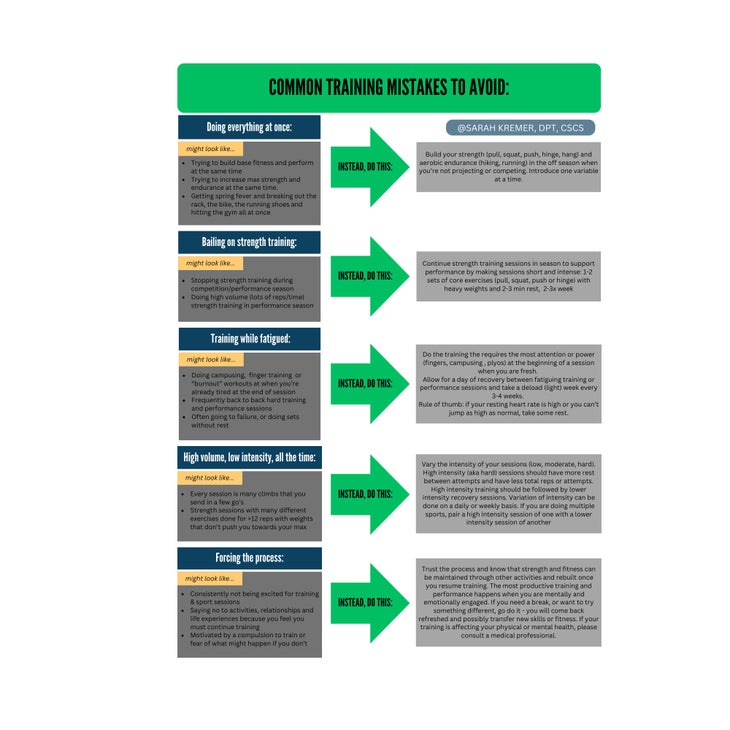
Generally, climbers who have been climbing consistently for a year or more will benefit from seasonal variation. Reflecting on your training history can provide valuable insight for when variation in climbing routine or a deload period might help. Signs that it could be time for training or season variation include:
- Feeling stuck on projects or in strength training despite consistent effort
- Not having taken more than a few days off from climbing in months (or even years)
- Doing the same type of climbing or training program for an extended period
- Recently achieving a big goal or wrapping up a competition season
In these cases, varying climbing intensity throughout the season and integrating periods of cross training with appropriate recovery will be highly beneficial to performance and longevity in the sport.
Pay attention to your physical and mental health
Lingering injuries, chronic fatigue, frequent illness, menstrual irregularity, a loss of motivation, or climbing out of compulsion rather than enjoyment are serious signs that a break is needed. If any of these sound familiar, don’t brush them off. Take a few weeks of deloading to recover from your current fatigue, then reassess your approach, and build more intentional seasonal variation into your routine moving forward.
Special Considerations
The youth climber: Adolescents are most susceptible to climbing injuries like growth plate fractures during puberty, and especially during growth spurts. (4) Preteen and teenage climbers typically have more time and fewer life distractions that allow them to spend many hours at the gym each week, and many youth teams train year round for the 10 month competition cycle. Frequent, long sessions and climbing into fatigue put youth climbers at serious risk for overtraining and overuse injuries. (1) Ideally, serious youth climbers will practice under the guidance of a well-informed coach or parent. The climbing competition schedule provides some framework that naturally promotes seasonal variation in training, but team programming and individual athlete needs vary widely.
Youth climbers should be encouraged to notice changes in their performance and energy levels or lingering aches and pains. Climbing intensity and duration should be limited by parents and coaches when signs of injury or fatigue occur and every year should include time off from climbing. Avoiding sport specialization by participating in a variety of sports is beneficial to developing athleticism and gross motor skills (8) and reduces the risk of overuse injury and burn out. (4) Ideally, athletes will participate in a variety of sports around the year and delay specialization in climbing until high school or 14 -15 years old. (3)
The climbing professional: If climbing is part of your job (route setting, guiding, arborist, athlete, etc.), or your work is physically demanding, your livelihood depends on adequate load management and recovery. It is especially important for climbing professionals to address aches and pains quickly with a health professional. Climbing for work may also limit you from dedicating additional energy to training for your personal climbing goals. Cross training and resistance training are important for maintaining strength and endurance.
The self-coached climber: One aspect that makes the sport of climbing unique is the number of “self-coached” athletes who participate at a high level. It’s easy to make training mistakes when you don’t have a structured program or the guidance of a coach, so it is especially important to be mindful of the amount of time you dedicate to recovery and cross training. As you plan your seasons of training and performance, consider these common training errors:
See a Doctor of Physical Therapy
Please seek the guidance of a physical therapist or medical professional if you are dealing with an overuse injury, lingering pain, or symptoms of overtraining. In most cases, you can see a Doctor of Physical Therapy directly without a referral.
About the author

Sarah Kremer is a Doctor of Physical Therapy, Certified Strength and Conditioning Specialist, and coach based on the New Hampshire Seacoast. She fell in love with climbing on the UNH Climbing Team and has spent many seasons bouldering and sport climbing around the country. After years as a dedicated climber, coach and routesetter, Sarah has found balance in letting the sports follow the season. Depending on the time of year, she can be found running, climbing, biking, skiing, paddling, hiking or watercoloring somewhere in New England.
About the contributors

Dr. Jared Vagy “The Climbing Doctor,” is a doctor of physical therapy and an experienced climber, has devoted his career and studies to climbing-related injury prevention, orthopedics, and movement science. He authored the Amazon best-selling book Climb Injury-Free, and is a frequent contributor to Climbing Magazine. He is also a professor at the University of Southern California, an internationally recognized lecturer, and a board-certified orthopedic clinical specialist.
To learn more about Dr. Vagy you can visit theclimbingdoctor.com or visit him on Instagram @theclimbingdoctor or YouTube youtube.com/c/TheClimbingDoctor

Kevin Cowell is a physical therapist, clinical instructor, and rock climber based out of Broomfield, CO. Kevin owns and operates The Climb Clinic (located at G1 Climbing + Fitness) where he specializes in rehab and strength training for climbers and mountain athletes. He found his passion for climbing in Colorado while attending Regis University for his Doctorate of Physical Therapy and has since become a Certified Strength & Conditioning Coach (CSCS), Board-Certified Orthopaedic Clinical Specialist (OCS), and a Fellow of the American Academy of Orthopaedic Manual Physical Therapy (FAAOMPT).
You can contact Kevin via email at kevin@theclimbclinic.com or by visiting www.theclimbclinic.com. Also, be sure to follow Kevin at @theclimbclinic on Instagram for free rehab and strength training resources.

Julien Descheneaux is a master of physical therapy who dedicates himself exclusively to rock climbing injuries, having treated over 1,200 climbers. He’s been covering Quebec competitions as a certified Sport First Responder since 2014. He is also the author of the online class “Climbing injuries at the upper quadrant” for the Quebec PT Board (OPPQ) and gives regular clinics and conferences on the subject. He founded PhysioHR in 2016, the first PT clinic inside a rock climbing gym in Canada and is currently the resident PT at Bloc Shop Chabanel.
You can contact Julien via email at julienlephysio@gmail.com or by visiting https://www.physioescalade.com/.

Todd Bushman is a doctor of physical therapy, clinical instructor, Certified Strength and Conditioning Specialist (CSCS), and climber of mountain, rock, ice, and plastic. Todd is a dedicated climbing specialist based out of Bozeman, MT where he practices full time. He is actively pursuing advanced training to become a Certified Orthopedic Manual Therapist (COMT) through the North American Institute of Orthopedic Manual Therapy. Todd is also available for remote consultation regarding climbing injuries, movement analysis, and strength training.
You can contact Todd via email at todd.climbingcoach@gmail.com or visit him @try.hard.pt on Instagram.

Carly Post is a physical therapist in Los Angeles, California. She is passionate about climbing and enjoys helping people move better and optimize their ability to participate in their lives to their fullest potential. She can be reached at carlypos@usc.edu and on Instagram at @carlypost
References
- Barrile AM, Feng SY, Nesiama JA, Huang C. Injury Rates, Patterns, Mechanisms, and Risk Factors Among Competitive Youth Climbers in the United States. Wilderness & Environmental Medicine. 2022;33(1):25-32. doi:10.1016/j.wem.2021.09.005
- Callender NA, Hayes TN, Tiller NB. Cardiorespiratory demands of competitive rock climbing. Appl Physiol Nutr Metab. 2021;46(2):161-168. doi:10.1139/apnm-2020-0566
- climbing-ltad.pdf. Accessed December 3, 2024. https://www.ualberta.ca/en/sport-system/media-library/ltad/climbing-ltad.pdf
- DiFiori JP, Benjamin HJ, Brenner JS, et al. Overuse injuries and burnout in youth sports: a position statement from the American Medical Society for Sports Medicine. Br J Sports Med. 2014;48(4):287-288. doi:10.1136/bjsports-2013-093299
- Haff G, Triplett NT, National Strength & Conditioning Association, eds. Essentials of Strength Training and Conditioning. Fourth edition. Human Kinetics; 2016.
- Halonen EJ, Gabriel I, Kelahaara MM, Ahtiainen JP, Hulmi JJ. Does Taking a Break Matter—Adaptations in Muscle Strength and Size Between Continuous and Periodic Resistance Training. Scandinavian Med Sci Sports. 2024;34(10):e14739. doi:10.1111/sms.14739
- Limonta E, Brighenti A, Rampichini S, Cè E, Schena F, Esposito F. Cardiovascular and metabolic responses during indoor climbing and laboratory cycling exercise in advanced and élite climbers. Eur J Appl Physiol. 2018;118(2):371-379. doi:10.1007/s00421-017-3779-6
- Myer GD, Jayanthi N, DiFiori JP, et al. Sports Specialization, Part II. Sports Health. 2016;8(1):65-73. doi:10.1177/1941738115614811
- Orth D, Davids K, Seifert L. Coordination in Climbing: Effect of Skill, Practice and Constraints Manipulation. Sports Med. 2016;46(2):255-268. doi:10.1007/s40279-015-0417-5
- Pieber K, Angelmaier L, Csapo R, Herceg M. Acute injuries and overuse syndromes in sport climbing and bouldering in Austria: a descriptive epidemiological study. Wien Klin Wochenschr. 2012;124(11-12):357-362. doi:10.1007/s00508-012-0174-5
- Woollings KY, McKay CD, Emery CA. Risk factors for injury in sport climbing and bouldering: a systematic review of the literature. Br J Sports Med. 2015;49(17):1094-1099. doi:10.1136/bjsports-2014-094372
- Woollings KY, McKay CD, Kang J, Meeuwisse WH, Emery CA. Incidence, mechanism and risk factors for injury in youth rock climbers. Br J Sports Med. 2015;49(1):44-50. doi:10.1136/bjsports-2014-094067
The post Stuck Climbing the Same Grade? You May Just Need a Break. appeared first on Climbing.
]]>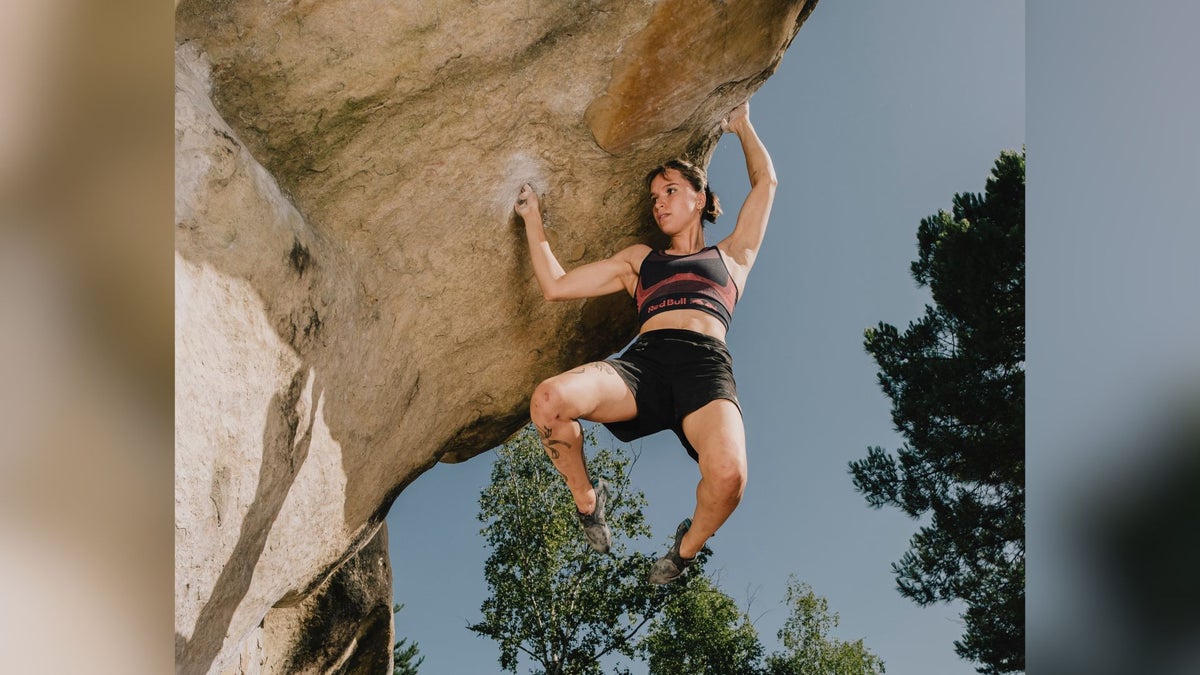
Everything you need to know about pesky pulley injuries
The post Your Complete Guide To Finger Injuries (And How To Recover!) appeared first on Climbing.
]]>If you’ve ever injured a finger pulley, you’re keenly aware of the structure. If you haven’t, you might not even know they exist. Finger pulleys are thick, fibrous bands of connective tissue that hold your finger flexor tendons tight along the finger bones and prevent “bowstringing” of the tendons while they are under load. Pulley injuries are common among climbers. Proper management of these injuries is crucial for a full return to sport and to decrease the chance of re-injury.
As a physical therapist of 31 years and climber of 42, I’ve treated hundreds of climbers. I wrote the following pulley rehab program to consolidate the evidence-based research and my own clinical knowledge into a comprehensive treatment plan for climbers. If you recently heard that alarming pop in your hand, or are feeling other signs of injury, here’s what to do.
Key points
- Climbers most-often injure the A2 pulley in the ring finger. Other pulleys are susceptible to excessive forces as well with the middle finger being the next most-commonly injured digit
- The A2 pulley is located at the base of your finger near the junction with your palm. The A1 pulley is more in the palm itself, over the MCP joint (metacarpal phalangeal joint)
- Treatment for a mild-to-moderate injury requires a balance of protection, scar mitigation, and progressive loading of the injured tissues
- More-severe injuries require medical evaluation, possible immobilization, and sometimes surgical intervention
- If pain is very severe, swelling is significant, or you can see or feel “bowstringing” then you should seek medical attention. ER visits are usually not necessary but seek medical evaluation within the first 3-10 days
Signs of a pulley injury
- Immediate onset of pain over the pulley that is often associated with an audible popping sound (there is not always a pop, so you can still have a pulley injury without the sound)
- Pain is usually quite severe, especially with direct pressure over the pulley or when trying to crimp or pull with the affected digit. (Do not keep gripping holds and pulling to try to convince yourself that you are not actually injured!)
- Swelling is often present over the affected pulley. Bruising can sometimes be present
- Pain is typically localized over the pulley and tends to be worse along the sides of your finger. If you flex the injured finger then gently pull out on your fingertip you should feel pain along the pulley
- If the pain radiates into your hand or wrist then it is probably not a pulley injury and may be an injury to one of the flexor tendons
- Stiffness, swelling, and tenderness along the knuckles themselves (the PIP or DIP joints) is usually not a symptom of a pulley injury and can be due to a capsular strain, arthritis, collateral ligament strain, extensor hood injury, or other problems
Stages of healing
Tissue healing can be divided into three overlapping phases: acute/inflammatory, reparative, and remodeling.
Acute phase: Homeostasis and inflammation
(Days 1-5)
- Blood vessels constrict, platelets stick together, coagulation occurs, and fibrin threads are formed to stop bleeding, seal the injury site, and create a scaffolding for the re-building process
- Macrophages and white blood cells clean the area and secrete growth factors and cytokines to stimulate fibroblast proliferation
- Inflammation is a necessary part of normal healing and is only a problem if the response is too aggressive or lasts too long. Ice is helpful to reduce pain and may help reduce inflammation, but has not been proven to improve the overall healing response. NSAIDs can also be helpful but only if the pain or swelling are excessive in the first few days
Repair and proliferation phase
(Days 3-21)
- New blood vessels form and the body starts to rebuild the damaged tissue with type III collagen (scar tissue). This collagen is weak, disorganized, and easily re-injured. Pain free movement is crucial in this phase to help the new collagen align itself parallel with the normal forces placed on the tissue. Gentle massage and Wave Tool work can also be helpful in this stage. [Disclosure: The author is the co-founder of Wave Tools Therapy]
Remodeling and reorganization phase
(Days 21-2 years)
- Type III collagen is replaced with stronger and better organized Type I collagen. It’s critical for this reorganization to occur so that the damaged pulley tissue is strong and healthy enough to handle the stresses of climbing. A very controlled and progressive loading program is crucial for this reorganization to occur. Wave Tool use with the edges can help stimulate a healthier healing response
Climber’s pulley injury complete rehabilitation program
Part 1: Overview
Part 2: H-taping
Part 3: Getting back to full strength
Treatment flowchart

During the inflammation phase:
- Ice for pain control
- Rest: No pressure or force through injured finger
- Pain-free, passive motion
- Pain-free, active motion
- NSAIDs only if pain or swelling is excessive
- Stimulate immune and healing response with healthy diet and exercise
During the remodeling and reorganization phase:
- Begin tendon gliding exercises. (See videos above)
- Begin stretches for entire kinetic chain (hand, wrist, elbow, shoulder, thoracic and cervical spine)
- Gentle Wave Tool use with edges and massage surfaces for desensitization, blood flow, and waste removal. Use on all finger pulleys and along entire length of forearm and elbow flexors. (See videos above)
- Begin the Progressive Loading Program. (See videos above and climbing program outline below)
- Ice if needed for pain control
- Heat is OK to add in for short duration (5-10 minutes) for comfort and blood flow
- Limit use of NSAIDs
During the repair and proliferation phase:
- Begin higher intensity muscle and tendon stretches
- Increase intensity of Wave Tool with edges and massage surfaces to improve blood flow and to help stimulate collagen deposition in a more organized and uniform arrangement
- Continue with Progressive Loading Program using resistance bands and no-hang finger training device (like the Tension Block, Tension Flash Board, or Metolius Wood Rock Rings). You can also start to work on regular hangboard with weight removed
- Begin the Return to Climbing Progression. (See videos above and consult the detailed climbing program outline below)
- Continue short duration heat applications for blood flow
- H-taping recommended for all climbing or progressive loading exercises. (See video above)
All Injuries and people are different. Progress through the program at your own pace. Recognize that there is considerable overlap between the different phases of healing. If you are unsure how to proceed then you should seek qualified medical evaluation and guidance.
Pre-climbing resistance training
- Begin this progression 5-10 days post injury
- Only progress to the next training level when you can perform the prior level with minimal or no pain
- Go slowly with all motions and progress through resistance levels carefully. If you are mildly sore for 30 minutes to 1 hour after a session that is fine. If soreness persists for several hours or into the next day then you must decrease intensity
Level 1: Isometric holds
5 x 5 x 5 program (see videos)
Using a flat edge such as the side of the table or counter edge, or use a no-hang device (see video). Open grip position only—NO CRIMPING. Using all four fingers, gently pull on the edge just to the point of feeling pain over the pulley. Now back the pressure off until no pain, or only very mild pain, is felt. This is where you will perform the hold. Pull for 5 seconds, 5 reps. Next pull with three fingers (index, middle, ring). 5 second hold, 5 reps. Now very carefully and gently pull with the injured finger and the finger next to it (middle and ring). 5 second hold, 5 reps. Perform up to 5 times in a day.
Follow a two days on, one day off cycle.
Level 2: Isometric holds using resistance band
5 x 5 x 5 program (see videos)
Use light resistance bands and a portable no-hang device. Make sure you can accurately reproduce the resistance during each session. Keep track of bands used, holds used, and your distance from the anchor point. A “keeper” sling around your wrist is recommended so that you can let go of the board if any pain is felt. (see video). Begin with the largest grip surface and all four fingers. Open grip positions only. With arm straight walk backwards until mild pain is produced over pulley, now step forward and ease resistance until no pain, or very mild pain, is felt. Hold 5 sec, 5 reps. Now repeat with three fingers (index, middle, ring) for 5 second holds, 5 reps. Now very carefully and gently repeat with two fingers (middle and ring). 5 second holds, 5 reps. Perform up to 5 times on your exercise days.
Continue performing these exercises two days on, one day off. You will progress faster if you have adequate recovery time.
Level 3: Resistance bands with climbing specific movements
(See videos)
Use your no-hang device attached to the bands. Open grip positions only. Start by careful pulling for the following three motions.
- Archer Position (pretend you’re pulling a bowstring back) using four fingers. 10 reps, 3 sets
- Undercling position with four fingers. 10 reps, 3 sets
- Palm down pulls. Keep your palm facing the floor and pull straight back with four fingers. 10 reps, 3 sets
Perform twice per day, training one day on, one day off.
Progress to three fingers then two fingers with the same motions and reps—very carefully. It may take several days before you can advance. You can also advance to smaller grip surfaces if no pain is noted.
Remember: Every injury and every individual is different. Progress at your own pace and listen to your body.
Return to climbing progression
- Begin the climbing progression 14-21 days post injury. You should be doing all resistance band exercises without pain prior to initiating the climbing plan
- The climbing will be in addition to the resistance bands. Follow the frequency plan listed under each climbing level
- Perform a minimum of four days of climbing at each level prior to proceeding to the next difficulty level. Advance only if pain levels are not increasing and workouts are done with a minimum of pain or strain
- Resume rotator cuff and periscapular strengthening. Bands work great for this as well
Basic climbing
- Toprope only. No bouldering. No leading
- Climb no harder than three full number grades below your onsight level (i.e. a 12a onsight climber can work at a maximum difficulty of 5.9)
- Work on balance, footwork, pushing with your legs, fall practice, breathing, and flexibility. Let go if any pain or twinge is felt
- Climbing and resistance-band work will be on the same day. Two days on, one day off
Harder climbing
- Toprope only. No bouldering. No leading
- Climb one full number grade below your onsight level (i.e. a 12a onsight climber can work at a maximum difficulty of 11a)
- Climbing and resistance-band work will be on the same day. Two days on, one day off
Lead climbing and bouldering
- Approach all climbs like you would a project. Feel out moves and holds. Toprope first as necessary
- Work on minimizing strain and climbing efficiently. Focus on technique: core tension, elbows in, scapulae engaged, etc.
- Choose a different climb if you have pain on any of the individual holds. Lead only after you’re confident the movement and holds are OK for your injury
- You can start to introduce full crimping with your resistance band workouts and slowly introduce full crimping to climbing routes
- More rest is needed during this phase. Follow the schedule below to optimize recovery. Band work is still done on the same day as climbing
Each week should have a minimum of three climbing rest days total, with two rest days in a row. If you’re feeling sore or aren’t progressing, then you should take three rest days in a row to allow for tissue recovery and repair processes. Below is a sample 14 day training schedule. Adjustments to the schedule are fine, but it’s best to follow the rest requirements.

Redpoint/onsight training
Begin working towards harder onsight climbing, your project grades, and normal training routine.
- Once you’re working back towards your project grade you may take less rest days and progress towards your pre-injury workout schedule. Keep in mind, however, that rest days are critical for preventing re-injury and chronic tissue break down, and to repair tissue micro-damage
- Soft tissue injury healing is not always linear. You will have ebbs and flows in your rehabilitation progress. Look at the bigger patterns and look forward to the ultimate goal of getting back to climbing again
The post Your Complete Guide To Finger Injuries (And How To Recover!) appeared first on Climbing.
]]>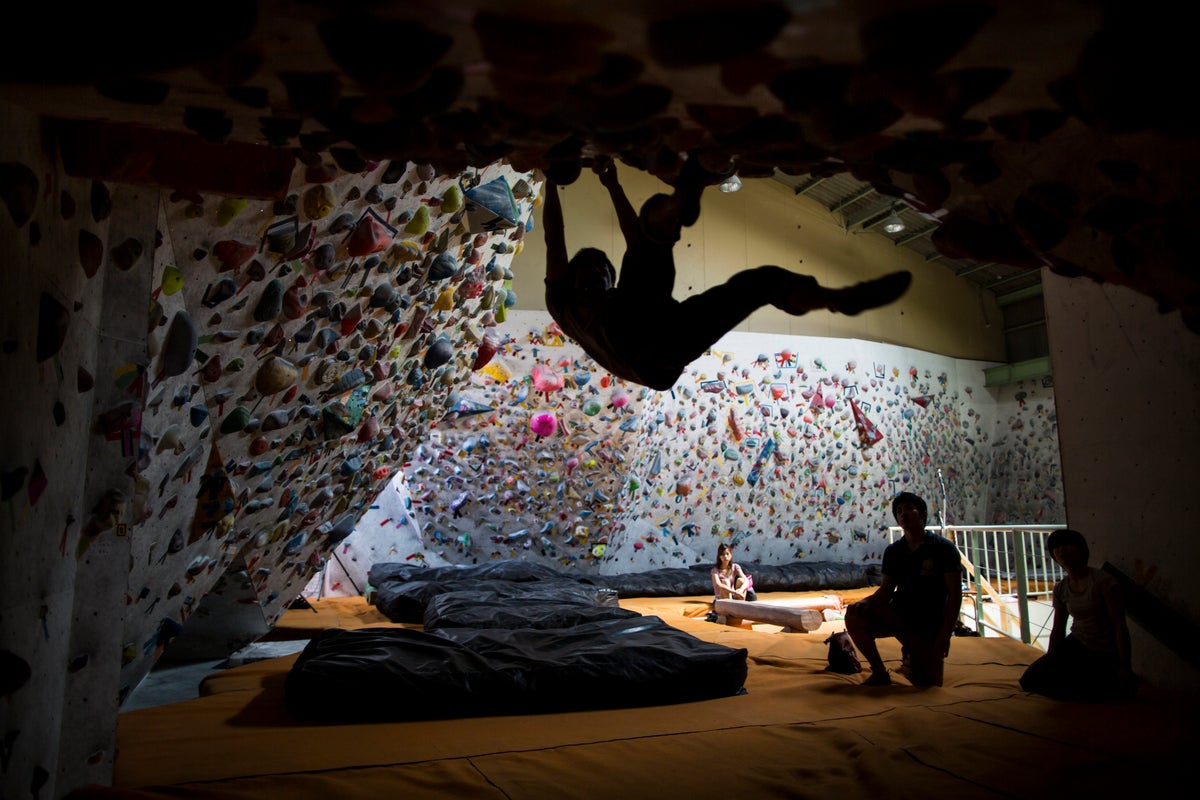
Why most of us shouldn't try to train like Janja Garnbret—or your favorite YouTuber.
The post Don’t Fall for the Training Trap appeared first on Climbing.
]]>Sitting on the edge of a bouldering mat, I eavesdropped on a conversation between two college-aged kids.
“Well, Janja [Garnbret] just climbs to train, so I’m just going to train like her,” one said.
I frowned thinking I misheard. Were they talking about the two-time gold Olympian?
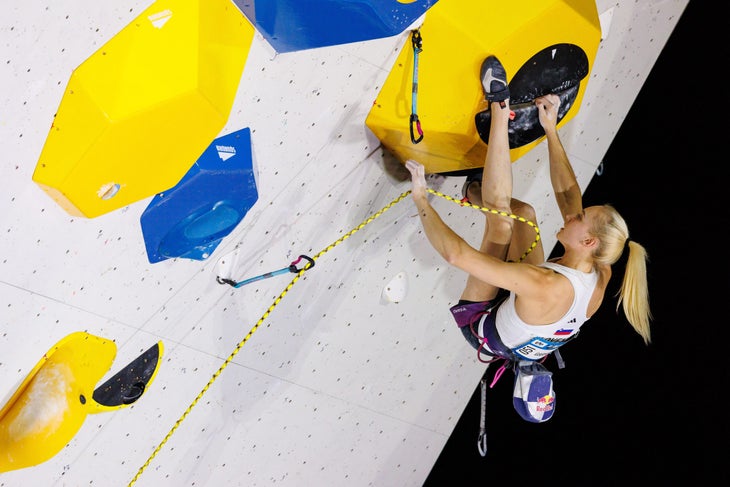
For a few minutes, I listened as they bounced ideas back and forth about building training programs modeled after their climbing heroes, pieced together from YouTube clips and social media posts. Their plan? Climb six days a week, two to four hours per session, with morning workouts and “supplementary sessions” in between.
“How long have you two been climbing?” I finally asked, a little concerned.
Turns out, they had only started climbing eight months earlier. They’d found climbing as a much-needed stress release from the grind of freshman year.
I wished them luck, but the exchange stuck with me. It highlighted just how easy it is to get swept up by online climbing training advice. Everywhere you look, flashy programs promise quick gains: Do these exercises and you’ll climb harder in no time. But the reality is far messier.
I see two big problems with these cookie-cutter approaches:
1. Mimicking pro routines is a shortcut to injury or burnout.
Elite climbers like Janja Garnbret can handle massive training loads because they’ve built decades of base strength and skill. And nutritionists, physiotherapists, and coaches help keep them healthy and balanced. For the average climber, jumping into that level of intensity is unsustainable and often harmful.
2. When someone who isn’t a pro is selling a program to train like a pro, that might be a problem.
This is where the insidious nature of online training can cause real problems for a new climber looking to build their training programs. Vetting these sources often goes by the wayside, putting participants at risk from the get-go.
A spreadsheet and a YouTube link won’t fix your form. Without proper coaching, it’s easy to ingrain poor habits, bad posture, sloppy movement, and over-gripping. This can lead to real injuries down the line.
What non-professional climbers should look for in training plans
Early training for recreational climbers should be about building healthy movement patterns and correcting mistakes, not rushing headlong into faux-pro workouts.
Having been one of those kids, I’ve seen the difference between internet-based training and the results I got when I was fortunate enough to work with Dicki Korb from Kafe Kraft in Germany. Having a coach’s eyes on my climbing was invaluable. He provided instant feedback and corrected my form on the spot.
It’s really important to find a program that allows regular check-ins with a coach. A hybrid of online and in-person training builds responsibility and accountability in a way a purchased spreadsheet never will. Many excellent coaches can observe your sessions via Zoom, which is a great option if you’re committed to working with a specific trainer who doesn’t live near you. Just make sure whoever you’re working with gets eyes on you and your form.
But the main takeaway is this: If a program doesn’t personalize its plan to account for your own climbing abilities, that’s a risk I wouldn’t take. The online space is virtually anonymous. Few checks or support systems exist for new climbers. Oh, and surgery is expensive. Unfortunately, falling victim to the latest training craze without proper context is one of the quickest ways to find that out.
The post Don’t Fall for the Training Trap appeared first on Climbing.
]]>
Don’t waste your time—or your life—on a partner who is reckless, irresponsible, or simply uncool to climb with.
The post Red Flags in a Belaytionship: 8 Signs You Need a New Partner appeared first on Climbing.
]]>Most of us climb because it’s fun. If you’re climbing with a bad partner, that fun factor quickly diminishes or disappears. This is especially true if you feel unsafe. Whether they climb recklessly, don’t respect your judgement, or are more annoying than a hopelessly stuck nut, it may be time to break up the belaytionship.
Keep in mind that it’s never too late to decide it’s time to leave a climbing partner behind. Even if you’ve been climbing with someone for years, or if your partner happens to be your significant other or mentor, don’t be deterred from moving on if you don’t feel comfortable climbing with them anymore.
Climbing Partner Red Flags
1. Your climbing partner uses sketchy equipment—or uses equipment in a sketchy way.
Is there a clear core shot in their rope? Have you rolled up to the anchor with not a locker in sight? Do they scoff when you ask them to do a pre-climb partner check? Are their carabiners so worn that you could probably cut the rope with them?
First, try pointing out the gear issue you perceive. Perhaps they have some acceptable explanation you didn’t think of—or they simply didn’t realize there was an issue. If they are receptive to your gear critiques, turn it into a teachable moment so you can both climb more safely. But if they get defensive, brush off your concerns, or show up to the crag again next time with the same sketchy gear or usage patterns, then you might want to bail on the belaytionship.
Word to the wise: If their gear, knots, anchors, or belay device truly make you uncomfortable, end the climbing session.
2. They ignore your requests when you’re on belay.
It’s one thing to dish out a little encouragement or tough love when belaying someone who asks to come down. It’s another for your belayer to continuously push back on your commands as a climber. Maybe they mock you when you say “take,” refuse to keep it tight, or prod you up in an insensitive way when you ask to come down. If your belayer repeatedly disregards your commands when you’re climbing, you’re better off getting a catch from someone who listens to you and respects you.
3. When they’re belaying you, they’re not paying attention.
There’s nothing more annoying than calling down a command to your belayer only to find them staring off into the distance, chatting up the climbers next to them, or eating a sandwich. Good belayers pay attention. Great belayers treat the act of belaying like an actual job—not a distraction between their own send burns.
Signs that your belayer is paying attention? When you ask them to do something, they respond immediately. When you look down at them, they’re looking up at you. They rarely short-rope you on lead, they keep it tight on toprope, and they give a soft catch. Another unmistakable mark of an attentive belayer? Belay glasses.
4. They intentionally sandbag you—or themselves.
Has your climbing partner tried to pressure you to lead something above your comfort level or hop on an R-rated climb that you clearly weren’t ready for? Have they lied to you about the character of a route? If they think sandbagging you by omitting details or lying will help you improve—or worse, do this as a sort of twisted joke or hazing ritual—it’s time to say “catch you later” (literally).
(Note: This may have been the way of some mentors of yore. If you live in pursuit of a hard knock life on rock, then submit to the hazing and sandbagging all you want. But if it’s not your thing and your climbing partner habitually pushes you to the point of tears, find a more modern mentor.)
On the flip side, if your partner routinely offers to rope gun routes they have no business leading, you may start to feel unsafe as the belayer—especially if they outweigh you. If they take gruesome whips as often as they top out, and often have to bail mid-pitch leaving booty behind, it may be time to find a more level-headed partner.
5. They are a serial beta sprayer.
Some of us want the full beta spraydown. Others want to find their own way, even when they start struggling. If you’ve told your partner that you don’t want their beta, but they keep hollering up about your bad left foot or the jug you’re missing at three o’clock, say sayonara to the sprayer. Of course, give them a few chances. Maybe they didn’t hear you the first time. Remind them about your beta preferences, especially right before you climb. But if they keep at it, keep them out of your climbing life.
6. They did something that made you distrust them.
Did they almost lose control of the rope while lowering you? Did you notice that they often momentarily remove their hand from the brake strand while belaying you? Mid-climb, did they hook up their Grigri to a ground anchor so they could go get a beer from their truck without notice? (True story.) Trust serves as the foundation of every good belaytionship. And the moment you lose it, it’s hard to regain. If you no longer have trust in your partner’s skillset or judgement, stop climbing with them.
7. Decision-making feels like a one-way street, especially when it comes to risk tolerance.
All decisions in climbing should be consensual or at least negotiated from even playing fields. From where you’re climbing that day, to the routes you hop on, to who will take which pitch, to whether you’ll rappel or walk off, it’s important to talk over decisions together.
So how can you tell if your partner isn’t engaging in mutual decision-making? They pose rhetorical questions. Rather than proposing a plan, they inform you of it. And when you offer input or ask questions, they push back or try to convince you otherwise. Never let a partner exclude you from decision-making or pressure you into climbing decisions you’re not comfortable with.
8. They offer unsolicited critique, talk shit about your climbing, or make fun of you even after you’ve made it clear you’re not into it.
Every climber and belaytionship dynamic is different. If you’re climbing with a mentor or coach, you’re probably in the market for some constructive feedback. If you’re a shit talker, maybe you don’t mind being on the other end of a less-than-constructive observation. And if you’re a member of the r/climbingcirclejerk subreddit, then there’s a good chance you’re okay with being the butt in that intentionally unflattering butt shot—or the butt of your belayer’s joke. But if you continue to remain on the receiving end of these digs even after you’ve made it clear that you’re over it, give your partner notice and peace.
Note: If you’re scared to end a climbing partnership because of threats or pressure from your partner, please reach out for help. Your partner should never make you feel like leaving them will create negative consequences for you. Start by telling a friend or family member, or check out the resources at the new organization Never Solo, which is committed to preventing sexual abuse issues in the climbing community.
The post Red Flags in a Belaytionship: 8 Signs You Need a New Partner appeared first on Climbing.
]]>
Projecting climbing routes isn’t widely taught, so how do you learn this complicated art? Here's our beginner's guide.
The post Never Had a Project Before? Here’s Where to Start. appeared first on Climbing.
]]>I take climbing seriously. I’ve lived the dirtbag lifestyle, chased El Cap dreams, and been a gym rat. I’ve climbed many pitches of frozen waterfalls and embarked on remote alpine routes. I’ve prioritized climbing over relationships and put pebble wrestling above family. Yet I still don’t know how to project a route. Not only have I never memorized every move of a route and devoted weeks or months to its completion; I have never even had the motivation to work on a single route beyond a handful of tries.
Frankly, I’m jealous of my grade-motivated peers who target certain routes and work them until they succeed; not only do they tend to progress faster through the sport, they seem to find more purpose in their climbing, which motivates them to put their heart and soul into each project. I meanwhile find it comfortable and easy to “train” by simply going into my local gym and climbing as hard as I can each session; but I’m frustrated by the plateau I’ve been stuck in for years. And I’d bet my #5 Camelot that most climbers are in the same boat.
Which got me wondering: Why don’t I project? And why do so few climbers learn this specific skill? What’s the secret?
Is there a secret to projecting?
Nathan Hadley, a software developer, 5.14 climber, first ascensionist, and all-around crusher, understands why more climbers don’t take up projecting.
“Being able to intuit how to read something is really rewarding,” he told me. He enjoys trying to onsight and flash routes, finding flow in climbing without rehearsing moves, and knowing that he can climb a wider variety of routes if he doesn’t spend as much time on an individual route—and he thinks that’s why most climbers don’t project much, myself included. (Why spend an inordinate amount of time on one route when there are so many routes to climb?!)
But Hadley also recognizes that to climb his hardest, he needs to spend significant time on a route—honing the beta and muscle recruitment, and getting stronger by doing harder moves. “There is more potential to climb that upper limit [through projecting],” he said.
Ally Cruz, the head routesetter at Edgeworks Climbing in Tacoma, Washington, has similar motivation for projecting routes. Climbing 5.12 was a barrier for her in the past, something that felt intimidating and out of reach. But the process of working harder routes made the grade feel more attainable over time, said Cruz. Now that she’s seen her effort pay off, she finds herself trying to convince her coworkers that trying harder things—and accepting that success won’t come easy—can change their climbing and adjust their sense of their own limits.
As a North American Ice Climbing Champion, rock climber, and elite dry tooler , Kevin Lindlau knows a lot about the art of projecting. For him it requires time, commitment, and a very analytical approach to climbing. Before he even touches rock, he tries to watch videos of other climbers sending his proj, giving him an idea of the movement and the possible cruxes of the route—a method that proved particularly useful when working his dream route, A Line Above the Sky (D15) in the Italian Dolomites, during a short trip from his hometown of Bozeman, Montana. (Some context: D16 is currently the world’s hardest dry tooling grade.)
When I asked him how I might start projecting, Lindlau told me to begin by thinking of a route that got me stoked. “Find something that inspires you,” he said, “so you don’t get burnt out or give up.” He also said it was important to find different goals, both long-term and short-term. “Find a dream route and then backtrack to find mini goals,” he said. “A lot of people go for their dream project [first] and get burnt out.”
Hone your process
Talking to each of these climbers, it became clear that, once you’ve identified a route that you’re psyched on, finding a process is essential. There is no right or wrong way to work a route, though there are common methods that projectors follow. Hadley likes to “give it a good [first] effort from the ground, even if I know I don’t have a chance,” while Lindlau likes to suss out the route and touch all the holds before he even starts to climb. After he gets comfortable with how the holds feel, Lindlau gets into the nitty gritty. “After figuring out where all the holds are, I’ll draw the whole route on paper with arrows on it with direction of pull.” He will then go bolt to bolt and try to physically do the moves. “I’ll stop at a crux and rest and then do another sequence. I’ll do that move three or four times.” After a day or two of going up the route and getting comfortable, he’ll take a rest day and then give it a redpoint try.
When he isn’t physically trying the route, he uses visualization tactics to memorize the sequence and get him in the right head space. “Once an hour I’ll go through the movement [in my head],” Lindlau said.
Hadley echoes the importance of learning a route. “You have to memorize the route. You don’t have an excuse not to,” Hadley said. He has seen too many climbers blow their send, not because they couldn’t do the moves, but because they forgot the beta.
Practice projecting in the gym
As a routesetter, Cruz has a daily pulse on the gym climbing scene. She finds that most members at her gym are “really here to just climb and not to send something.” Her observation resonates with me, as I find myself drawn to the gym for socializing or simply to blow off some steam from a busy workday. As a dedicated projector, Lindlau sees the gym as a place to hone his projecting skills. “Mini projects in the gym can be helpful. It gets you in the right headspace to find out what you need to do when you do go outside,” he said.
So why don’t people project more often?
Because it’s so damn hard. “Projecting is tough mentally because you are trying something at your limit. Each attempt is stressful,” Hadley said. But once you accept that it’s going to be hard, once you acknowledge that sending is not the only metric of success, it can be incredibly rewarding—as I myself have recently discovered.
That’s right: News flash! I found a project, and I’m totally stoked.
Japanese Gardens (5.11+, 4 pitches) is located in Index, WA, and it felt impossible at first. The climb is sustained, very beta intensive, and involves a lot of precise smearing. After my first try, I almost gave up. I’ve climbed the grade before, but I’ve never put together that many hard pitches in one ground-up effort, which is my personal goal. But after speaking with Hadley, Cruz, and Lindlau, I felt ready to employ their tactics, and I’m hoping to discover the joy of really sticking with a route.
I don’t fully know what I’m doing yet, and I’m still winging it, but I’m motivated and more excited about climbing than I’ve been in years. As a father of two kids under three years old, my time is limited, and I need to be focused to find moments to climb. I’m using methods like toprope soloing to work on my project when I have time, instead of relying on the schedules of my partners. I can do all the moves now, and that’s given me hope. I’m not sure I’m ready to call myself “a projector,” but I am smitten by this route, and I’ve discovered a new joy in this way of climbing.
The only thing I’m left wondering; why did it take me so long?
Key Takeaways for the Aspiring Projector
- Pick a climbing project that you are 100% stoked on, not just something you think you should climb because it’s classic or the right grade.
- Figure out a repeatable projecting process that works for you.
- Break down routes into sections and memorize cruxes rather than trying to remember the entire route.
- If you are stuck in a plateau, projecting can help you break out and have fun climbing again.
- Learn to try hard without taking it too seriously; If it’s not fun, you aren’t doing it right!
The post Never Had a Project Before? Here’s Where to Start. appeared first on Climbing.
]]>