Year-round climbing may keep you sharp, but foregoing an "off season" comes at a price.
The post Stuck Climbing the Same Grade? You May Just Need a Break. appeared first on Climbing.
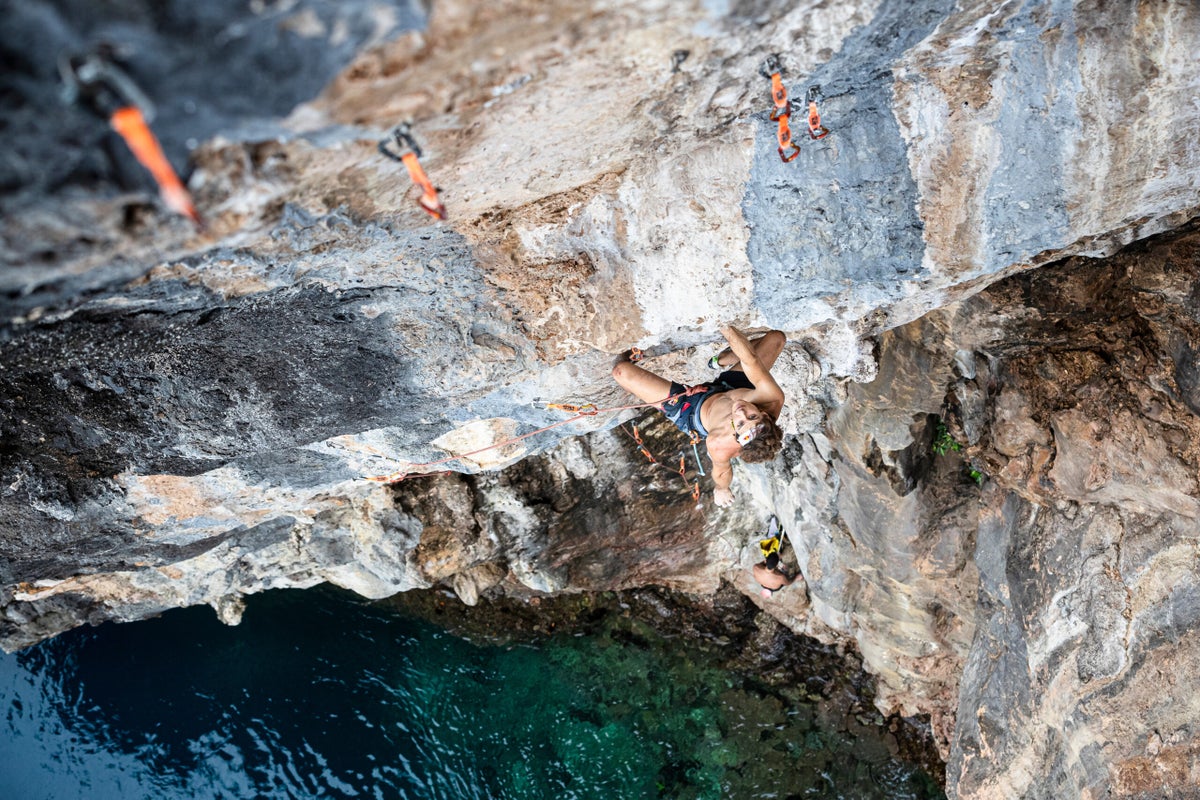
]]>In the days before climbing gyms were widely accessible, the end of rock climbing season loomed dark. Climbers had limited options once the spring and fall seasons waned; you could head out to suffer in subpar conditions or stash the rope and dangle from hangboards until send temps returned.
Modern accessibility to climbing gyms has totally eliminated the “climbing season” by providing the space to continue trying hard regardless of the weather. Year-round climbing is fantastic for rapid skill development, and allows continuous training at a high intensity, but it also eliminates seasonal variation in training patterns and ensures there’s never an “off season.” Unfortunately, unlimited access to continuous training often comes at a price. Eventually, progress begins to plateau, your list of sore body parts keeps growing, and climbing becomes more monotonous than fun. Having a sustainable relationship with climbing requires intentionality in balancing climbing specific training with cross training and recovery. If you’ve been trying hard for a while, but feeling a bit stagnant, taking a season off of climbing might be just the solution for unlocking your next big send.
The problem: Climbing at the same intensity year round stunts your progress and increases risk of injury
Many climbers get hooked on the sport because initial progress happens so quickly: You spend a few days flailing up V0s, and soon you’re projecting V2s. However, initial progress slows down as the body adapts to the stimulus, and requires a stronger stimulus to continue improving. (5) Many climbers attempt to increase the stimulus by increasing training frequency and intensity—with positive results, initially—but that can lead to fatigue and overuse injury if training variation and recovery periods aren’t sufficient. (4) Overuse injuries are the most common climbing related injury and athletes who have more experience, climb more frequently and climb at a higher level are at an increased risk due to increased stress on the body. (1, 10, 11) In other words: climbing hard is hard on the body and once you’ve been climbing regularly for a while, your body needs variation in training frequency, intensity, and activity to continue progressing.
The solution: Seasonal variation in training type and intensity
Many sports follow a training structure called periodization to build variation into a training program. Periodization is the intentional sequencing of different training phases or seasons, each designed to stimulate specific adaptations, and the program culminates in a period of peak performance (think “competition season”). Each phase alternates periods of training overload with periods of recovery to promote gains and reduce injury risks.
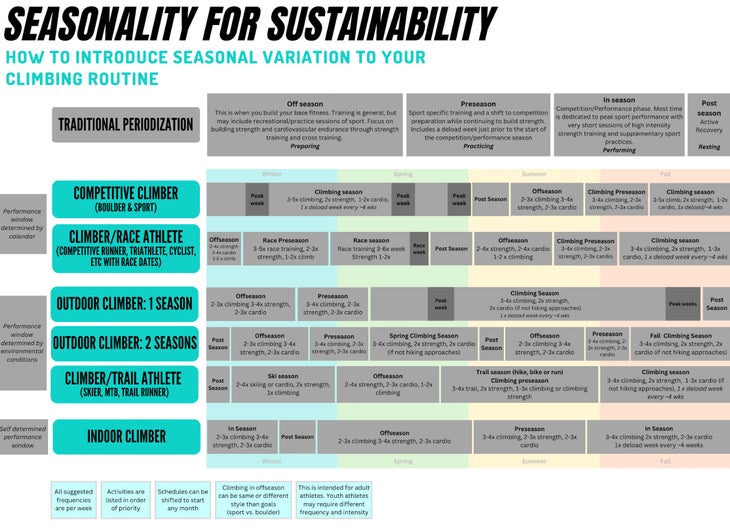
Periodized training works well for athletes with consistent schedules, clear goals, and a predictable timeframe for peak performance, such as a competition season. However, the structure can feel too rigid for climbers who have variation in their schedules, goals, or performance windows—outdoor climbers, multi-sport athletes, and athletes with busy schedules, for example. For this I propose a more organic training structure: Seasonality. Seasonality is structured variation in activity and intensity influenced by personal goals, life circumstances, and weather conditions. Rather than attempting to train for everything at the same time or struggling to stick to a training plan that doesn’t suit your schedule, thinking in seasons can provide perspective on the choice to modify your climbing routine or step away to focus on “off season” pursuits that serve as a building block for the next “climbing season.”
Reintroducing seasonality to a sport that is now always in season is a simple way to find the balance needed to maximize performance and longevity in the sport. This chart provides a breakdown of the focus and goals of each season.
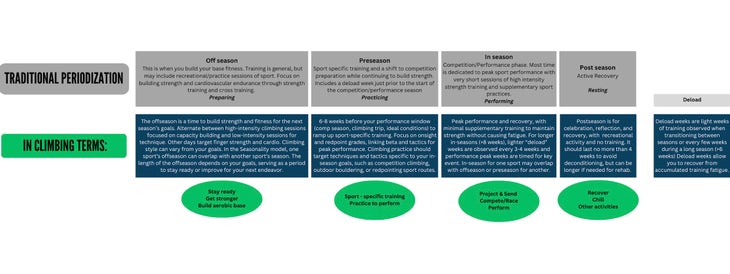
It can feel counterintuitive to decrease climbing frequency in the “Off Season” when your goal is to improve your climbing performance. Each season provides training benefits that build on each other to improve performance. Knowing that there is another season around the corner is reassuring when it feels scary to change your routine for something you’ve dedicated so much time to. The length of a season can vary, but is a period of time that has meaning to you and your pursuits: A semester, the winter months, the youth sport climbing season, the 16 weeks leading up to a marathon, etc.
Recommendations for training
Building Seasonal Variation
To incorporate seasonal variation into your training, start by identifying your peak performance window—your “In Season.” This is the period you will be performing at your absolute best, whether that’s for a climbing trip, competition series, or ideal send temps. Once you’ve pinpointed that window, work backwards.
The six weeks or so leading up to your In Season is your “Preseason”—a phase focused on ramping up sport-specific training and sharpening your skills. Everything before that is your “Off Season,” the time to build your physical and mental base through general conditioning, strength work, or other activities. This structure—Off Season, Preseason, In Season—can be customized to fit your goals, lifestyle, and other activities. Here are a few possible options:
Respect the Off Season
The “Off Season” is often misunderstood by climbers. Many treat it like the “Post Season,” spending months doing minimal activity at low intensity. In reality, the Off Season is the time to prioritize consistent cross training to build a strong foundation for improved in-season performance. While different cross training activities vary in how they transfer to climbing, the key is choosing something you enjoy or find meaningful. Although cross training alone may not directly improve climbing ability, climbing performance depends heavily on motor and perceptual skills (9), which can be developed through many activities. Strength, endurance, problem-solving, and movement skills are all highly transferable to climbing.
- Aerobic activities (running, biking, hiking, skiing, rowing, swimming) improve cardiovascular fitness which aids rapid recovery between attempts and is linked to sport climbing ability, which has similar aerobic demands to cycling. (2,7) Cardiovascular fitness also improves stamina for long days—like tough approaches or multi-round comps.
- Anaerobic activities (strength training, martial arts, kickboxing, HIIT) build muscle and explosive power, which support climbing performance and injury prevention. Heavy load training and plyometrics support bone density and tendon health. Strength training and sports that have high demand on the upper body (ie. boxing) may have similar demands to climbing, (7) making them more transferable.
- Mobility/proprioception (yoga, Pilates, dance) improves body awareness, balance, and mobility, helping access demanding positions and enhancing movement on the wall.
- Creative activities (art, building, music) support climbing’s cognitive and creative demands, such as recalling, or solving, intricate sequences.
Cross training during the Off and Preseasons trains your body to tolerate harder climbing In Season. Find something that brings you joy and try it out for a season.
Climbing less is okay
It can be scary to climb less or step away to prioritize other activities during the Off Season. When you’ve worked hard to get to the level that you’re at, you may be anxious about losing strength and skin or “forgetting” how to climb. Trust the process—taking time during the Post Season or Off Season to recover and prioritize cross training will set you up for greater success in future seasons.
Generally, 3-4 weeks of relative rest in the Post Season is considered the ideal amount of time to recover while avoiding excessive detraining. (5) The “relative” part of “relative rest” is important; continue moving recreationally and in daily activities, but at lower intensity than during training periods. Aim to meet general exercise guidelines: two sessions of strength training for all major muscle groups, and 150-300 minutes of aerobic exercise (75-150 min if the exercise is high intensity) every week.
As another comfort to rest-adverse climbers, a recent study found that participants who trained, took 10 weeks off, and resumed training saw the same strength gains—and even greater long-term strength gains—compared to those who trained continuously. (6)
Key indicators your climbing will benefit from seasonal variation
Generally, climbers who have been climbing consistently for a year or more will benefit from seasonal variation. Reflecting on your training history can provide valuable insight for when variation in climbing routine or a deload period might help. Signs that it could be time for training or season variation include:
- Feeling stuck on projects or in strength training despite consistent effort
- Not having taken more than a few days off from climbing in months (or even years)
- Doing the same type of climbing or training program for an extended period
- Recently achieving a big goal or wrapping up a competition season
In these cases, varying climbing intensity throughout the season and integrating periods of cross training with appropriate recovery will be highly beneficial to performance and longevity in the sport.
Pay attention to your physical and mental health
Lingering injuries, chronic fatigue, frequent illness, menstrual irregularity, a loss of motivation, or climbing out of compulsion rather than enjoyment are serious signs that a break is needed. If any of these sound familiar, don’t brush them off. Take a few weeks of deloading to recover from your current fatigue, then reassess your approach, and build more intentional seasonal variation into your routine moving forward.
Special Considerations
The youth climber: Adolescents are most susceptible to climbing injuries like growth plate fractures during puberty, and especially during growth spurts. (4) Preteen and teenage climbers typically have more time and fewer life distractions that allow them to spend many hours at the gym each week, and many youth teams train year round for the 10 month competition cycle. Frequent, long sessions and climbing into fatigue put youth climbers at serious risk for overtraining and overuse injuries. (1) Ideally, serious youth climbers will practice under the guidance of a well-informed coach or parent. The climbing competition schedule provides some framework that naturally promotes seasonal variation in training, but team programming and individual athlete needs vary widely.
Youth climbers should be encouraged to notice changes in their performance and energy levels or lingering aches and pains. Climbing intensity and duration should be limited by parents and coaches when signs of injury or fatigue occur and every year should include time off from climbing. Avoiding sport specialization by participating in a variety of sports is beneficial to developing athleticism and gross motor skills (8) and reduces the risk of overuse injury and burn out. (4) Ideally, athletes will participate in a variety of sports around the year and delay specialization in climbing until high school or 14 -15 years old. (3)
The climbing professional: If climbing is part of your job (route setting, guiding, arborist, athlete, etc.), or your work is physically demanding, your livelihood depends on adequate load management and recovery. It is especially important for climbing professionals to address aches and pains quickly with a health professional. Climbing for work may also limit you from dedicating additional energy to training for your personal climbing goals. Cross training and resistance training are important for maintaining strength and endurance.
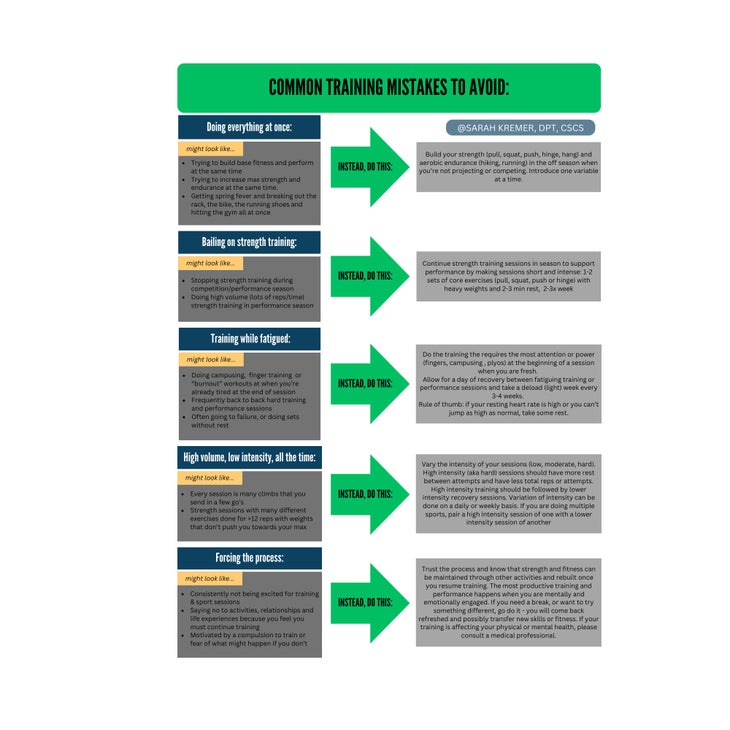
The self-coached climber: One aspect that makes the sport of climbing unique is the number of “self-coached” athletes who participate at a high level. It’s easy to make training mistakes when you don’t have a structured program or the guidance of a coach, so it is especially important to be mindful of the amount of time you dedicate to recovery and cross training. As you plan your seasons of training and performance, consider these common training errors:
See a Doctor of Physical Therapy
Please seek the guidance of a physical therapist or medical professional if you are dealing with an overuse injury, lingering pain, or symptoms of overtraining. In most cases, you can see a Doctor of Physical Therapy directly without a referral.
About the author

Sarah Kremer is a Doctor of Physical Therapy, Certified Strength and Conditioning Specialist, and coach based on the New Hampshire Seacoast. She fell in love with climbing on the UNH Climbing Team and has spent many seasons bouldering and sport climbing around the country. After years as a dedicated climber, coach and routesetter, Sarah has found balance in letting the sports follow the season. Depending on the time of year, she can be found running, climbing, biking, skiing, paddling, hiking or watercoloring somewhere in New England.
About the contributors

Dr. Jared Vagy “The Climbing Doctor,” is a doctor of physical therapy and an experienced climber, has devoted his career and studies to climbing-related injury prevention, orthopedics, and movement science. He authored the Amazon best-selling book Climb Injury-Free, and is a frequent contributor to Climbing Magazine. He is also a professor at the University of Southern California, an internationally recognized lecturer, and a board-certified orthopedic clinical specialist.
To learn more about Dr. Vagy you can visit theclimbingdoctor.com or visit him on Instagram @theclimbingdoctor or YouTube youtube.com/c/TheClimbingDoctor

Kevin Cowell is a physical therapist, clinical instructor, and rock climber based out of Broomfield, CO. Kevin owns and operates The Climb Clinic (located at G1 Climbing + Fitness) where he specializes in rehab and strength training for climbers and mountain athletes. He found his passion for climbing in Colorado while attending Regis University for his Doctorate of Physical Therapy and has since become a Certified Strength & Conditioning Coach (CSCS), Board-Certified Orthopaedic Clinical Specialist (OCS), and a Fellow of the American Academy of Orthopaedic Manual Physical Therapy (FAAOMPT).
You can contact Kevin via email at kevin@theclimbclinic.com or by visiting www.theclimbclinic.com. Also, be sure to follow Kevin at @theclimbclinic on Instagram for free rehab and strength training resources.

Julien Descheneaux is a master of physical therapy who dedicates himself exclusively to rock climbing injuries, having treated over 1,200 climbers. He’s been covering Quebec competitions as a certified Sport First Responder since 2014. He is also the author of the online class “Climbing injuries at the upper quadrant” for the Quebec PT Board (OPPQ) and gives regular clinics and conferences on the subject. He founded PhysioHR in 2016, the first PT clinic inside a rock climbing gym in Canada and is currently the resident PT at Bloc Shop Chabanel.
You can contact Julien via email at julienlephysio@gmail.com or by visiting https://www.physioescalade.com/.
Todd Bushman is a doctor of physical therapy, clinical instructor, Certified Strength and Conditioning Specialist (CSCS), and climber of mountain, rock, ice, and plastic. Todd is a dedicated climbing specialist based out of Bozeman, MT where he practices full time. He is actively pursuing advanced training to become a Certified Orthopedic Manual Therapist (COMT) through the North American Institute of Orthopedic Manual Therapy. Todd is also available for remote consultation regarding climbing injuries, movement analysis, and strength training.
You can contact Todd via email at todd.climbingcoach@gmail.com or visit him @try.hard.pt on Instagram.

Carly Post is a physical therapist in Los Angeles, California. She is passionate about climbing and enjoys helping people move better and optimize their ability to participate in their lives to their fullest potential. She can be reached at carlypos@usc.edu and on Instagram at @carlypost
References
- Barrile AM, Feng SY, Nesiama JA, Huang C. Injury Rates, Patterns, Mechanisms, and Risk Factors Among Competitive Youth Climbers in the United States. Wilderness & Environmental Medicine. 2022;33(1):25-32. doi:10.1016/j.wem.2021.09.005
- Callender NA, Hayes TN, Tiller NB. Cardiorespiratory demands of competitive rock climbing. Appl Physiol Nutr Metab. 2021;46(2):161-168. doi:10.1139/apnm-2020-0566
- climbing-ltad.pdf. Accessed December 3, 2024. https://www.ualberta.ca/en/sport-system/media-library/ltad/climbing-ltad.pdf
- DiFiori JP, Benjamin HJ, Brenner JS, et al. Overuse injuries and burnout in youth sports: a position statement from the American Medical Society for Sports Medicine. Br J Sports Med. 2014;48(4):287-288. doi:10.1136/bjsports-2013-093299
- Haff G, Triplett NT, National Strength & Conditioning Association, eds. Essentials of Strength Training and Conditioning. Fourth edition. Human Kinetics; 2016.
- Halonen EJ, Gabriel I, Kelahaara MM, Ahtiainen JP, Hulmi JJ. Does Taking a Break Matter—Adaptations in Muscle Strength and Size Between Continuous and Periodic Resistance Training. Scandinavian Med Sci Sports. 2024;34(10):e14739. doi:10.1111/sms.14739
- Limonta E, Brighenti A, Rampichini S, Cè E, Schena F, Esposito F. Cardiovascular and metabolic responses during indoor climbing and laboratory cycling exercise in advanced and élite climbers. Eur J Appl Physiol. 2018;118(2):371-379. doi:10.1007/s00421-017-3779-6
- Myer GD, Jayanthi N, DiFiori JP, et al. Sports Specialization, Part II. Sports Health. 2016;8(1):65-73. doi:10.1177/1941738115614811
- Orth D, Davids K, Seifert L. Coordination in Climbing: Effect of Skill, Practice and Constraints Manipulation. Sports Med. 2016;46(2):255-268. doi:10.1007/s40279-015-0417-5
- Pieber K, Angelmaier L, Csapo R, Herceg M. Acute injuries and overuse syndromes in sport climbing and bouldering in Austria: a descriptive epidemiological study. Wien Klin Wochenschr. 2012;124(11-12):357-362. doi:10.1007/s00508-012-0174-5
- Woollings KY, McKay CD, Emery CA. Risk factors for injury in sport climbing and bouldering: a systematic review of the literature. Br J Sports Med. 2015;49(17):1094-1099. doi:10.1136/bjsports-2014-094372
- Woollings KY, McKay CD, Kang J, Meeuwisse WH, Emery CA. Incidence, mechanism and risk factors for injury in youth rock climbers. Br J Sports Med. 2015;49(1):44-50. doi:10.1136/bjsports-2014-094067
The post Stuck Climbing the Same Grade? You May Just Need a Break. appeared first on Climbing.
]]>
Why most of us shouldn't try to train like Janja Garnbret—or your favorite YouTuber.
The post Don’t Fall for the Training Trap appeared first on Climbing.
]]>Sitting on the edge of a bouldering mat, I eavesdropped on a conversation between two college-aged kids.
“Well, Janja [Garnbret] just climbs to train, so I’m just going to train like her,” one said.
I frowned thinking I misheard. Were they talking about the two-time gold Olympian?
For a few minutes, I listened as they bounced ideas back and forth about building training programs modeled after their climbing heroes, pieced together from YouTube clips and social media posts. Their plan? Climb six days a week, two to four hours per session, with morning workouts and “supplementary sessions” in between.
“How long have you two been climbing?” I finally asked, a little concerned.
Turns out, they had only started climbing eight months earlier. They’d found climbing as a much-needed stress release from the grind of freshman year.
I wished them luck, but the exchange stuck with me. It highlighted just how easy it is to get swept up by online climbing training advice. Everywhere you look, flashy programs promise quick gains: Do these exercises and you’ll climb harder in no time. But the reality is far messier.
I see two big problems with these cookie-cutter approaches:
1. Mimicking pro routines is a shortcut to injury or burnout.
Elite climbers like Janja Garnbret can handle massive training loads because they’ve built decades of base strength and skill. And nutritionists, physiotherapists, and coaches help keep them healthy and balanced. For the average climber, jumping into that level of intensity is unsustainable and often harmful.
2. When someone who isn’t a pro is selling a program to train like a pro, that might be a problem.
This is where the insidious nature of online training can cause real problems for a new climber looking to build their training programs. Vetting these sources often goes by the wayside, putting participants at risk from the get-go.
A spreadsheet and a YouTube link won’t fix your form. Without proper coaching, it’s easy to ingrain poor habits, bad posture, sloppy movement, and over-gripping. This can lead to real injuries down the line.
What non-professional climbers should look for in training plans
Early training for recreational climbers should be about building healthy movement patterns and correcting mistakes, not rushing headlong into faux-pro workouts.
Having been one of those kids, I’ve seen the difference between internet-based training and the results I got when I was fortunate enough to work with Dicki Korb from Kafe Kraft in Germany. Having a coach’s eyes on my climbing was invaluable. He provided instant feedback and corrected my form on the spot.
It’s really important to find a program that allows regular check-ins with a coach. A hybrid of online and in-person training builds responsibility and accountability in a way a purchased spreadsheet never will. Many excellent coaches can observe your sessions via Zoom, which is a great option if you’re committed to working with a specific trainer who doesn’t live near you. Just make sure whoever you’re working with gets eyes on you and your form.
But the main takeaway is this: If a program doesn’t personalize its plan to account for your own climbing abilities, that’s a risk I wouldn’t take. The online space is virtually anonymous. Few checks or support systems exist for new climbers. Oh, and surgery is expensive. Unfortunately, falling victim to the latest training craze without proper context is one of the quickest ways to find that out.
The post Don’t Fall for the Training Trap appeared first on Climbing.
]]>
Find more balance and improve your movement
The post Climbing Training Drills for “The Fighter” appeared first on Climbing.
]]>In my story about “the Dancer” and “the Fighter,” I break down the mindset and approach differences between two types of climber. To help each archetype find more balance, I developed some drills to help different climber types grow and improve. These drills for “the Fighter” require enough practice within a short amount of time that the ego can be re-trained. This of course requires practice spread out over years so that the training is remembered, internalized, and regularly utilized.
You can do these drills at the crag, at the gym, or ideally at both. Both settings will yield different results. I would recommend making these drills a core portion of one to two climbing days per week for one to three months. Then, depending on the complexity of the drill, incorporate them into a warm up or a cool down for at least one full day per month for the next six months. Finally, incorporate at your discretion. These drills will never not be helpful to practice.
Fighter Drill 1: No Send Sunday
Purpose: To help Fighters dance.
We are going to avoid the traps of flash-pumps and sloppy climbing with this simple drill.
The Drill:
Pick a specific day when you take and hang at the first bolt of every single route on every single try. Simply eliminate the ability to send so that the fight is less likely to enter your system.
If you eliminate the ability to send, you become more likely to work on the moves at any point on the route. When you make moves that are not quite optimized (dynamic when they could be static with better lower body positioning, or stiff when they could be more fluid), take and hang, and explore other options.
You’ve already un-sent the route by bolt one, so there is no reason to put up a fight now. Repeat this question to yourself:
Where can I learn to dance on the route instead of fighting through it?
Pro tip: Find a supportive partner for these practice days. Surprise! That might not be your boyfriend or girlfriend.
A drill for Fighters who are starting to dance
I call this one the “Second-Go-Balancing-Act.”
Purpose: To help Fighters find the balance.
Planning: This drill encompasses both techniques and, in my personal opinion, is the benchmark of a talented climber. If a climber can send something very hard on the second go (or potentially the third), it demonstrates their ability to combine high effort and high precision in a relatively short amount of time.
Many pro climbers are incredible at this, especially if they have competition experience. They have this special (and by special, I mean they have spent loads of time training it) ability in which they gather so much beta on their first try that they can turn on a readily available amount of try-hard to send on their second go. While this requires serious effort, it also necessitates incredible focus and beta-finding. And it entails memorizing skills, climbing tactics, and a controlled ego.
Practice:
Pick a climb that is higher than your onsight or flash grade, but lower than your redpoint grade. If you have redpointed 5.11c and onsight or flashed 5.10c, then a 5.10d or 5.11a is perfect for this.
On your first go, do not spend all of your energy achieving perfection on every move. Also: Don’t try to onsight the route. The goal is to spend as little energy as possible learning as many of the important moves as you can. Also, learn how and where to rest, and which sections require try-hard vs. slow and controlled precision.
During your first go, try to commit the moves to memory. Then return to the ground and spend some time rehearsing the moves before attempting a second go. This is the Dancer-heavy part of the drill.
Next, try to send. The second go is when you introduce the Fighter part of the drill. Mix the Dancer memorization with the Fighter try-hard and intuition. On this redpoint attempt, give a full effort, while keeping an open mind for beta that feels more intuitive.
To retain the Dancer memory while fighting, you need to stay in the present. Do your best to think about only the moves directly in front of you. If you find your mind straying to “those hard moves before the anchor,” then you might forget your beta in the middle of the route and have to try harder than necessary. This could lead to falling by the time you reach “those hard moves by the anchor” (i.e., a self-fulfilling prophecy). I know I’m at risk of being a broken record, but breathwork is a fantastic way to stay present and limit your try-hard when you don’t need to activate it just yet.
Even if you do get so pumped that you can’t climb for the rest of the day, remember: This is still a goal-oriented session, so not sending is okay and productive.
Each attempt is a learning experience, and at the end of the day, it’s all money in the bank. Often, a route of that grade would take someone four tries to send normally. This is a practice in condensing four attempts of unfocused effort into two fully focused attempts.
Explore more about the Dancer, the Fighter, and Ego Grade.
The post Climbing Training Drills for “The Fighter” appeared first on Climbing.
]]>
Find more balance and optimize your effort level
The post Climbing Training Drills for “The Dancer” appeared first on Climbing.
]]>In my story about “the Dancer” and “the Fighter,” I break down the mindset and approach differences between two types of climber. To help each archetype find more balance, I developed some drills to help different climber types grow and improve. These drills for “the Dancer” require enough practice within a short amount of time that the ego can be re-trained. This of course requires practice spread out over years so that the training is remembered, internalized, and regularly utilized.
You can do these drills at the crag, at the gym, or ideally at both. Both settings will yield different results. I would recommend making these drills a core portion of one to two climbing days per week for one to three months. Then, depending on the complexity of the drill, incorporate them into a warm up or a cool down for at least one full day per month for the next six months. Finally, incorporate at your discretion. These drills will never not be helpful to practice.
Dancer Drill 1: Learning to try hard and communicate with intent
Purpose: To help Dancers fight.
Pick 10 new routes that you and your partner have never climbed. Each partner will attempt to flash five routes and onsight five routes over two climbing days. The goal is to practice letting go of perfection.
The Drill:
Day 1:
Your partner is the “onsighter” and you are the “flasher” (please don’t take this literally) for five new and different routes.
Your partner (the onsighter) will try to onsight a route with the goal of sending. Their secondary goal is to collect as much information for their partner, the flasher, as possible. They will try their absolute hardest, committing to not saying “take” on the attempt.
Once the onsighter is back on the ground, talk it out. Discuss where the hard moves are. Talk about the beta options and where the rests are. Eventually, you can figure out how much beta is useful, what type of beta works for you, and how much information feels like overload.
Also notice how you prefer to receive beta. Do you want the full spray-down on the ground? Or would you prefer a play-by-play as you are climbing?
Then you (the flasher) will try to flash the route, knowing that you only get to try that route once. If you fall, pull back up and rest for five to 10 minutes before trying again to flash the rest of the route. No hanging around to work beta or re-try moves.
Clean the draws and repeat this process on four more routes that day.
Day 2:
Reverse roles: Now you are the onsighter and your partner is the flasher for five new and different routes.
Repeat the steps for Day 1. Kind of like understanding your romantic partner’s love language, remember that your beta spray needs likely differ from your partner’s. Again, you will try as hard as you can to onsight the route with the intention of helping your partner flash the route afterward.
Day 3 (Extra Credit):
Eating ice cream isn’t usually part of any real workout, but I often recommend it after a well-executed training session. So, Day 3 is the chunky monkey of this drill.
On Day 3, return to any route that you did not send on Day 1 or 2.
- Before you climb, practice discussing the beta options again with your partner, using the combined insight from both of your attempts.
- The second-go attempt of the routes will still require some flash or onsight practice since you won’t remember all the beta, even if you think you might. Work on being patient and open-minded, and don’t be afraid to sprinkle in some good ol’ fighter try-hard when needed.
Pro tip: This is a fantastic thing to do on climbing trips where you don’t want to spend time projecting. You can explore a lot of new areas, get familiar with the style of a zone, tick off new routes, and learn something in the process. I did this all the time with the students at The Climbing Academy for the first few days in a new zone as a way to find which crags they liked and explore the area, but still be targeted with training.
A Drill for Dancers who are starting to fight
I call this one the “Second-Go-Balancing-Act.”
Purpose: To help Dancers find the balance.
Planning: This drill encompasses both techniques and, in my personal opinion, is the benchmark of a talented climber. If a climber can send something very hard on the second go (or potentially the third), it demonstrates their ability to combine high effort and high precision in a relatively short amount of time.
Many pro climbers are incredible at this, especially if they have competition experience. They have this special (and by special, I mean they have spent loads of time training it) ability in which they gather so much beta on their first try that they can turn on a readily available amount of try-hard to send on their second go. While this requires serious effort, it also necessitates incredible focus and beta-finding. And it entails memorizing skills, climbing tactics, and a controlled ego.
Practice:
Pick a climb that is higher than your onsight or flash grade, but lower than your redpoint grade. If you have redpointed 5.11c and onsight or flashed 5.10c, then a 5.10d or 5.11a is perfect for this.
On your first go, do not spend all of your energy achieving perfection on every move. Also: Don’t try to onsight the route. The goal is to spend as little energy as possible learning as many of the important moves as you can. Learn how and where to rest, and which sections require try-hard vs. slow and controlled precision.
During your first go, practice committing the moves to memory. Then return to the ground and spend some time rehearsing the moves before attempting a second go. This is the Dancer-heavy part of the drill.
Try to send. On the second go, introduce the Fighter part of the drill. Mix the Dancer memorization with the Fighter try-hard and intuition. During this redpoing attempt, give a full effort to sending the route while keeping an open mind for beta that might feel more intuitive.
Climb until you fall, rather than deciding it is time to take, or purposefully letting go. If—like Nicki determined—you aren’t actually afraid of falling, this should help Dancers practice feeling uncomfortable while trying hard.
If you find that you are scared to do the next move, then that prompts other drills that you could work on in tandem. As always, gauge the safety of where you are falling because that fear might be justified!
Even if you get so pumped that you can’t climb for the rest of the day, remember: This is still a goal-oriented session, so that is okay and productive.
Each attempt is a learning experience, and at the end of the day, it’s all money in the bank. Often, a route of that grade would take someone four tries to send normally, so this is a practice in condensing four attempts of unfocused effort into two fully focused attempts.
Explore more about the Dancer, the Fighter, and Ego Grades.
The post Climbing Training Drills for “The Dancer” appeared first on Climbing.
]]>
The struggle to find balance as a young athlete is real. This is how I interrupted the burnout cycle and fell back in love with climbing.
The post Burnout Hit Me Hard as an Elite Teen Climber. Here’s How I Overcame It. appeared first on Climbing.
]]>Every day, I face the weighty struggle of getting myself to the climbing gym. It’s hard, which is unfortunate because climbing is what I do.
Even as a teenager, I’ve already dedicated a large portion of my life to climbing, but 99 percent of the time, I’m not excited to train or climb. I procrastinate until the last minute, often coming up with an excuse to cut my training days short, all to get a reprieve from the constant pressure of expectations.
Voices in the back of my head tell me that I will never be good enough, that I’m wasting precious time, and that I could be spending this time on more neglected parts of my life. This makes it extremely difficult for me to find the joy in training.
This, I’ve begun to understand, is called burnout. And I’ve been experiencing it off and on for the last three years.
This story is about burnout, but it’s also about learning to balance different aspects of life. It’s about shedding light on the effects of training on elite young athletes in the age of social media. Most importantly, it’s about keeping your love for what you do bright as our lives shift over time.
What does burnout look like for climbers?
“Athletic burnout” is a state of mental, emotional, and/or physical exhaustion caused by excessive stress and training, according to Sterling Sport Mindset. But burnout can be caused by many things, and it can show up for climbers in a variety of ways. While one person may need a weekend break from the climbing gym, another may simply need a shift in how they approach training. Others may never climb again.
Many researchers hypothesize that burnout is a large factor in depression in athletes as well as chronic stress. The most typical signs also include decreased motivation, irritability, chronic stress and fatigue, weakened immune system, higher resting heart rate, or low self-esteem. Lack of self-esteem itself can be a singular cause of burnout, often leading to plateaus or declines in performance, which tend to stem from over- or under-training. This is something I’ve dealt with significantly, as I often compare myself to other climbers in harmful ways.
It’s also important to mention the cumulative effects that social media has had on young athletes over the last decade. The majority of people posting on social platforms only render the best versions of themselves. I know this may seem obvious, but many recent studies reinforce the harms of the continual comparison resulting from social media. The rising depression rates, decreasing attention span, and general mental health crisis tied to social media also contribute to burnout. This not only stems from the direct effects of social media on mental health, but from the constant pressure placed on climbers and other athletes to be as “perfect” as what they see in their feeds.
The devastating emotional effects of burnout on athletes can even change their relationship with the sport. Feeling the joy that climbing once brought me fizzle out has been heartbreaking. A loss of passion often goes hand in hand with depressive symptoms and resentment—something that I’ve spoken to peers about in the past. Once training becomes too much, resenting climbing arises as a pretty common theme.
Why I started resenting training
I’ve struggled a lot to find a way to juggle my social life with training as an elite athlete. This has especially been an issue over the last two years. As I started to set higher goals, such as sending my first double-digit boulder outside and making finals at National Championships, I must dedicate more considerable chunks of time and energy.
Let me back up: I’m from a small town in eastern Washington. I commute two hours each way to the nearest climbing gym, where I’m on the team. Two years ago, my family decided it wasn’t sustainable to continue driving there three times a week anymore. So we built a home gym in our garage. Now, the majority of my training is at home, and I only travel to the gym once or twice a week.
Last year, I dropped out of high school to homeschool so I could focus more on training. While this did wonders for my climbing, I steadily lost the motivation to get to my home gym to train.
Why? Because I couldn’t see my friends as much as I needed to. I was struggling to get my school work done. And the idea of climbing was fast becoming more unappealing than ever.
For the first time in my life, I hated my sport.
I dreaded training for hours only to get sub-par competition results that didn’t reflect how good I actually was. I didn’t love the process either. And without the process, why was I even there? I envied the athletes who thrived when they trained as much as possible—the ones who truly loved the process.
I spent years of my life trying to understand why I couldn’t enjoy hard training. It’s been difficult for me to accept that it will probably always be harder for me to motivate than some of my fellow competitors.
My challenges with training—which increase during these extended periods of burnout—have never fully gone away. Even now, I feel somewhat repulsed at the idea of going to the gym and training by myself for three hours, even though I know once I’m there, I’ll feel just fine.
It all comes down to balance
Once I stopped comparing my relationship with training to that of my peers, I felt the freedom to redefine what training could mean for me.
Nine months ago, I started working with a remote coach and created a personalized plan geared toward my individual needs and goals. I began training more—six to seven days a week—but with intention. Instead of chaotic unplanned training days, I followed consistent drills and exercises every week. As I saw progress in both my technique and my mentality, I finally felt like my hard work was paying off.
This new found flow continued for four months. I felt strong and proud of the climber I was growing into. But in the last few weeks of 2024, my new training program became unsustainable once more. I wasn’t seeing my friends enough, and all my motivation was going towards climbing. This imbalance, mixed with seasonal depression, made for a terrible combination. I felt another wave of burnout fast approaching as I failed once again to balance climbing with other aspects of my life.
For the first time, I considered quitting completely.
But this bout of burnout was different from my past experiences. It wasn’t just the result of overtraining—it stemmed from a three-year plateau, toxic inner monologues, and chronic stress. This time, I could feel it set in. I recognized the slow decrease in motivation, the panic when I thought about training, the lack of joy that climbing brought me.
I knew I couldn’t continue training at this intensity. And I realized that I needed to prioritize other parts of my life before I could find my love of climbing again.
5 things that can help teen climbers with burnout
Six months have passed since that last experience with burnout. Here are my very own strategies that have made a legitimate difference since then.
1. Find balance
For the first time since becoming an athlete, I began prioritizing my teenage social life. For years, I put training before seeing friends. Then I would wonder why I was feeling so unsatisfied. I waged many internal battles over the experiences I was missing out on. A common one was after-practice hangouts, especially in the weeks leading up to Nationals. Typically, I’m the only one from my team to qualify for Nationals, which means my friends’ competition seasons are over a month before mine. Once summer hits, we have a habit of leaving practice 30 minutes early and jumping in the river. Because I have to dial in my training leading up to Nationals, I usually tell them to go without me.
It may seem small, but moments like these have made me question why I continue to put in the effort that I do. I hated that I was forcing myself to say no every time. Of course, sometimes I’ll have to miss out on plans. But finding balance between training and my social life has made the choice to climb—and climb hard—much easier.
To strike that balance, I created three simple guidelines for myself:
- Rule 1: See friends outside of practice time at least twice a week.
- Rule 2: Don’t beat myself up about missing a lighter day of training.
- Rule 3: Climbing doesn’t define or control my life.
Allowing myself to tend to my other needs made a huge difference. If I could have only made one change, it would have been this one: Reminding myself that I am allowed to enjoy being a teenager, and that doing so doesn’t make me any less of an athlete, lazy, or uncommitted to my goals.
2. Remember why I climb
I am learning to lead my training with my love for the sport. One way I’ve been able to do this? Just-for-fun days at the gym or crag. I don’t track them, but I try to do them as soon as training starts to feel mentally draining. Here’s the mindset I adopt on fun-oriented climbing days:
- Decide what I feel excited to climb that day
- Forget about the grade
- Don’t worry about not doing “proper training”
- Let myself find that feeling that first hooked me on the sport
- Climb until I feel done—no shaming, just simply stop when I’m no longer enjoying myself
Ironically, these sessions tend to be some of the longest for me because I can shed the feeling of heavy responsibility that comes with harder training days. This leaves me excited to climb because it genuinely makes me happy.
The minute I start to lose that sense of joy, training immediately becomes a battle. This shift often looks like listening to my body. If I’m exhausted, I take a day off and remind myself it’s a process, not an all-or-nothing situation. This has made an enormous difference and has become a bit of a mantra for me:
Do it because you love it. Do it because it brings you joy.
3. Switch up the setting
When I’m in a headspace where I struggle with motivation to train, it’s hard for me to get my schoolwork done. I’ve combatted this by going to a bakery or cafe, getting myself a coffee, and sitting down to do my school work for a solid couple hours. In doing so, I’m able to efficiently get schoolwork done while still having the emotional energy to get down to the gym and train.
This tactic might not work for everyone because most kids aren’t homeschooling like me, while others struggle to focus around external stimulation. But I’ve always been able to focus better in settings where there are other people around.
Similarly, when training becomes repetitive or excessively draining, venturing to the crag or heading to a less-visited gym can be a really good way to physically step away from the toxicity, while still climbing.

4. Prioritize earlier mornings
I generally hate waking up early, but I’ve found that starting my day before 8:00 a.m. makes a really big difference for how productive and vibrant I feel. When I wake up and can get my schoolwork done by 2:00 p.m., I have more time and energy to train. I end up having more balanced days when I’m able to effectively manage my time. I also end up feeling more accomplished and pleased with my day when I don’t feel like I wasted my morning sleeping in.
5. Find a sustainable training schedule
One of the biggest factors in avoiding recurring burnout was actively speaking up for myself about how I train. This looked like doing the thing that my performance anxiety fears the most: training less. I cut down to four training days a week, and those sessions were a bit shorter, closer to two-and-a-half or three hours, as opposed to three or four hours.
Reducing my training schedule made a significant difference in my mental health. I haven’t once felt overwhelmed with a training day since I made this change. While my progress has maybe slowed a small amount, the positive changes in my wellbeing and mental health have made training far more sustainable. In the long run, this change has been unbelievably good for my climbing. I am stronger than ever, and most importantly, I adore climbing once again.
Am I sometimes reluctant to get down the gym to climb? Sure. But the shift in balance made an immediate difference in how I felt about training. On a recent debrief call with my coach, I told him I loved this training plan. I shared how much joy the sport has been bringing me again, and how I feel as if I’ve found a balance in my life that I haven’t had for years.
Burnout-free for six months and counting
I’ve come to realize that no perfect solution exists for avoiding burnout and mental challenges as a competitive climber. What I can do is keep my training schedule fluid with my priorities as they continue to shift down the road. Nothing is concrete, and rigidity and guilt have done nothing for me as a climber, nor as a person learning to navigate the world.
There are still days when it’s hard. Voices in my head still tell me that I’m not good enough. Some days, I still struggle to motivate. But these five changes in both my life and approach have made profound impacts. They have also taught me a lot about what I need in order to maintain healthy training as an elite athlete, while allowing myself to nurture the other aspects of myself and my life that deserve attention.
Now, I’m almost 17 years old, and have a far better relationship with climbing than I have in a long time. I’ve grown exceptionally as an athlete, both mentally and physically, over the last nine months. And I’ve learned enough that I want to share my story to hopefully make a difference in the lives of other climbers or athletes facing similar struggles.
Since making these changes, my mental health has been better than it has in years. Decreasing the stress I put on myself has lowered my performance anxiety and helped me stay motivated. Cutting a few hours of training off per week gave me enough time to prioritize other parts of my life that bring me joy. In turn, this has helped me rekindle my love for the sport. In the end, more is not always better.
The post Burnout Hit Me Hard as an Elite Teen Climber. Here’s How I Overcame It. appeared first on Climbing.
]]>
An op-ed on why pulling on plastic has its shortfalls. Here's what I recommend doing instead.
The post I Run a Climbing Gym. Here’s Why I Tell People to Climb Outside More. appeared first on Climbing.
]]>It’s 2 a.m. on a sleepless night. A dull red light illuminates my pitch-black room as I doom-scroll through the dumpster fire that is my Instagram algorithm. I’ve left the wholesome cat memes. Now, I’m navigating influencers pushing the latest climbing trends and advertising their “training programs” to help you send your project.
“Learn to climb 5.12 in just two weeks!”
“Train on a board to get the gains for your project!”
These tropes play over cliché music. They are layered with catchy cuts, smiles, and a kernel of good advice—but mostly, it’s just a garbage diatribe searching for clicks and sign-ups, all with promises that pulling on plastic in a gym will get you to the chains of your outdoor project.
I believe training in a gym is a useful tool. It’s especially advantageous for those who work full-time jobs, have kids, or need to build a foundation of strength, power, or endurance to achieve their climbing goals. However, it isn’t a substitute for being outside. If the gym is your only approach to sending, you’ll likely walk away from a session on your outdoor project feeling disheartened and unmotivated.
I’ve taught several clinics on the process of redpoint climbing with the American Alpine Club’s Craggin’ Classic Series from 2012–2024 (R.I.P.) and have had the fortune of working with a gamut of people with wildly different climbing experiences. The participants ranged from teenagers to a spry 70-year-old, and from people just learning how to top-rope belay to those questing after their first 5.14. One common thread among all these climbers? The desire for some kind of training program—a shortcut or a quick way to improve their climbing immediately.
My answer to those queries was simple: “No amount of burpees, one-arm hangs, lifting exercises, or pull-ups will solely get you through a route or boulder problem.”
This may have been a disappointing answer, but I think time on route, rather than gym training, is king. Getting on your project day after day and gaining experience and fitness will do more to help you meet and surmount your goal than doing trending exercises to “strengthen that core” without knowing how to apply the gains.
What’s the best way to get started? First, find a project that inspires you. You’ll be spending a lot of time on it, and if you’re not inspired by what you’re doing, then there’s little reason to do it in the first place.
It’s also worth having projecting friends or a partner who is on the same page. Don’t drag out friends or significant others who hate the project mentality; it just causes rifts and a lack of focus.
Next, get comfortable on the route. If you’re afraid of falls, extend draws for more comfortable clipping stances. Find a belay partner you trust implicitly. Remove any variables that keep you from focusing on the climbing.
Last, I suggest setting a timer. Honestly, this may have saved my marriage and climbing partnership. Give yourself a 40- to 60-minute timer for sussing out beta. This way, no one gets upset about long belays, and the climber doesn’t feel rushed.
There’s no silver bullet to your next send, but putting in the time (and doing it on rock) is a surefire way to increase your chances at success.
The post I Run a Climbing Gym. Here’s Why I Tell People to Climb Outside More. appeared first on Climbing.
]]>
How to train and stay in good climbing shape while living on the road, whether you’re van-lifing it, dirtbagging it, or sailing across the ocean.
The post I Live in My Van And Train on the Go. Here’s How I (and Some Pros) Make It Work. appeared first on Climbing.
]]>Back in my small condo in San Francisco, my “gym” often consisted of a set of dumbbells wedged between the bed and the wall, a hangboard mounted above the doorframe, and a daily mobility flow squeezed between furniture. Like many climbers during the pandemic, I learned to train without fancy setups.
That DIY ethos became essential when I left city life to live and climb on the road last fall. Staying in shape wasn’t just about vanity or chasing grades—it was a necessity. I needed to keep up with rehab from injuries that almost pushed me out of climbing. To avoid backsliding, I also wanted to preserve range of motion and maintain strength. As I traveled through new places, I would often lack the convenience of gyms, yoga studios, or even flat ground.
So I brought the gym with me.
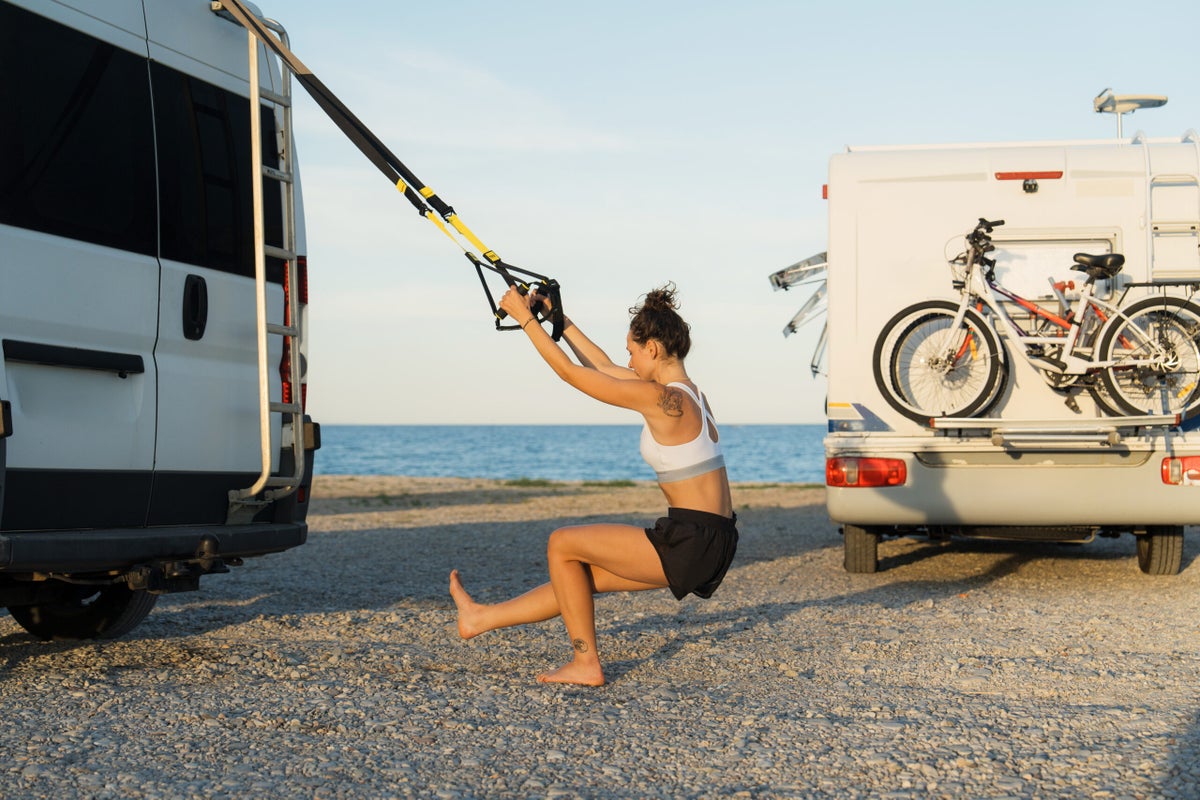
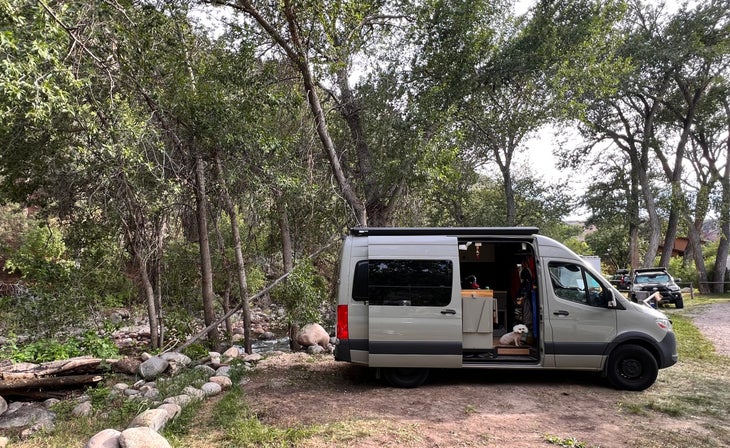
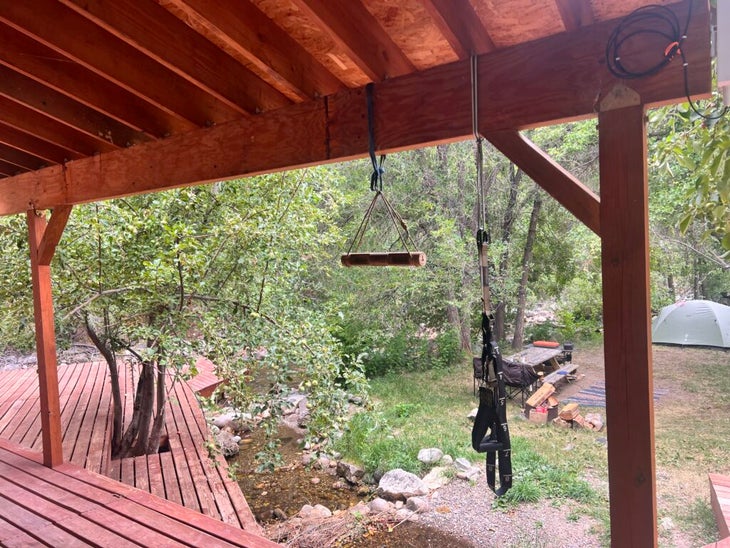
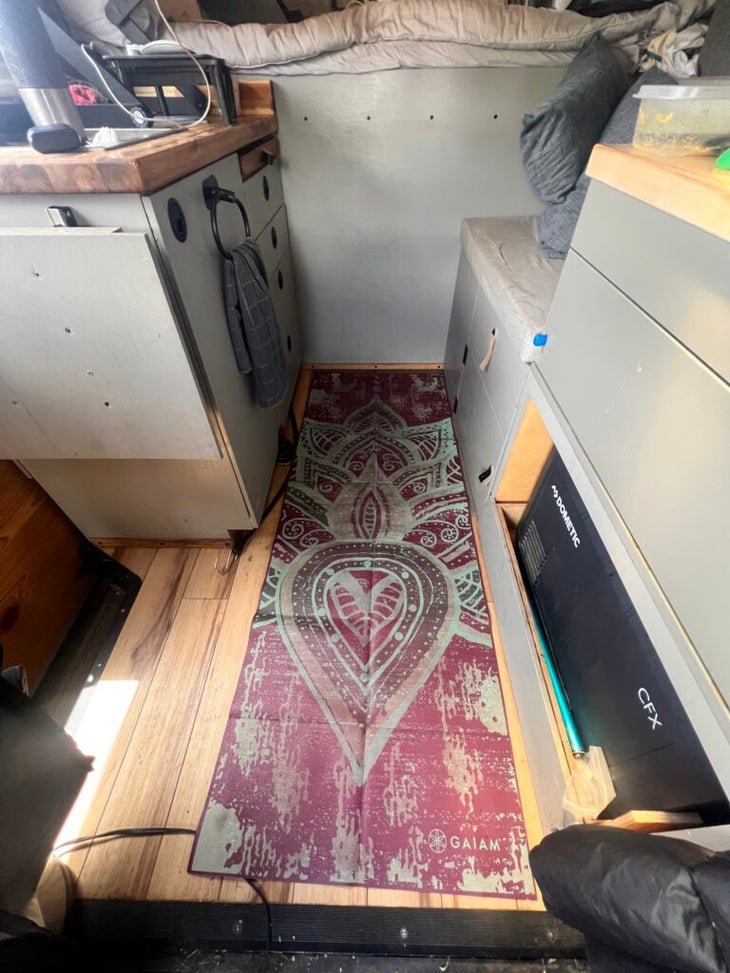
I mounted TRX straps and a hangboard to the ceiling of my van. I squeezed in adjustable dumbbells that I could load or strip down. Luckily, my van aisle is just wide enough for a yoga mat—perfect for a pared-down Ashtanga standing sequence most mornings. While the setup was simple, it works. In fact, it forced me to get clearer on what I really needed.
While on the road this past year, I’ve started noticing the creativity of other climbers living this life. Whether it’s swinging kettleballs at roadside pullouts or doing yoga by a desert campsite, the ingenuity of the portable gym mentality is endless.
In urban areas, climbers adapt in other ways. Once, at a Planet Fitness in Las Vegas (a city with world-class outdoor climbing, but meh climbing gyms), I saw two women improvising with a fingerboard they’d clipped to a squat rack—sneaking in fingerboarding between sets of sumo squats.
If you live and climb on the road—or aspire to one day—I’ve dug deep for the best climber van life training tips. I’ve drilled nomadic pros and I’m sharing my greatest discoveries to help you stay fit wherever you are. Best of all, you don’t need a fancy Sprinter van to take action on this advice. Whether you’re living in the back of your Subaru or sailing across the sea to a big wall objective, here are some ideas for training on the go.
How pro climbers get creative with on-the-go training
I’ve interviewed several pro climbers who’ve managed to stay fit in wanderlust mode. Each example offers guidance for different on-the-go scenarios.
Roving (and sending) senior climbers
Chuck and Maggie Odette, in their 50s and 60s respectively, travel around the U.S. full-time in their van—and they’re still sending 5.13+. In an interview I with the Odettes last year for my podcast Ageless Athlete, Chuck described their itinerant setup in El Salto, Mexico:
“We’d be camped at the parking lot near the cliff and I’d warm up before heading to the wall. After climbing we’d do supplemental work—a crossfit-type of workout with pullups and pushups.”
They also carry BFR (blood flow restriction) bands that Maggie claims helps them recover better for actual climbing days.
This case study in climber fitness shows us that training doesn’t need to be high-volume. It just needs to be specific to objectives.
Staying in shape on the open sea
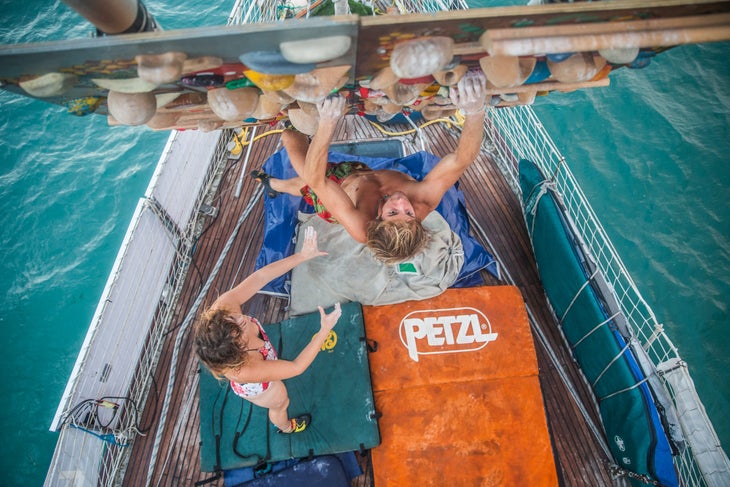
This January, Seb Berthe made the fourth repeat of the Dawn Wall. He spent a total of eight months on a sailboat traveling and training between Europe and Yosemite while projecting the route. Why a sailboat? To get to Yosemite from Europe with a minimal carbon footprint.
When I spoke with him on Ageless Athlete, Seb described how his training evolved over those multiple ocean crossings. On his first trip to attempt the Dawn Wall in 2022, he admitted that just standing up could be hard as he was often seasick. He brought a fingerboard but admitted that “trying to do max hangs on a moving boat was not ideal.”
So when Seb returned for his second attempt, he adapted. He and his crew installed a spray wall on the deck, and developed a creative new way to train:
“Depending on how the boat was tilting, I had different exercises. Sometimes it was really easy, and sometimes it was really hard. I couldn’t measure anything exactly, but I had to accept that. You can’t always know how strong you are when the floor is moving.”
That constant unpredictability—combined with a moving “mountain,” as he put it—wasn’t just a hindrance. It became a hidden asset. “It’s actually quite good for the joints and muscles,” he said with a laugh. “Maybe a moving hangboard is something people should try.”
Because sessions were short—usually just an hour in the morning, then another in the afternoon—he focused on quality over quantity: “I couldn’t do a five-hour session. So I went really intense. Pure strength and power. And that’s maybe what I needed most.”
In the end, Seb believes the whole experience may have helped him prepare for Yosemite’s most legendary climb in ways no spreadsheet—or stationary training setup—ever could. “It got me more psyched,” he explained. “It put me out of my usual routine. Maybe it helped … or maybe that’s foolish. But I like to believe it.”
It’s hard not to agree with him.
These examples—van lifers, urban creatives, and ocean-bound athletes—point to the same truth: It’s not about having the perfect gym. It’s about solving for what you can do wherever you are.
Tips for climbers training on the road
After living in my van for over a year while climbing and rehabbing, these are the habits and tools that have helped me stay strong, consistent, and injury-free—even without a traditional gym.
- Define your training goal. Are you rehabbing? Building power? Maintaining finger strength? Know your “why” so you can set specific goals to work toward—and develop the on-the-go training setup needed to achieve them.
- Make movement part of your morning. A simple yoga or mobility flow can set the tone for the day. I try to do mine first thing—sometimes right inside the van. I lucked out with just enough space for a yoga mat, but often I’ll unroll it outside at a campsite or even a quiet trailhead. The key is consistency, not perfection—just find a flat spot, breathe, and begin.
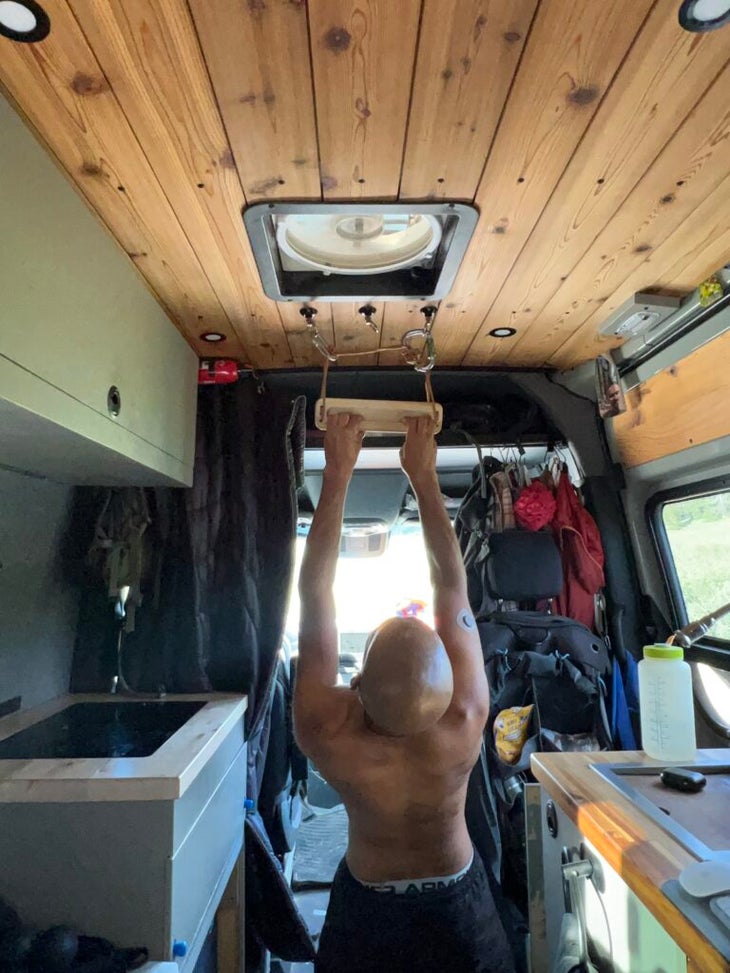
- Invest in multi-use tools. Resistance bands, a yoga mat, suspension straps, and adjustable dumbbells cover a lot. I keep mine in one storage bin I can pull out easily. In smaller vehicles, try a collapsible crate or under-bed bin, or stash them around your space. For a hangboard, I drilled hooks to my van ceiling. Alex Honnold had one mounted to his van doorframe. You can even hang one from a tree branch if nothing else is available! Get creative.
- Use your environment. Campsites, chain gyms, climbing gyms, or any rest stop can serve as venues for training. At a rest stop, I’m usually just trying to sneak in a quick session right after snacking and napping—some band work, scapular hangs off my pull-up bar, or yoga stretches. You’re not there to impress anyone—just to move, refuel, and keep going.
- Train around your climbing days. As climbing coach Steve Bechtel recommends, train either before or after your climbing session, or early the next day. Stack your stress, then rest fully—especially if you’re trying to send hard projects.
- Training in public? Don’t be shy. Honestly, nobody cares if you are stretching it out at a train station, a gas station, or the boarding gate at Dulles waiting for your delayed flight. And who knows? You may just inspire others to follow suit.
- Don’t forget recovery. A yoga mat (get the travel-friendly one) and foam rollers (get the mini) can go a long way. I carry a massage gun, too, but admittedly, I never use it. The lacrosse ball works well for some good old self-massage.
Let go of the script when it comes to training
One surprising gift of road life? I’ve stopped obsessing over structured training blocks.
For years, I thought progress required spreadsheets and periodized cycles. But living from a van—where rest days might depend on water availability or driving logistics—I’ve learned to improvise. I’ve discovered that sometimes, less is more.
Some days, it’s a 20-minute bodyweight session before breakfast. Other days, it’s a hangboard workout after climbing. Sometimes, it’s just stretching against my van while getting gas. And often, the most satisfying sessions are the ones I do outside—under the sun, by a river, or with the wind pushing through the trees. There’s something grounding about training to the rhythm of the day, not the clock.
There’s freedom in letting go.
As Seb Berthe told me:
“Being on the boat reminded me to enjoy the process. You’re not always in control, but you can always adapt. And adaptation is part of performance.”
Exactly.
Watch Kush give a tour of his van and various training setups
The post I Live in My Van And Train on the Go. Here’s How I (and Some Pros) Make It Work. appeared first on Climbing.
]]>
10 tips anyone can use to push their boarding grade
The post How I Climbed V10 on the Boards at Age 53 appeared first on Climbing.
]]>If you had told me as I pulled onto a MoonBoard for the first time at age 47 that six years later, I’d do my first double-digit problem on a board, I’d have smacked you upside the head with a stick brush.
That’s because, during that first session, on the 2017 MoonBoard at the Boulder Rock Club, I could barely do the easiest problems: the V3 benchmarks. With an arrogance rooted in outdoor bouldering and commercial gym sets—but zero boarding!—I was certain that V3 would feel “easy.” The savage wall quickly stomped that illusion out of me.
The board felt impossibly steep. The holds—even the jugs—seemed miles apart. And my feet kept skittering off, leaving me swinging out without the tension needed to get my feet back on before I Superman’ed onto the mats. There was an experienced boarder up there, watching my gong show with quiet amusement. I asked him if MoonBoarding got any easier. “Yeah, you just need to stick with it,” he said, before he floated up the wall. And so, I did.
For the past six years, I’ve been grinding away on the boards, mainly to hold on to—and even gain—power into my fifties for cruxy sport projects. But I also board because I’ve grown to love it and to see it as the best training modality, be it for bouldering or routes. Boarding makes you beast-strong, and being a beast gets you up shit.
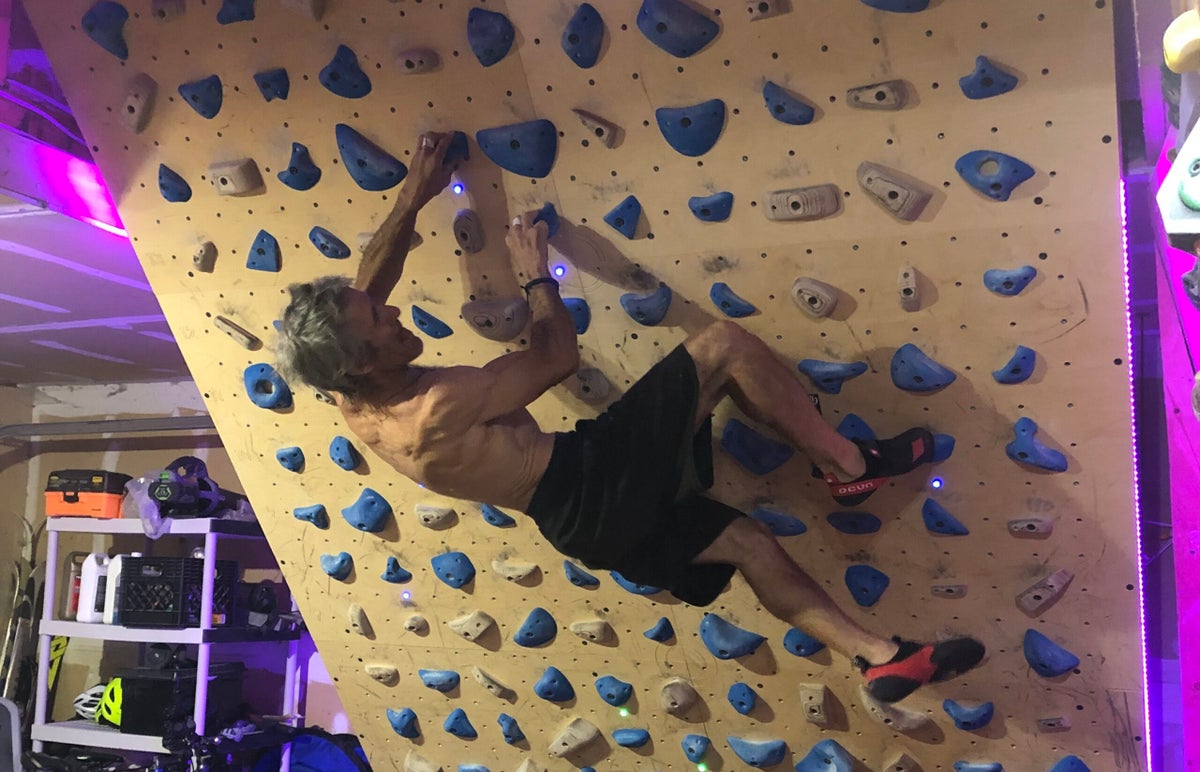
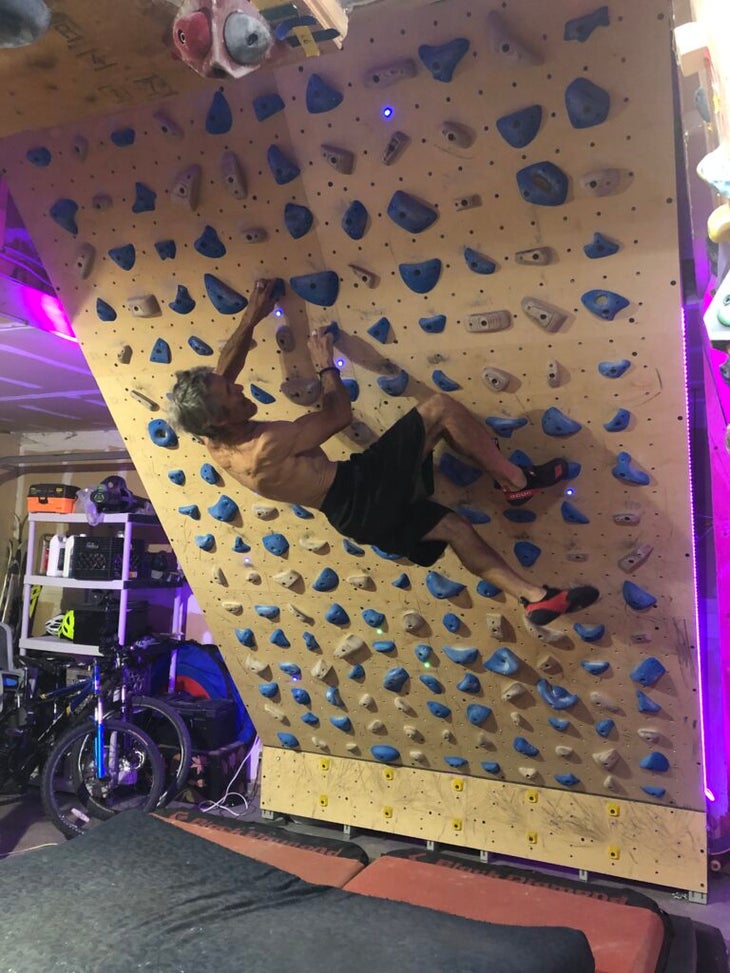
Along the way, I’ve also moved up through the grades. I chalk up my progression to both stubbornness and diligent training. This winter, at age 53, I did my first V10 on a board: Knights of Cydonia @45 degrees on the Tension Board 2. In the weeks that followed, I ticked off two V10s on the Kilter Board (Hard proj 4 @45 degrees and Small hands or big balls @40 degrees), proving, I suppose, that this wasn’t just a hat trick.
Watch the author send two V10s, filmed at The Campus gym in Boulder
Anyway, here are the 10 boarding tips, tricks, and learnings* that helped me on my journey from V3 to V10, and that can help you, too, at any level on the boards.
1. Brush thy board
Most board holds are flat or incut, meaning they accumulate more chalk, boot rubber, and dead skin in the back—where they meet the wall—than your average, often-rounded gym hold. Therefore, they need to be brushed more thoroughly, so get a big, soft-bristled brush like Black Diamond’s Medium Bouldering Brush.
Brushing is also a great way to learn the grid. I’ll brush the board—including foot jibs—before I start the session, and clean the holds I’m using and maybe others nearby between burns.
Bonus tip: If your wall adjusts, drop it down to 60 degrees so you can dust off the often-neglected top half, in particular those key finishing holds. If your wall is at a fixed angle, grab a chair or stepladder.
2. Preview moves instead of always blindly trying to flash
While trying to flash a new problem is a great test of skill, it can also drain power and burn through skin. If a problem is near my limit grade-wise and has moves that look reachy, taxing, or complex, I’ll sometimes pull on in the “problem spots.” By previewing potential cruxes, I can see if the moves go or if I’m better off just picking another problem.
3. Work up through the grades (but grades aren’t everything!)
Start with the benchmarks/classics/most-repeated problems roughly four or five V-grades beneath your limit as you learn a new board. This helps you grasp the holds, movement patterns, and rating scale, letting your fingers, shoulders, and back muscles adjust to that board’s specific demands, while minimizing the risk of injury.
By the same token, don’t get stuck doing “X number of problems at Y grade” before you progress to the next grade. I can get my ass kicked on a Ravioli Biceps V4 MoonBoard benchie, for instance, then go on to flash another setter’s V8 in the same session. Many problems are morpho—height, finger-size, and limb-length dependent. So you may find a higher-graded problem more agreeable than an “easier” one. Many problems are also super sandbagged, so take any grade with a grain of salt.
4. Don’t attempt to send a problem more than five times per session, especially if it’s fingery
Flinging yourself at the same problem over and over is a recipe for injury, especially if the holds are small, pockety, or demand full crimping. Working out beta is one thing, and can be done relatively safely (see tips #6 and #7). But giving full-effort ground rips is best limited to no more than five goes per session, to avoid an overuse injury. Plus, you just get more powered-down with each burn. As another option, on mirrored walls like Grasshopper, TB2, Decoy Board, and the 2017 MoonBoard’s wood holds, you might try switching to the other side if the first one isn’t happening.
5. Crowdsource the beta
Boarding with friends—ideally close to you in height and ability—is a great way to figure out beta. Other sources I’ll turn to are Instagram videos, usually linkable from within the app, and logbook comments. For instance, just today, as I write this, someone commented on a KilterBoard V6: “Shorties, ignore the pinch out left and jump to the next hold.” Standing at a wee 5’6”, I 100 percent did this on my next burn, after having gotten to the pinch only to be too starfished out to continue.
6. On an adjustable-angle wall, do the problem at easier angles first
Pretty much as it sounds—try the easier, lower-angle versions to master a problem’s holds and imprint muscle memory. Then slowly crank the angle up. (The Tension, Kilter, Woods, Grasshopper, and Decoy boards list their problem in five-degree increments.) You might even do this over multiple sessions, on different days, to let your body acclimate and to micro-refine the beta.
7. While working beta, use “helper” holds and open feet to learn the body positions
It can be tempting to be a purist and say, “If I can’t do this problem exactly as it was set, then I have no business on it.” But this rigorous mindset will only hold you back. Hell, even the world’s best boulderers use tactics like this, including having spotters push them into the wall to take weight off.
So, if you’re not quite sticking a move, “break” the rules: Use open feet or a more positive foothold. Use a better, more in-cut hold next to the indicated grip. On a long or dynamic move, go for a target hold one or two rows down. And with challenging one-armed lockoffs or moves—like Rose moves and crossovers—that isolate you on a single grip, add an intermediate en route to the next hold. Once you have the movement down, eliminate the “helpers.”
8. Seek out the softies
No matter how hard a problem feels to you, there will always be some Red Bull’ed up board-bro who flashes it and comments “soft” or “trash” and gives it the app’s easiest possible rating. Ignore all that! Instead, what I mean is that, when you’re breaking into a new grade, seek out the softest problems within that grade range, since there really is a wide gap between the easiest and the hardest problems. This typically means filtering for “most repeats” or looking at the problem’s repeat tally on the master list—the farther down the list, the more difficult and/or bizarre a bloc will usually be. Trust me!
9. Look for problems that suit you
Because I’m short and not especially jumpy, I gravitate toward problems that rely on body tension to control small holds close together, though on a good day I will push myself to get springy. This bucks the boarding trend of footless acrobatics and big, spectacular, jumpy moves, but I don’t much care because my goal is outdoor climbing anyway. So, when shopping for board projects, pick ones that suit your morphology and how you like to climb first, because you will—as a result of actually enjoying the problem—be more motivated to put the work in. Then, as you solidify your efforts at a new grade, begin trying blocs in your anti-style.
10. Do core work at least 3x per week
It doesn’t really matter what you do, IMO, as long as you do something to strengthen your core—after your boarding or climbing session. I’ll either follow ~10-minute YouTube core videos or, using my nine-pound Gravity Ball, do three rounds of crunches, sit-ups, Russian twists, and leg lifts. The goal is to develop a strong core that helps you drive down through your toes and keep your hips in, as well as, when jumping, to bring your feet back into the wall precisely and quickly.
*11. Bonus tip—reuse and recycle holds!
A final hack I’ve learned to use both on the boards and off is to reuse/recycle holds. For example, you might make a big jump off two crimps to a good hold up and left. Then, as you bring your feet back in, you move your right hand to the left crimp, closer to your body. Or on a diagonalling problem, you might take a big pinch with the right hand to get up to another set of holds, then return to the pinch with your left as part of the next sequence. Just today, I did a Kilter Board problem on which I used the same hold as a right-hand pinch that I then rolled into a gaston, before coming to it later as a left-hand pinch.
The post How I Climbed V10 on the Boards at Age 53 appeared first on Climbing.
]]>
Coach and elite climber Cameron Hörst explains why climbers might not be strong enough for their project–and what training they should be doing instead.
The post Too Weak For Your Sport Project? Here’s What to Do About That. appeared first on Climbing.
]]>This article is the third in a series of four. Read article one and two—and check back next Monday for the final installation.
There are two types of strength sport climbers should be aware of: maximum power and power endurance. Maximum power draws from your body’s anaerobic alactic system (learn more about that here) while power endurance—high-intensity bouts of climbing up to about 90 seconds—calls on the anaerobic lactic system. Both types of strength are crucial for overcoming sport-route cruxes and I’ve written about them at length in the link above.
In this article, I will explain how you can train these two vital aspects of your body’s anaerobic energy production. No matter your climbing background, if you’re “too weak” to clip the chains on your project, you can nurture your body to a state of higher anaerobic capacity via a smartly designed training program. So let’s get to it!
Adding strength workouts to your climbing training
I typically recommend that climbers train in a climbing-specific manner max four days a week, and less if also climbing outdoors.
Beginner climbers should focus their gym time on actual climbing, while intermediate and advanced climbers should engage in doses of both climbing and targeted, climbing-specific training. Advanced and elite-level climbers may need to incorporate a couple of “two-a-days” per week—putting in up to six sessions over the four days of gym training per week. (If this sounds like you, please reach out to talk specifics. It is all too easy to overtrain during such an intensive schedule.)
Whether you’re climbing 5.11 or 5.15, focus each gym session on training a single energy system. You should target your weakest energy system with two sessions per week and at least one session per week for the other two energy systems.
Optimizing your training days is complex due to the fact that sport climbing demands physical prowess in all three of your energy systems—you need to be able pull hard moves and cruxes, but also recover at rests and climb through the pump after many moves of vigorous climbing.
Sport climbers should aim for one “max strength” session (anaerobic alactic focus), two “power endurance” sessions (anaerobic lactic focus), and one “aerobic capacity” session (oxidative focus) per week. Advanced and elite climbers who are deep in training mode should incorporate a couple of “two-a-days” per week, enabling them to train each energy system twice per week.
I have outlined a basic max-strength and power-endurance training program below. This is not a one-size-fits-all program—that’s never the case with climbing training. My intention is to present an effective, science-backed training philosophy, alongside some basic workouts to help get you started. To develop a personalized training program, I can’t recommend working with a professional coach enough.
Strength & power workout (alactic system focus):
This session will consist of near-limit movements and exercises, and therefore should always be performed following at least one rest day.
A few things to keep in mind while training the alactic system
- Complete a proper warm-up before beginning at-your-limit movements
- Your high-intensity exercises should last between two to ten seconds (up to 20 seconds if engaging in limit bouldering)
- Give a high-quality effort during each exercise and boulder attempt. Rest for a minimum of three minutes between exercises.
- End your workout when fatigue forces you onto lower-intensity exercises. Depending on training history, the duration of the actual alactic-focused training could be as little as 30 minutes and up to perhaps two hours. (Note: Performing limit exercises in a fatigued state tempts injury and compromises the effectiveness of your overall training program. Your goal is to consume the minimum effective dose of alactic training, not a body- and soul-crushing maximal dose!)
Examples of anaerobic alactic focused exercises
- Limit bouldering. Using a home woodie, spray wall, system board, or commercial bouldering set, select short, near-maximal problems that you can attempt (or send) in 5-15 seconds. You should not be on the wall for more than 20 seconds.
- Max-weight or minimum-edge hangboard training. I recommend doing either single, 10- to 12-second hangs (with 3 minutes rest in between) or the 7 on/53 off protocol (3 cycles of 7-second hangs followed by 53 seconds of rest) taking a full 3 minutes rest after the 3-hang set is completed. Either way, most folks should limit themselves to just 6 to 9 total hangs.
- No-hang max edge lifts. Consider repurposing some of your hangboard sessions into no-hang training. The training protocols are similar, but the novel strain and training stimulus of no-hang training benefits many well-trained climbers. The ForceBoard gauge by PitchSix is a great digital training device with SmartPhone real-time data and workout tracking.
- Limit bouldering. This session should be a full hour or two, rest well between attempts! For advanced climbers, I recommend the Tension Board 2 at 45 degrees or the Kilter Board at 50 degrees.
- Weighted pull-ups. Hang enough weight from your harness’s belay loop to make doing 5 reps of standard pull-ups challenging. Rest 3-5 minutes between each of the 5 sets. Elite-level climbers may be able to graduate to doing sets of 5 one-arm pull-ups.
- Campus boarding. This is a wonderful training tool if you’re strong and disciplined enough to use it properly. Exercises to consider using (but not in the same sessions!) are “Ladders,” “Touches,” “Lock-offs,” “Switches,” and “Double-Dynos.” Just 2-3 sets of 1-2 of these is plenty. Rest completely between sets—3 minutes at least. Warning: This advanced training tool has injured many climbers. Do not campus in a fatigued state. Do not campus if you’re uncertain of proper campusing technique and training protocols.
“Power-endurance” workouts (anaerobic lactic focus)
Power-endurance training sessions are the most pumpy and mentally grueling of a climber’s gym-training program. Engaging in repeated 20- to 90-second bouts of high-intensity exercise triggers sensations of pain and rising levels of fatigue. When properly programmed and executed, these training-induced stresses will yield gains in anaerobic capacity that really pay off on the rock! Performed infrequently—or too frequently, and in excess—these power-endurance sessions can lead to overtraining syndrome and decreased performance. (If you’ve ever noticed your climbing performance decrease despite “all your hard training,” you might now know why.)
After completing a thorough, progressive warm-up, your power-endurance training session should take between 30-90 minutes depending on your training history. Perform 1-3 of these exercises or climbing protocols described below.
Examples of anaerobic lactic focused climbing protocols
- 30/30 Intervals. This protocol is 30 seconds of all-out, max-intensity climbing (Rate of Perceived Exertion, or RPE, 9-10) followed by exactly 30 seconds of rest. Do 6 of these 30/30 intervals back-to-back, being sure to stick to this precise rest/climb interval protocol (use the timing app on your phone to get it right!). Then, take 10-15 minutes of rest, before firing into your second set of 6 30/30 intervals. Well-conditioned climbers can complete up to 4 sets of 6 30/30 intervals; elite climbers should consider wearing a 5-pound weight belt. Important: Do not climb set boulder problems. Instead, climb intuitively, “open-hold” style, on a spray wall, home woodie, or system wall. Use the smallest holds possible without falling off the wall. As you fatigue, use bigger holds and smaller arm moves to avoid reaching muscular failure before the 30-second interval is completed.
- Bouldering 4x4s. These offer a slower-paced and less-intense interval workout than the 30/30s. Begin by picking out 4 different boulder problems 2-4 grades below your max. For example, if you’re a V8 boulderer, pick out a couple V5s for this exercise. Here’s how to do it: Lap the first boulder 4 times in a row with a brief shake out and rechalk between goes. Your rest should roughly equal the amount of time you spent climbing, then hop back on the wall for the next lap on the same problem. After you’ve sent the boulder 4 times, take a 5- to 10-minute rest. Repeat this process on 3 more boulder problems, for a total of 4 ascents of 4 different boulders. Be sure to adjust up or down the grade of the boulders you climb—they should be challenging, but doable without falling. Tip: Interactive climbing boards (i.e. Kilter, Tension, etc.) are perfect platforms for 4×4s because of the ease of switching to a new problem within the proper target grade.
- 1’/4’ Intervals. This is another all-out protocol, similar to the 30/30 intervals detailed above. The difference here is a longer climbing interval (1 minute) which makes it more lactic (and pumpy). The 4-minute recovery between climbing burns allows partial, but not complete, recovery, so expect the fatigue to build over the course of doing 10 total 1/4 intervals. Be sure to make this physically hard, but technically straight-forward. Use the smallest holds and biggest arm moves possible (9 out of 10 RPE), but, like the 4x4s, toggle down the difficulty as you fatigue. Perform 1/4 intervals on a spray wall, system board, Treadwall, or bouldering wall.
- 20-move circuits on spray wall. I recommend this protocol to advanced sport climbers who need the physical capacity to do many hard moves in a row (as a simulator of long crux sequences in outdoor projecting). The key is to produce a limit, 20-move circuit that will really test your mettle. You can get as creative as you like with it—even mimicking the moves and sequences of your current project—but the circuit needs to totally power you out. For advanced climbers, I recommend adding a weight belt to drop the difficulty of individual moves without reducing the intensity. This way, the 20 moves are still hard, but also higher percentage. Do 3-5 sets of this 20-move circuit with a complete rest (>15 minutes) between burns.
- Route intervals. Once thoroughly warmed up, your goal is to give a few all-out efforts on two or three near-limit sport climbs. Pick routes that you’re not likely to flash, but have a good chance of sending on your second or third go. It helps to have a motivated partner (and good belayer) to take turns with. Rest at least 15-20 minutes between each attempt. Block out 2-3 hours for this session; you should aim for 4-8 quality attempts. Important: If a particular route is “shutting you down” or feels tweaky, immediately move on to another route.
Examples of anaerobic lactic focused exercises
- EMOM pull-up intervals. EMOM stands for “every minute on the minute.” In this exercise, you will do 5 pull-ups EMOM for 20 minutes. This makes for 100 total pull-ups. If you find this amount to be easy, then do 6 pull-ups EMOM for your next session! Increase as needed to make this protocol grueling.
- 7”/3” hangboard repeaters. Pick 3-7 grip types to train. In addition to the half-crimp and open-crimp grips, select a few others such as open hand, two-finger pocket (middle pair or inside pair), wide pinch, and narrow pinch. You will perform 1 (entry-level) to 3 (advanced) sets of repeaters with each grip position. Each set consists of 6 hang-rest intervals consisting of a 7-second hang and 3-second rest. Therefore, each 6-hang set will take about 1 minute. Add weight, as needed, to make each hang challenging but yet not so heavy that you can’t complete a set of repeaters. Rest 1-3 minutes between sets (limiting to 1-minute rest between sets will make this more lactic and grueling to perform).
- Campus board up-and-downs (large holds only). Using the largest rungs on a campus board, ladder up and down the board (using every rung or more every-other-rung) continuously for 20-60 seconds (hard). Rest 3-5 minutes before contemplating another set. Do 2-5 total ladder “up-and-downs.”
Looking forward
Now that I have walked you through various strength, power, and power-endurance protocols I challenge you to apply these concepts into your goal-directed training. In the fourth and final article, I’ll share how to train your aerobic energy system for resistance-style routes, and how to recover faster between boulders and routes. Until then, hit the gym, and try out a few of the power-endurance protocols detailed above!
The post Too Weak For Your Sport Project? Here’s What to Do About That. appeared first on Climbing.
]]>
Coach and elite climber Cameron Hörst highlights three all-too-common hang ups for sport climbers—and how to train them away.
The post 3 Common Projecting Mistakes and What To Do About Them appeared first on Climbing.
]]>This article is the second in a series of four. Read article one here—and check back next Monday for #3!
As a professional climber and coach, I see all sorts of projecting woes at the crag. Folks are too weak, too tired, too scared to fall, too scared to succeed. While each of these issues requires patience and keen introspection to overcome, weakness is generally the simplest to address.
If you are struggling to make links on your project, you have a weakness in one of your energy systems. (Check out this article for a debrief on the differences between Anaerobic Alactic, Anaerobic Lactic, and Aerobic.) Generally speaking, sport climbing demands that you optimize all three of your energy systems, since you must be able to power through severe crux moves while simultaneously resisting the fatigue of a sustained effort.
Any given sport climb, however, might have very specific demands that stress one energy system more than the other two. For example, an eight-meter “bolted boulder problem,” that you must redpoint in just 90 seconds, will call most heavily on the two anaerobic systems (alactic and lactic). Conversely, a 30-meter “resistance” route will be far more demanding on the aerobic energy system. Sure, your limited anaerobic reserves will be tapped for individual hard moves and sequences, but persevering for 10 or 20 minutes (or more) on a long, steep route is more of a test of your climbing-specific aerobic fitness.
Many climbers have a “weakest energy system.” Do you know which one is yours?
A weak system is the result of potentially favoring your most practiced form of climbing, your past and present ways of training, your sports history, and your genetics (i.e. are you fast-twitch or slow-twitch?). Let’s examine common signs and symptoms of a weak energy system. Reflect on your climbing struggles and see which sounds most familiar.
Scenario #1: “I’m unable to power through a short crux sequence.”
If you often feel underpowered on crux moves—or you can’t execute the single hardest move on a route—a weak anaerobic alactic system may be part of the problem. Of course, poor beta-recognition skills (or movement skills) might be preventing you from efficiently navigating those limit moves. But mental and technical skills aside, crux moves often have a high energy cost that you can only meet with a robust alactic energy system.
The solution: invest a few sessions per week into performing brief, high-power exercises such as 3- to 10-move limit boulders, max-weight hangboarding and pull-ups, near-limit campus boarding, and leveling up your core strength and stiffness. We will take a deeper dive into what this looks like in next week’s article.
Scenario #2: “I can’t link long, difficult sequences.”
If you frequently struggle to link long crux sections, then a weak anaerobic lactic system may be to blame. (Although, as I’ve said before, perhaps you’re powering out due to irrational fear, anxiety, overgripping, or improper pacing.) Assuming you’ve got smooth movement and a focused mind, the feeling of a rapid “power out” (i.e. the inability to climb hard, sustained movements for up to 60 seconds) is a sign of a relatively weak anaerobic lactic (glycolytic) system.
In absolute terms, the anaerobic lactic system is the least trainable of the three bioenergetic systems. However, over the short term (2 to 4 weeks) you can make meaningful relative gains in power-endurance through proper training. Therefore, a short block of focused lactic-system training might bump your anaerobic capacity enough to send your project sooner rather than later.
Climbing-specific interval training is the gold standard for leveling up your anaerobic lactic energy system. Intensity must be high (Rating of Perceived Exertion [RPE] of 8-9 out of 10) and the exercise duration should be 20 to 90 seconds, with a work-to-rest ratio of between 1:2 and 1:4. Commonly used exercises include bouldering 4x4s, Treadwall or spray wall intervals, hangboard repeaters, and pull-up intervals, to name just a few. I’ll provide a much deeper drill down on power-endurance training protocols next week.
It’s important to note that the above-mentioned lactic system training will not provide long-term gains by itself. Elevating your absolute anaerobic-lactic power output year over year demands simultaneously increasing your alactic (max strength) and aerobic power. Keep that in mind while you build your annual training program.
Scenario #3: “I struggle to recover at rests / I pump out near the chains.” (AKA You’re a punter!)
If either of these scenarios sound familiar, then your limiting physical constraints likely revolve around a weak climbing-specific aerobic base. No matter if your route is 15 meters or 30 meters tall, the majority of the energy powering you up the climb comes from the aerobic energy system. While you can rely on the anaerobic systems to get you through a short crux section or two, successfully climbing to the chains—and recovering at mid-route rests—is all about aerobic power.
A strong aerobic system demands a consistent, almost year-round commitment to high-volume climbing at least twice weekly. Like a runner training in their Zone 2, your goal of “Zone 2 climbing” is to climb many routes at or just below your flash level. Whether you do this at a sport crag, gym or home spray wall, the goal is to accumulate 30 to 60 minutes of actual climbing time on sub-maximal terrain.
Getting the intensity right is critical. Shoot for an RPE of 6-8 out of 10. Importantly, avoid climbs so hard that you get massively pumped or fall—these routes are too lactic and miss the target for effective aerobic-system training. Likewise, don’t waste your time on super easy routes that are mindless and effortless—there are no aerobic system gains from such low-intensity exercise. For experienced climbers, the aerobic training sweet spot is one to three letter grades below your current redpoint limit. Strive for a work-rest ratio of 1:1 or 1:2. Taking turns climbing and belaying with a partner is a perfect way to do this workout in the gym.
Final thoughts
Now that you have a conceptual understanding of your body’s three energy systems, you are empowered to accurately self-assess the root of your physical weaknesses as a route climber. Above I have outlined some basic training techniques for spinning up each energy system, and I will expand on each in future articles. Until then, happy climbing!
The post 3 Common Projecting Mistakes and What To Do About Them appeared first on Climbing.
]]>
When your kiddo mentions a sore finger that’s been hurting for days, take special note: kids aren’t immune to climbing injuries—and, in some cases, are even predisposed to them.
The post How to Prevent and Treat Finger Stress Fractures in Young Climbers appeared first on Climbing.
]]>Parents are understandably proud of their climbing kids. Perhaps the kids show incredible drive and passion for climbing, or have a natural aptitude for moving fluidly over rock and plastic alike. Maybe they are medaling in local or national comps. But when your kiddo mentions a sore finger that’s been hurting for days, take special note: kids aren’t immune to climbing injuries—and, in some cases, are even predisposed to them.
What is an Epiphyseal Stress Fracture, and Why Haven’t I Gotten One?
An epiphyseal stress fracture is a common overuse injury that occurs in the finger growth plates of youth climbers, often their middle fingers. Youth climbers commonly experience these injuries—which are small cracks in the bone—during or after periodized training plans, which involve climbing the same “style” of routes, or training via the same mechanisms, repeatedly over a period of weeks or months.
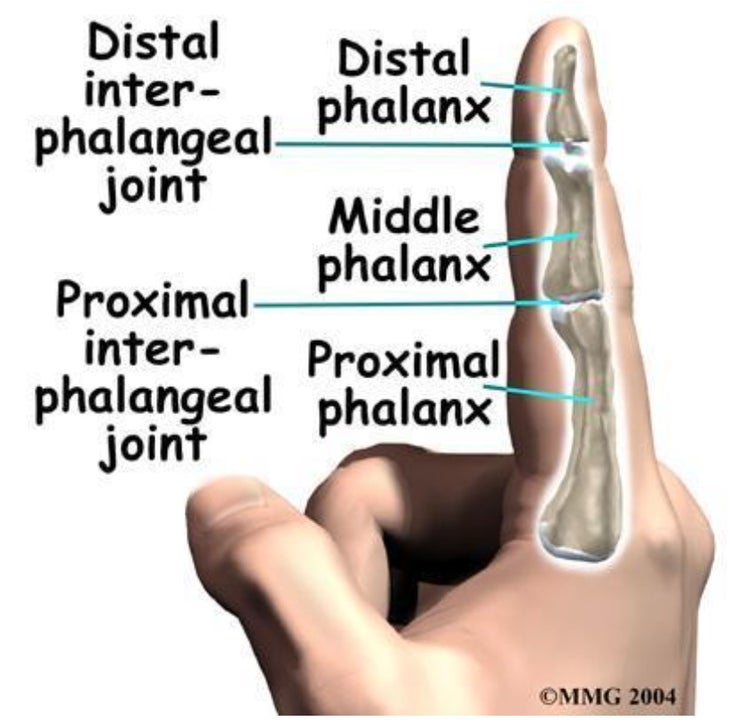
If you’re an adult reading this post, you’re probably wondering why you’ve never had an epiphyseal stress fracture in one of your fingers. The reason is simple: Adults are skeletally mature, meaning epiphyseal growth plates have fused, while youth and adolescent climbers remain skeletally immature until puberty ends. Let’s take a look at the anatomy of our fingers and the mechanism of these injuries.
Thumbs have two phalanx bones while our second, third, fourth, and fifth digits all have three. The phalanx bones are connected via synovial hinge joints with greater range of motion typically found into flexion versus into extension. Digits two through four have distal interphalangeal (DIP) joints (which are the first knuckle from the top of the finger) and proximal interphalangeal (PIP) joints (the second knuckle from the top of the finger). Thumbs contain only a PIP joint.
Phalanges are classified as long bones because they contain distal heads, bodies, and proximal bases. Rounded epiphyses can be found at both the distal and proximal ends of phalanges and are separated from the diaphysis by hyaline cartilage growth plates. Growth plates reach their softest and weakest points in childhood and adolescence, and are the most vulnerable to injury during puberty when adolescents realize significant bone growth.
Skeletal maturity is reached when epiphyseal growth plates fuse with the diaphysis, and is typically reached at about 25 years of age. Once the epiphyseal plate disappears, it is no longer possible for epiphyseal stress fractures to occur at the location of the epiphyseal growth plate.
Signs, Symptoms and Risk Factors
Epiphyseal stress fractures are the most common injuries for youth climbers. A study by Rachel N. Meyers et. al. found that these injuries often occur in the middle phalanx of the third digit, which typically receives the most force of any finger due to its physiology and biomechanical effectiveness. However, it is also possible for epiphyseal stress fractures to occur in the second and fourth digits based on finger length differences. For example, men typically have longer ring fingers than pointer fingers, and the reverse is typically true in women. Therefore, youth male climbers may put more force through their ring fingers while youth female climbers may put more force through their pointer fingers, thus making each respective digit more prone to stress fractures.
Typically, repetitive terminal extension of the DIP joint and simultaneous flexion of the PIP joint from chronic crimping in either the half-crimp or full-crimp position is the cause of epiphyseal growth plate fractures. Campus boarding, double-dyno moves, and the use of full-crimp positions are risk factors for developing epiphyseal stress fractures. These risks are even more pronounced during puberty or periods of sustained bone growth.
The onset of epiphyseal stress fractures is typically slow as the stress fracture develops over time. Bartschi et. al. found that none of the 28 youth climbers participating in their study reported a sudden, single traumatic event causing the fracture. Instead, all 28 of these climbers reported a gradual progression of pain during or after climbing over a period of two to six months. Pain is most commonly experienced during dynamic movement on small edges (i.e., campus boarding) or during the half-crimp and full-crimp positions. Tenderness of the back of the PIP joint is common along with swelling around the joint capsule. Additionally, climbers with these injuries commonly experience limited flexion range of motion in the PIP joint.
Below are common signs and symptoms of growth plate fractures:
- Tenderness on the back of the PIP joint
- Swelling
- Finger stiffness
Because crimping and dynamic movement places significantly more force through the fingers than activities of daily living, the impact outside of climbing is typically minimal. Symptoms can be aggravated during high-exertion activities such as lifting heavy objects or manual labor. The most impactful limitation outside of climbing may be participation restrictions for multi-sport athletes. Youth and adolescent climbers may be limited in motions such as throwing and catching which require flexion of the PIP joint and high impact to the fingers.
Assessment
Finger epiphyseal fractures are typically assessed with both a clinical examination and imaging. Clinicians should use the following considerations to rule in the likelihood of this diagnosis:
Age
Clinicians can rule OUT the likelihood of an epiphyseal fracture in adult patients. A study by Olva Kvist et. al. found that growth plates typically close in females by age 17 and in males by 19 . Patients significantly older than 19 years of age are unlikely to have an epiphyseal stress fracture. Clinicals should be cautious when using age as a diagnostic factor, however, because the timing of growth plate closure is variable.
Flexion Range of Motion in PIP Joint
Epiphyseal fractures typically lead to decreased flexion range of motion in the PIP joint adjacent to the fracture. Typical range of motion in digits two through five is between 100 and 110 degrees. Clinicians should perform both active and passive range of motion tests in the affected finger and compare their findings to the contralateral digit. If a growth plate injury on both sides is suspected, clinicals should compare flexion range of motion to digits two through five on each side. Clinicians should not use PIP flexion range of motion as the primary diagnostic test because limited ROM can present as a sequela to swelling due to a number of other common finger injuries (capsulitis, joint sprains, collateral ligament damage, and tenosynovitis).
Dorsal PIP Joint Tenderness
Finger epiphyseal stress fractures typically occur on the back of the proximal epiphyseal plate of the intermediate phalanx. Tenderness to the back (dorsal) aspect of the affected PIP joint can be a strong indicator of an epiphyseal stress fracture, especially if the patient has pain in the third digit.
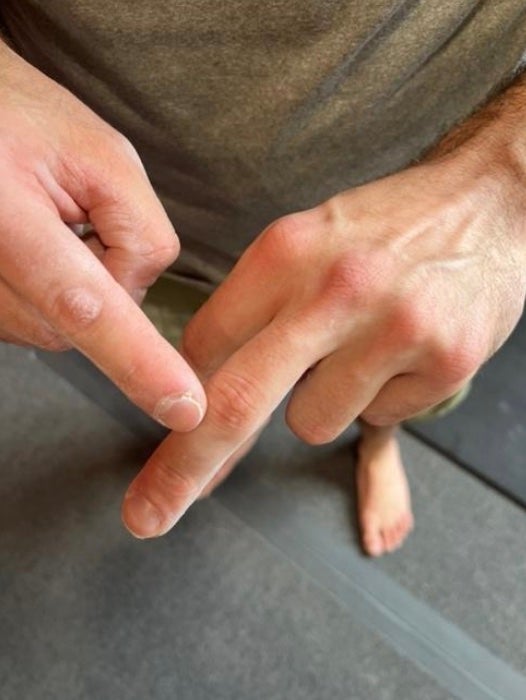
Ruling Out Pulley Injuries
While pulley injuries are a common finger injury in adult climbers, they are less common than epiphyseal stress fractures in youth climbers. Because the A3 pulley is located on the palmar aspect of the PIP joint, this diagnosis should be ruled out.
To rule out a pulley injury, clinicians should assess for tenderness on the palmar and lateral surfaces of the finger, and also perform a manual muscle test (MMT) of the flexor digitorum superficialis. If the patient does not feel pain on the palmar and lateral aspects of the finger and the MMT fails to elicit pain to the palmar aspect of the PIP joint, the clinician can rule out the likelihood of an A3 pulley injury.
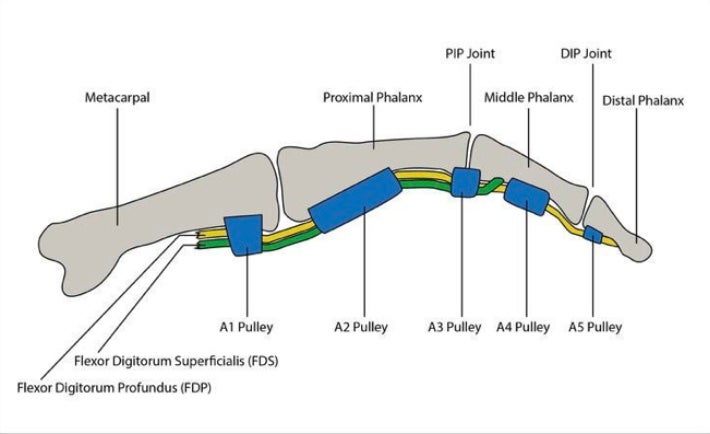
Ruling Out Tenosynovitis
Tenosynovitis is a common climbing injury that may also be brought on by overuse. Typically, Tenosynovitis results from an increase to training volume, intensity, or both. To rule out the likelihood of this diagnosis, clinicians should look for swelling that is diffuse to the finger with noticeable tenderness or swelling primarily to the palmar aspect of the finger. Conversely, swelling with epiphyseal stress fractures is typically more localized to the area surrounding the fracture and PIP joint.
Ruling Out Capsulitis
Capsulitis may present with symptoms quite similar to an epiphyseal stress fracture, including:
- Limited range of motion
- Pain with active finger flexion
- Swelling of the PIP joint
- Tenderness on the dorsal aspect of the PIP joint (although tenderness with capsulitis typically surrounds the joint)
- Occurs after overuse
Despite the similarities, there are some fundamental differences between these injuries. Pain with capsulitis typically occurs the morning after a climbing session due to the buildup of fluid that occurs after sustained use. Additionally, capsulitis may elicit a persistent dull, aching pain to the joint, while epiphyseal stress fractures typically elicits sharp pain during climbing. Another difference is that climbers typically experience capsulitis to the DIP joint, while epiphyseal stress fractures are more commonly found in the PIP joint.
Youth climbers experiencing pain on the back of the finger should seek imaging, and should suspect a growth plate fracture instead of capsulitis. If the imaging is negative, the injury may still be an injury other than capsulitis. Therefore, youth climbers should be careful with this diagnosis and obtain an opinion from a licensed physical therapist.
Imaging
Clinicians may use imaging to rule in the likelihood of an epiphyseal stress fracture. The Salter-Harris Type III is the most common type of fracture with these injuries, and is usually found at the dorsal aspect of the intermediate phalanx. This fracture passes vertically from the epiphysis through the entire growth plate, but does not impact the metaphysis.
Bartschi et. al. discussed that x-rays are the most common imaging tool used to diagnose these injuries, but found that x-rays do not effectively detect mild fractures unless providers assess both lateral and oblique views. Bartschi et. al. instead recommended using either an MRI or CT scan to effectively diagnose an epiphyseal stress fracture. Given that MRIs and CT scans are both expensive, and that CT scans use radiation, oblique plane x-rays may be suitable for diagnosing these injuries.
Prevention of Epiphyseal Stress Fractures
There are a number of climbing techniques that can be avoided or modified to prevent epiphyseal stress fractures. Additionally, youth climbers can safely follow some strengthening and stabilizing exercises that specifically aim to offload the amount of force through their fingers . Parents and coaches of youth climbers can implement the techniques discussed below to build better habits in their climbers and reduce the likelihood of developing epiphyseal fractures.
*The focus of this blog post is on the prevention of epiphyseal stress fractures. Therefore, a detailed rehabilitation protocol will not be discussed. Should you or your child currently have an epiphyseal stress fracture, please consider reaching out to a licensed physical therapist as soon as possible.
Additionally, you can find a great reference protocol by reading “Returning to Climb after Epiphyseal Finger Stress Fracture” by Rachel N. Meyers, et al. 9
Avoid or Modify
Double-Dyno Campus Boarding: Avoid
Meyers et al. found that campus boarding during childhood and adolescence is the single biggest risk factor for climbers developing early onset osteoarthritis. Additionally, double-dyno campus boarding is the biggest risk factor for developing epiphyseal stress fractures. Youth climbers should avoid double-dyno campus boarding until they reach skeletal maturity (Meyers et al. recommends that climbers less than 18 years old refrain from all double-dyno movement). Should youth climbers choose to campus board, they should periodize their training and only perform exercises that put relatively little stress through the fingers.
For example, youth climbers can campus board once weekly for three weeks, and should then refrain from campus boarding for at least one month before beginning their next three week protocol. I provide examples of relatively low-strain campus board exercises below.
1×1 Ladders: Matching
Climb rungs in numerical order while matching on each rung.
1×1 Ladders: Alternating
Climb rungs in numerical order but do not match. Instead, bump each hand to the next succeeding rung.
Offset Ladders
Start with one hand on rung 1 and the other hand on rung 2. Bump your hand from rung 2 to 3, and then the other hand from rung 1 to 2. Continue until the final rung.
Max Bumps
Start with hands matched on rung 1 and bump one hand up each rung in numerical order until failure. Repeat with the other hand.
Max Skips
Start with hands matched on rung 1 and make the biggest move possible with one hand. Then, drop back down to rung 1 and repeat with the other hand.
Weighted Hangboarding: Avoid
If you follow climbers on Instagram, you have likely seen videos of climbers hangboarding with an absurd amount of weight, or doing weighted pull-ups with an even more absurd amount of weight. You have probably also seen climbers send V15 and never make a single post about hang ing with weight!
The truth is that weighted hangboarding does make your fingers significantly stronger. However, this training technique places an extreme amount of stress through the fingers and is a major risk factor for youth climbers who have not yet reached skeletal maturity. Climbers less than 18 years old should avoid hangboarding with significant weight. Youth climbers can, however, train weighted pull-ups if they maintain a full overhand supinated or pronated grip on the pull-up bar.
Full-Crimp Grips: Try to Avoid
There are three types of crimp grips in climbing: Full-Crimp, Half-Crimp and Open-Hand Crimp. Each grip type listed above places a decreasing amount of force through the fingers. Youth climbers should try not to overuse full-crimp grips because full-crimping forces the DIP joints into terminal extension and increases the compression on the PIP joint, which is a major risk factor for epiphyseal stress fractures.
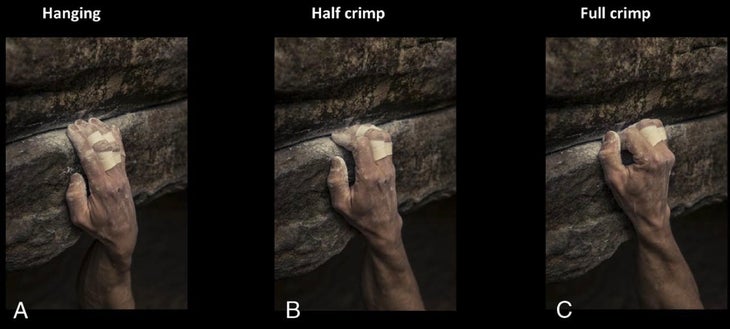
Prolonged Training Board Climbing: Be Cautious
The use of training boards has exploded since Ben Moon’s creation of the Moon Board in 2005 . Training with these boards has become a staple of many climbers’ training protocols due to the plethora of boulder problems programmed into each board, the variability in wall angle, and the ability to increase training volume in short sessions.
However, these boards place large amounts of stress through the finger joints, especially at steeper wall angles. Youth climbers should limit their climbing on training boards to twice per week, and should climb at angles where they can consistently avoid full-crimping while sending problems.
Synergistic Strengthening and Stabilizing
The following exercises are suggestions for strength and stability exercises that youth climbers can safely integrate into their training protocols. These exercises will increase the climber’s overall level of fitness, and help to offload a small amount of the force placed through the fingers while climbing by strengthening synergistic muscles and increasing joint stability.
Shoulder Exercises
Banded External Rotation: 3 Sets x 8-12 Reps
Hold each side of an exercise band and, with your elbows tucked at your side, move your arms outward until you meet maximal resistance. This exercise targets shoulder strength and rotator cuff stability.
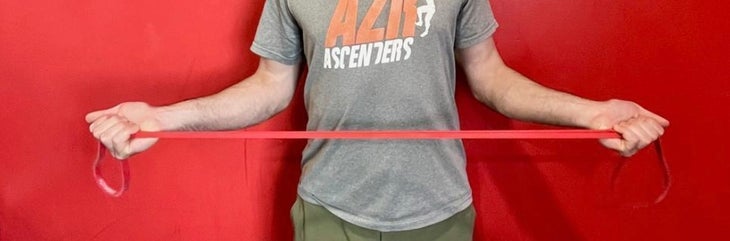
Banded Horizontal Abduction: 3 Sets x 8-12 Reps
Hold each side of an exercise band with your arms out in front and parallel to the group. Pull each side of the band until your arms are at your sides and the band is flush across your chest. This exercise targets shoulder and upper back strength.
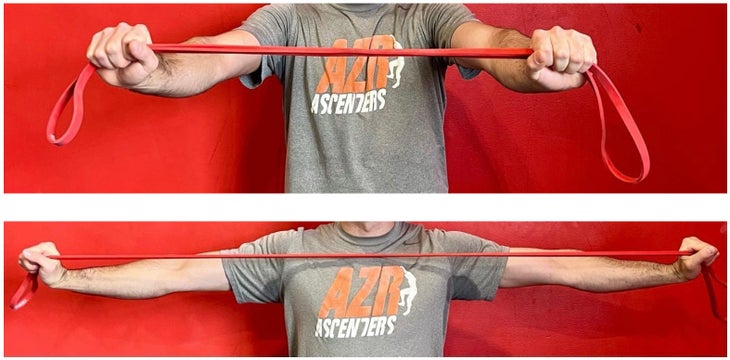
Type-Writers: 3 Sets x 8-12 Reps
Grab a pull-up bar with your palms facing forward and with your hands slightly wider than shoulder width. Pull yourself up until your shoulders are at equal height with the bar. Move yourself side-to-side and stop when you are either unable to hold the bar with the hand on the opposite side or you are no longer able to keep your shoulders at the same height of the bar. Each rep involves moving to both sides and back to the central starting position. This exercise targets shoulder strength.
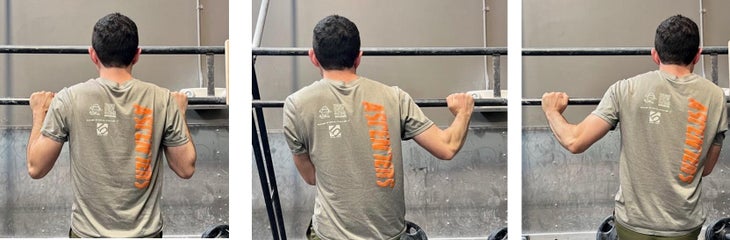
Is, Ys and Ts: 3 Sets x 8 Reps of Each Position
This classic exercise is effective for strengthening and stabilizing the shoulder, and can easily be progressed or regressed based on the climber’s ability levels. Begin with an inclined bench raised to 45 degrees. Rest your chest on the bench and, with dumbbell weights, complete eight reps of each exercise:
- I’s: Lift both arms out directly in front of you and then slowly return to the starting position
- Y’s: Lift both arms out in front of you but at a 45-degree angle away from your head. Slowly return to the starting position.
- T’s: Lift both arms out directly to your side at a 90-degree angle from your head. Slowly return to the starting position.
To regress this exercise, eliminate the use of weights. To progress the exercise, lay on an exercise ball instead of an incline bench and/or increase the weights of the dumbbells.
Wrist Stability Exercises
Wrist stability is vital to climbing and maintaining safe crimp grip positions. If you have been climbing for a long time, you have likely heard of someone injuring their TFCC (Triangular Fibrocartilage Complex). The TFCC is on the outside of the wrist and is particularly vulnerable to injury.
The following exercises will help you to stabilize and strengthen your wrist, further reducing the stress placed through the fingers. The goal of each of these exercises is to feel fatigued by the end of each set.
TheraBand Rolls: 3 Sets x 15 Reps
While holding a TheraBand out in front of you with both hands, roll each wrist forward and then back to the starting positions. Complete 3 sets of 15 reps with each hand. This exercise targets strength in the rolling hand and stability in the other hand.
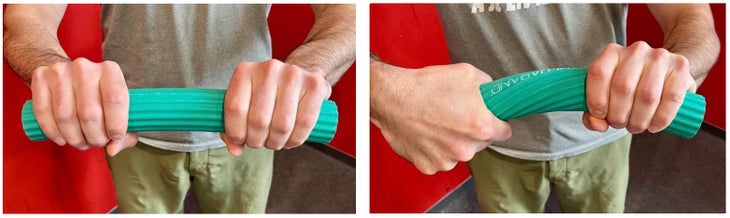
TheraBand Bends: 3 Sets x 15 Reps
While holding a TheraBand out in front of you with both hands, roll your wrist forward while bending the bar down and inwards. Complete 3 sets of 15 reps with each hand. This exercise targets strength in the rolling hand and stability in the other hand.
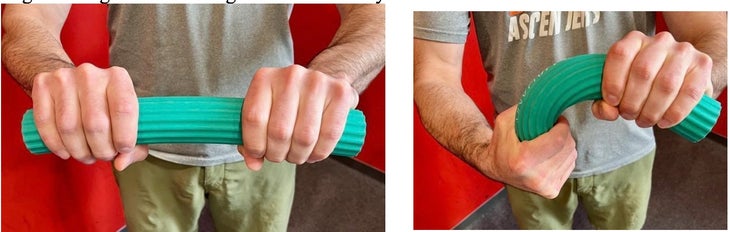
BOSU Planks and Pushups: 3 Sets x 30 seconds; 3 Sets x 10 Reps
Complete standard chest-down planks on the BOSU ball with your fingers facing forward. To progress this exercise, do BOSU push-ups instead. Keep in mind that the goal of this exercise is not primarily to increase push-up strength, but to increase wrist stability in weight-bearing positions. This exercise targets wrist strength and stability.
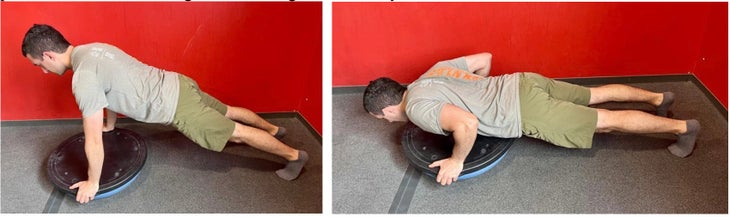
PVC Pipe Forearm Rotation: 3 Sets x 8-12 Reps
Hold a PVC pipe near its end and, with your elbow to the side and arm out in front, slowly rotate your wrist as far as you can to each side. Make sure to progress this exercise to feel fatigue by the last rep by either using a longer PVC pipe or holding the pipe closer to the end.
Core Strength Exercises
Core strength contributes significantly to climbing success, particularly on steep angles and in roofs. Maintaining tension and foot contact with the wall to avoid cutting feet can significantly reduce the stress put through the fingers when climbing. While cutting feet is typically associated with finger injuries other than epiphyseal stress fractures, consistent tension through the body may reduce the demands on the fingers when climbing steep angles, and could preserve the long-term integrity of the epiphyses.
The core exercises listed below are simply suggestions. Effective climbing core exercises work the abdominals, but also target back extensors, hip flexors, and glutes.
Hanging Leg Raises: 3 Sets x 8-12 Reps
Hang on a pull-up bar with your palms facing forward grip shoulder-length apart. While avoiding swinging your torso, lift each leg up in front of you individually until they are parallel to the floor, and then slowly return to the starting position. Repeat with the opposite leg. This exercise targets the lower abdominals and hip flexors.
Progress the exercise by lifting both legs at the same time. Progress the exercise further by doing the “Windshield Wiper” exercise (see video below).

High Planks and Variations: 3 Sets x 30 Seconds
Maintain a high plank position and complete one of the following exercises. Note that the exercises are listed in ascending order of difficulty, and this list can be used for exercise progression. This exercise targets abdominal muscles and back extensors, and also may work the shoulders and upper body.
- Maintain a high plank position, and lift each arm off of the ground and back into the starting position. Video here.
- Maintain a high plank position, and lift alternating arms and legs off the ground and back into the starting position. Video here.
Kettlebell Plank Pushes (Dalugas): 3 Sets x 10 Reps on Each Arm
Place a 30-pound kettlebell on a slider in front you. While maintaining a low plank position, push the kettlebell forward and pull it back towards your body (1 rep). Complete 3 sets of 10 reps with each arm. Each set should take approximately 45 seconds. This exercise targets core muscles, back extensors, and shoulders.
https://youtu.be/3SF1ROE-CBs?si=WqNLnpMCddN4rAoZ
See a Doctor of Physical Therapy
We have all heard the phrase “do not believe everything you read on the internet!” While this article and others may directly relate to you or your child’s injury, there is no substitute for receiving an expert opinion from a licensed physical therapist. They will consult evidence-based practice and their own experience to get you or your child back on the wall as quickly as possible. Ideally, seeing a physical therapist familiar with climbing can help you understand how the injury occurred and how to prevent similar injuries in the future.
Early diagnoses are key with epiphyseal stress fractures to prevent long-term damage. Meyers et al. found that youth climbers who train consistently on campus boards and experience epiphyseal fractures can experience early onset osteoarthritis up to 10 years after their injury. Additionally, improperly diagnosed and/or treated epiphyseal fractures can lead to incongruency of the articular cartilage and permanent damage to the finger.
It is helpful to understand the basics of how physical therapy operates in your home state. Some states have a direct access policy, meaning you and/or your child can seek care from a licensed physical therapist without a referral from a primary care physician. Also, some states have begun to allow Physical Therapists to order imaging that can reduce the time it takes to establish a proper diagnosis and begin treatment, and can reduce the likelihood of long-term damage.
About the author
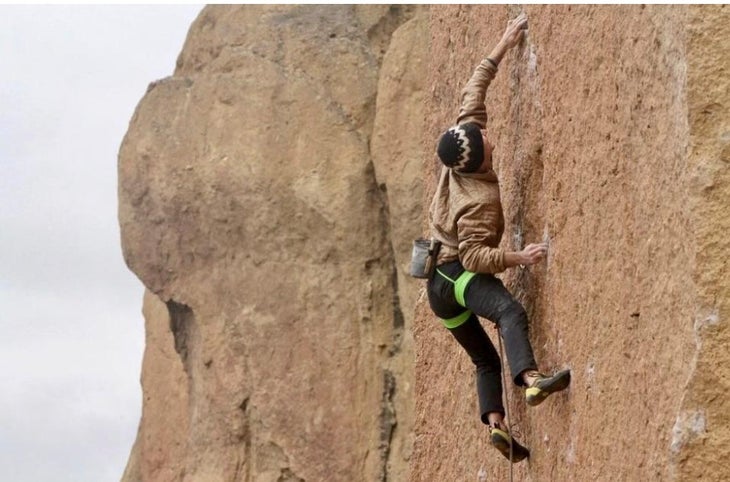
Daniel (Dan) White is a second year Doctor of Physical Therapy student and Research Assistant at The University of Colorado. He has been climbing since 2015, engaging primarily in sport climbing and bouldering. Dan worked as a competition youth climbing coach for the AZR Ascenders in Scottsdale, AZ, from 2017 until 2020.
Physical Therapy will be Dan’s second career as he coordinated medical residency and fellowship programs across Arizona and Oregon for eight years prior to beginning his DPT program. He is interested in pursuing a career in orthopedic and oncology physical therapy, and looks forward to spending his career working in the Front Range.
Dan lives in Denver with his wife, Cece, and spends his free time climbing, hiking, skiing (badly), and traveling. You can contact him via email (daniel.p.white115@gmail.com) or Instagram (@dan_white18).
About the contributors
Dr. Jared Vagy “The Climbing Doctor,” is a doctor of physical therapy and an experienced climber, has devoted his career and studies to climbing-related injury prevention, orthopedics, and movement science. He authored the Amazon best-selling book Climb Injury-Free, and is a frequent contributor to Climbing Magazine. He is also a professor at the University of Southern California, an internationally recognized lecturer, and a board-certified orthopedic clinical specialist.
To learn more about Dr. Vagy you can visit theclimbingdoctor.com or visit him on Instagram @theclimbingdoctor or YouTube youtube.com/c/TheClimbingDoctor
Kevin Cowell is a physical therapist, clinical instructor, and rock climber based out of Broomfield, CO. Kevin owns and operates The Climb Clinic (located at G1 Climbing + Fitness) where he specializes in rehab and strength training for climbers and mountain athletes. He found his passion for climbing in Colorado while attending Regis University for his Doctorate of Physical Therapy and has since become a Certified Strength & Conditioning Coach (CSCS), Board-Certified Orthopaedic Clinical Specialist (OCS), and a Fellow of the American Academy of Orthopaedic Manual Physical Therapy (FAAOMPT).
You can contact Kevin via email at kevin@theclimbclinic.com or by visiting www.theclimbclinic.com. Also, be sure to follow Kevin at @theclimbclinic on Instagram for free rehab and strength training resources.
Julien Descheneaux is a master of physical therapy who dedicates himself exclusively to rock climbing injuries, having treated over 1,200 climbers. He’s been covering Quebec competitions as a certified Sport First Responder since 2014. He is also the author of the online class “Climbing injuries at the upper quadrant” for the Quebec PT Board (OPPQ) and gives regular clinics and conferences on the subject. He founded PhysioHR in 2016, the first PT clinic inside a rock climbing gym in Canada and is currently the resident PT at Bloc Shop Chabanel.
You can contact Julien via email at julienlephysio@gmail.com or by visiting https://www.physioescalade.com/.
Todd Bushman is a doctor of physical therapy, clinical instructor, Certified Strength and Conditioning Specialist (CSCS), and climber of mountain, rock, ice, and plastic. Todd is a dedicated climbing specialist based out of Bozeman, MT where he practices full time. He is actively pursuing advanced training to become a Certified Orthopedic Manual Therapist (COMT) through the North American Institute of Orthopedic Manual Therapy. Todd is also available for remote consultation regarding climbing injuries, movement analysis, and strength training.
You can contact Todd via email at todd.climbingcoach@gmail.com or visit him @try.hard.pt on Instagram.
Carly Post is a physical therapist in Los Angeles, California. She is passionate about climbing and enjoys helping people move better and optimize their ability to participate in their lives to their fullest potential. She can be reached at carlypos@usc.edu and on Instagram at @carlypost
References
- Bärtschi N, Scheibler A, Schweizer A. Symptomatic epiphyseal sprains and stress fractures of the finger phalanges in adolescent sport climbers. Hand Surg Rehabil. 2019;38(4):251-256. doi:10.1016/j.hansur.2019.05.003
- Bone kistology. Crumbie L. Published August 10, 2023. Accessed December 5, 2023. https://www.kenhub.com/en/library/anatomy/histology-of-bone
- Caine D, Meyers R, Nguyen J, Schöffl V, Maffulli N. Primary Periphyseal Stress injuries in young athletes: A systematic review. Sports Med. 2022;52(4):741-772. doi:10.1007/s40279-021-01511-z
- Capsulitis and Synovitis Climbing – Swelling of the Fingers. The Climbing Doctor. Published April, 2023. Accessed December 1, 2023. https://theclimbingdoctor.com/swelling-of-the-finger-joints/
- Halsey T, Johnson MI, Jones G. Epiphyseal stress fractures of the fingers in an adolescent climber: A potential “Maslow’s Hammer” in Terms of Clinical Reasoning. Curr Sports Med Rep. 2019;18(12):431-433. doi:10.1249/JSR.0000000000000658
- Kvist O, Luiza Dallora A, Nilsson O, et al. A cross-sectional magnetic resonance imaging study of factors influencing growth plate closure in adolescents and young adults. Acta Paediatr. 2021;110(4):1249-1256. doi:10.1111/apa.15617
- Meyers RN, Hobbs SL, Howell DR, Provance AJ. Are adolescent climbers aware of the most common youth climbing injury and safe training practices?. Int J Environ Res Public Health. 2020;17(3):812. doi:10.3390/ijerph17030812
- Meyers RN, Potter MN, Hobbs S, Provance A. Finger stress fractures in youth climbers. Orthop J Sports Med. 2019;7(3 Suppl):2325967119S00065. Published 2019 Mar 29. doi:10.1177/2325967119S00065
- Meyers RN, Schöffl VR, Mei-Dan O, Provance AJ. Returning to climb after epiphyseal finger stress fracture. Curr Sports Med Rep. 2020;19(11):457-462. doi:10.1249/JSR.0000000000000770
- Phalanges of the hand. Rad A. Published November 13, 2023. Accessed December 5, 2023. https://www.kenhub.com/en/library/anatomy/the-phalanges
- Rock Climbing Finger Tenosynovitis. Simon A. Published March, 2022. Accessed December 5, 2023. https://theclimbingdoctor.com/rock-climbing-finger-tenosynovitis/#:~:text=Tenosynovitis%2C%20or%20inflammation%20of%20the,flexor%20digitorum%20profundus%20(FDP).
- Sims LA. Upper extremity injuries in rock climbers: Diagnosis and management. J Hand Surg Am. 2022;47(7):662-672. doi:10.1016/j.jhsa.2022.01.009
- Wrist pain from slopers? Here’s the fix. Yarin, J. Published December 20, 2022. Accessed January 14, 2024. https://www.climbing.com/skills/wrist-strengthening-rehab-climbers/
The post How to Prevent and Treat Finger Stress Fractures in Young Climbers appeared first on Climbing.
]]>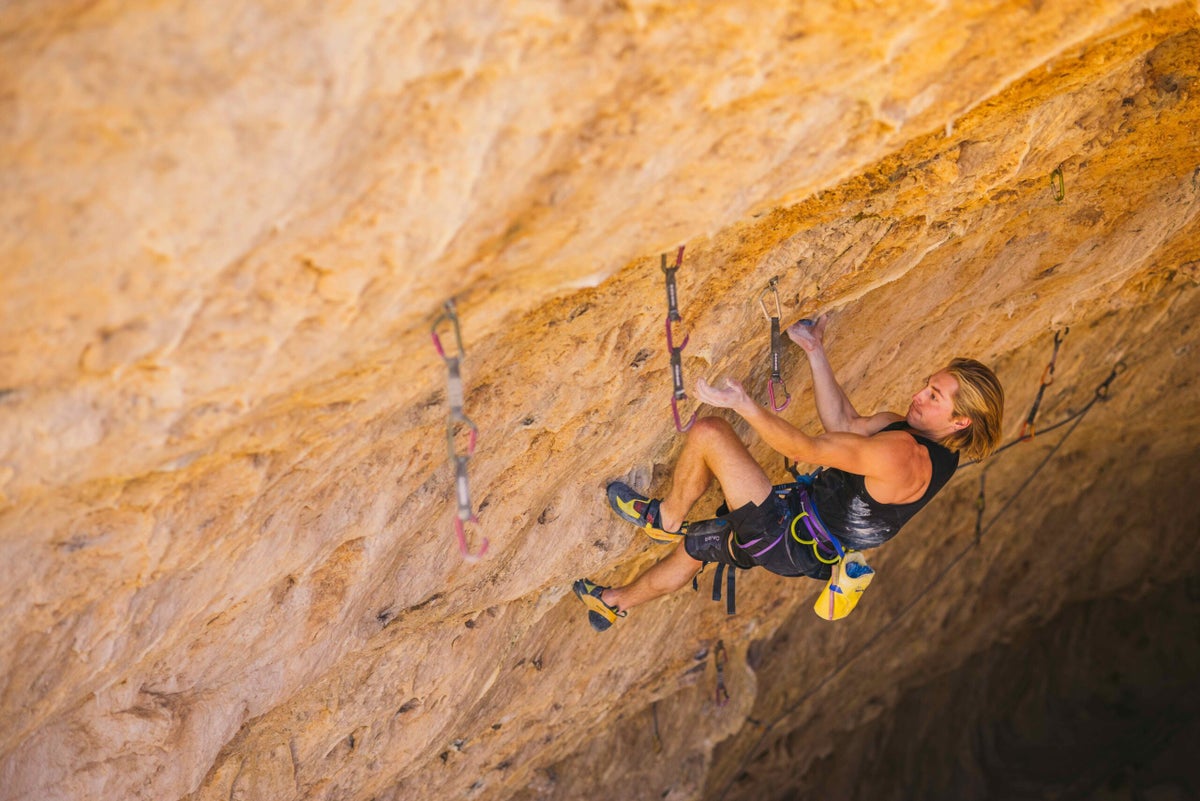
Cameron Hörst highlights two common hiccups in multi-session projecting—and how you can put them to bed.
The post A Pro’s Advice for Short-Term and Long-Haul Projecting appeared first on Climbing.
]]>I often give uninspired attempts on my projects during the first few sessions—hanging on nearly every bolt—despite being a professional climber. To a bystander, it would seem unlikely that I would ever link the sequences of a steep, physical 30-meter cave route together into a send. But over 15-plus years of climbing, and actively studying the “art” of projecting, I’ve learned that the most important part of projecting is learning from my repeated failures. By incorporating this feedback, and dialing in my sequences and strategy, I often see rapid progress from my initial attempts.
So how do you craft an efficient redpoint strategy? And what happens when your project is truly at your limit? It’s all too easy to get stuck in a loop of failure that lasts weeks or months.
In this article, we’ll examine two scenarios common in multi-session projecting. Depending on your situation, the solution to sending may be technical and quick to remedy, or it may be physical and take a month, a season, or more to level up for the send.
Scenario #1: “Any Go Now!”—You’re close to sending the rig
This scenario is characterized by the “one-hang ascent”: often falling off before the anchor, a key rest, or at the end of the crux sequence. When you’re in this situation, don’t despair—instead, be stoked that with some tactical adjustments you are sure to send:
How to Send
Optimize Your Warm Up
A poor warm up equals a wasted attempt—and potentially a vicious flash pump that wrecks your entire day. By contrast, a slow, thorough warm up allows you to wield all the strength, power, and endurance you trained so hard to acquire.
Many climbers do a quick warm-up comprised of a few hangs, pull-ups, and stretches. While this might suffice for a sub-maximal route, success on a limit route demands that your alactic power is fully turned on and your aerobic energy system is fired up.
Turning on your finger strength and upper-body power is best achieved using a portable hangboard. Do a series of progressively strenuous movements such as dead hangs and pull ups. If you’re able, add weight or use progressively smaller holds as you feel your body turn on. Follow this with some shoulder and torso mobility work (for a route at my limit, I will do shoulder circles, neck rolls, sagital and lateral leg kicks). Finally, don’t forget to do at least one set of push-ups—vital for activating your scapular stabilizers.
Activating your aerobic and lactic energy systems is best done on an appropriate warm up (a route with a similar angle, but easier than your project) or going bolt-to-bolt on your project. Either way, be sure that this warm up ascent is strenuous enough to produce a moderate pump, but not a deep, exploding “flash pump.”
Refine Your Beta
Don’t fall into the trap of believing that the first beta you used is the best beta. If you’ve only put in a few goes on the project, there’s a good chance you can further refine your sequences and increase your efficiency of movement. Be sure to focus on non-crux sequences, too. These “filler” sections of a project are often overlooked on the hunt for beta, but they will decide how pumped you’ll be when you engage in the true crux.
If you’re faced with an especially long and/or complex crux sequence, commit to trying a half dozen or more hold and sequence variations. Get creative and a little crazy—this just might give you the beta breakthrough you need!
A final, huge tip: On your formative “working burns” on the project, try to identify the critical rest positions. Knowing the location of all the shake-out positions will allow you to leverage the powerful send-strategy of “sprinting from one rest position to the next.” Learn more about pacing here.
Improve Your Mental Game
This concept is simply too broad to thoroughly address here so I will provide some simple yet profound advice: Optimize your intentions before starting a redpoint attempt.
If you tend to carry a lot of nervous energy up a climb, take a few slow belly breaths to tamp down that inner buzz. Nix any thoughts of “needing to send” or fears of failing (again) by focusing on just the moves ahead of you. Better yet, before climbing, vow to “have fun” no matter the outcome. By letting go of outcome-oriented thoughts, you are liberated to climb your best and enjoy the experience. (Check out Climbing’s “mental training” page for more expert advice.)
Scenario #2: “I’m Getting Worked”—You’re Nowhere Near Sending
If you’ve already logged several days on the project, and progress is slow or imperceptible, then you’re likely in the midst of a long-haul adventure that will demand you become a better, stronger climber. Unfortunately, there is no quick fix to magically piece together a redpoint ascent.
If you’ve succeeded in doing all of the moves, but with many hangs, then you might be able to gain some momentum via the tactic of low-pointing—that is, linking progressively longer sequences up to the anchors. If gains remain slow, you might need to put the project on hold and return in a month or two as a stronger, fitter climber. If you are a relatively new climber (two years or less in the sport), your “training” may just mean improving movement efficiency, or garnering more confidence on lead (by lead climbing more often). However, if you are a rather experienced climber pushing your limit, I have some tips you can implement into your climbing specific training.
Heading back to the gym for some project-specific training is a smart move, but it involves much more than just hitting the hangboard. You need a sober understanding of your physical constraints, specific to your project’s demands. Ask yourself: Does the challenge revolve around doing a difficult boulder problem, or hanging on through a series of pumpy, submaximal sequences?
If it’s the former, then a strength- and power-training block, including limit bouldering sessions, will help you level up. I recommend two of these strength/power/bouldering (SPB) sessions per week, along with two maintenance endurance sessions (done on the day after your SPB session). On the other hand, if you’re failing to redpoint due to the aggregate load of climbing the entire route, then you need to level up your endurance. The pathway to better on-the-rock fitness is climbing more!
Make it your goal to climb four days per week, with at least three of these sessions spent mostly on a rope (gym or crag). Hitting the right training zone is the key here—your goal is not to try maximal routes on every session (a common mistake). Instead, execute two sessions of high-volume submaximal climbing (one to four number grades below your redpoint limit). Round out your week with one strength/power/bouldering session (as maintenance) and one near-limit session of route climbing. The latter is best done in a climbing gym on routes within one number grade of your limit.
After a one-month block of route-specific training, take a few “deload” days and then return to the project for a few attempts. How do you measure up? If progress remains elusive, then you may want to pick another project for the time being and set your sights on returning to the mega-project next season.
To wrap up
In the next article, we’ll dig deeper into energy system training. I will describe even more complex (and very common) scenarios you may face while projecting and the ways you can overcome them with strategic training. Then, at the end of the series, we will go through various climbing-specific exercises you can implement in your training to take your redpointing to a new level!
The post A Pro’s Advice for Short-Term and Long-Haul Projecting appeared first on Climbing.
]]>