Climbing gyms make fantastic training and learning environments, but they differ greatly from real rock outdoors.
The post Transitioning From Gym to Crag is Tricky—But It Can Also Be Fun With These 5 Tips appeared first on Climbing.
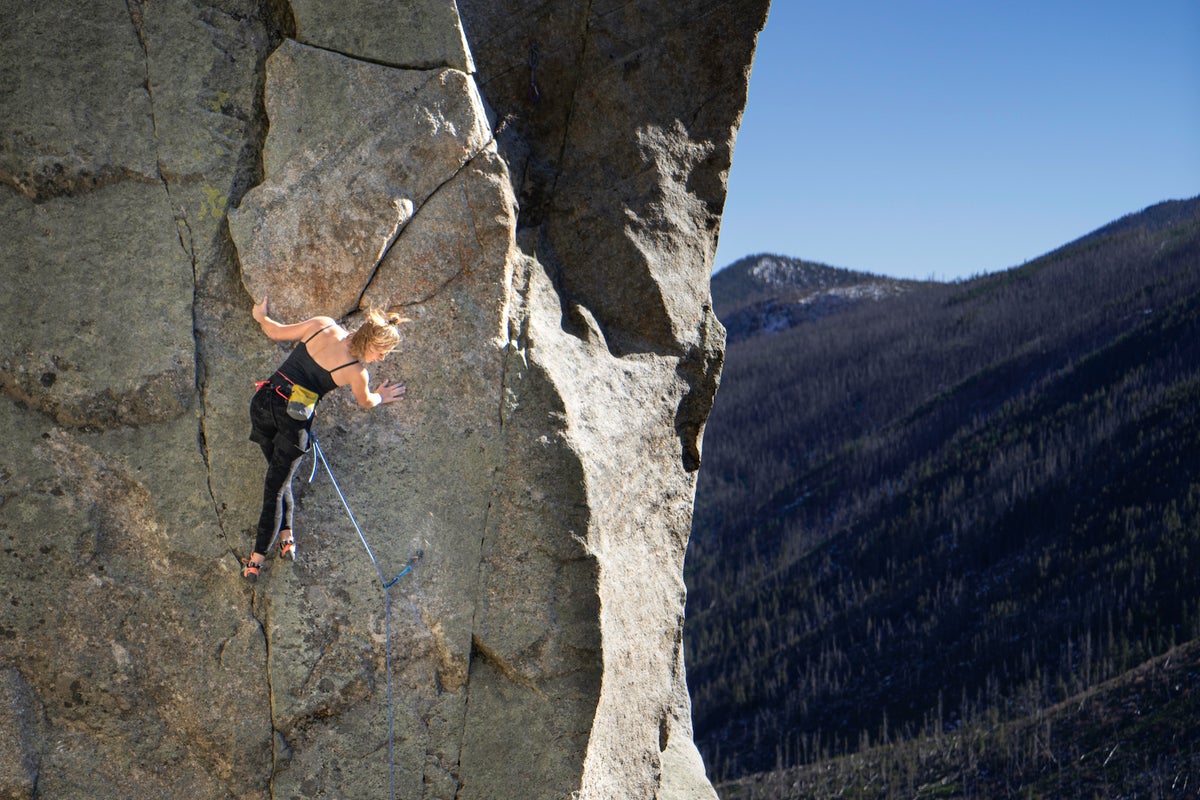
]]>We’re full bore into a climbing gym boom. There are more gyms than ever, and that’s great for the sport. What we’re also seeing is a mass migration of first-timers from the indoors to outside crags. After a few recent visits to classic crags in the Northwest, my head was spinning from all the incorrect procedures bred from the gym. Although these plastic paradises make fantastic training and practice environments, they also facilitate or even reward some bad habits that can hold you back or be downright unsafe outside.
We all start off as clueless gumbies. But we don’t have to—and shouldn’t—stay that way. Observe, ask, and emulate the habits of more experienced climbers. Their practices are produced by years of experience and hundreds of days climbing outside, but you can jump-start your transition to outdoor master by avoiding these five common mistakes.
1. Don’t lead belay while standing far away from the base of the wall
This “stand back and observe” habit is a function of wanting to view the entire pitch while belaying, and some gyms require that belayers anchor themselves into the floor, typically 10 to 15 feet from the base of the wall. At the crag, stand adjacent to the wall, directly beneath the first bolt or piece of protection and slightly to the side of the climber, moving around if you have to. In the event of a fall, you want to be pulled up, not slammed forward into the wall. As the climber moves up a few bolts, you can step back just a bit, but you should remain relatively close to the first bolt. You’ll spend more than half your climbing time belaying, so it’s important to develop your safe-catch skills as much as you develop your climbing technique. For an array of intermediate and advanced tips on becoming a more proficient belayer, check out “5 Tips for Safer Belaying.”
For a demonstration of what happens when the belayer stands too far from the wall when catching a trad fall, watch this weekend whipper.
2. Don’t anchor yourself in at the base of the wall when belaying single-pitch routes
Unless the route begins off a narrow ledge or your climber massively outweighs you, it’s better to be mobile and able to step side to side or be lifted up off the ground in the event of a large fall, which gives your climber a softer, more comfortable catch. This mobility will help you avoid small falling rocks and ensure low-impact catches on marginal gear, two considerations that don’t come into play when gym climbing.
3. Do spot your climber before they have the first bolt clipped
Gym floors are covered by huge mats of soft foam while crags are strewn with sharp talus and tree roots. Falling from the start of a route outside, even just a couple feet up, can have devastating consequences, especially if the climber isn’t wearing a helmet. Until the first bolt or piece of gear has been clipped, don’t consider yourself a belayer, consider yourself a spotter. Ensure that the belay device is rigged correctly and then feed out more than enough slack to allow the climber to reach and clip the first piece of protection. (The rope is useless until it’s clipped to something.) As the climber begins the climb, take both hands off the rope and belay device and focus on spotting the climber. Your goal is not to catch them if they fall, it’s to minimize the consequences. As she’s clipping the first piece, get into proper belay position.
For advice about how to spot effectively outside, check out “Everything You Need to Know to Boulder Safely”
4. Don’t walk around in climbing shoes
Rather than walking around on (relatively) clean cloth floors as you are in the gym, when you’re outside you’ll be walking across gravel, mud, grass, desiccated guano, you name it. Your climbing shoes rely on pure contact between the rubber and the rock, so even a super-thin layer of dirt in between will reduce the friction. Furthermore, that dirt will over time damage your shoes and the rock (it coats the first few holds of the route in whatever you just stood in before starting up the wall, which not only makes holds slippery, but is also pretty bad etiquette).
5. Do ditch all of those “not for climbing” accessory carabiners
This might seem too cautious, but I’ve seen multiple novice climbers accidentally grab a plastic toy carabiner (which for some inexplicable reason is clipped to their harness) when they meant to grab a full-strength piece of gear. Leave those fake ones for your keychain, and if you must clip your shoes, water bottle, or chalkbag to your harness make sure you use a fully strength-rated carabiner.
The post Transitioning From Gym to Crag is Tricky—But It Can Also Be Fun With These 5 Tips appeared first on Climbing.
]]>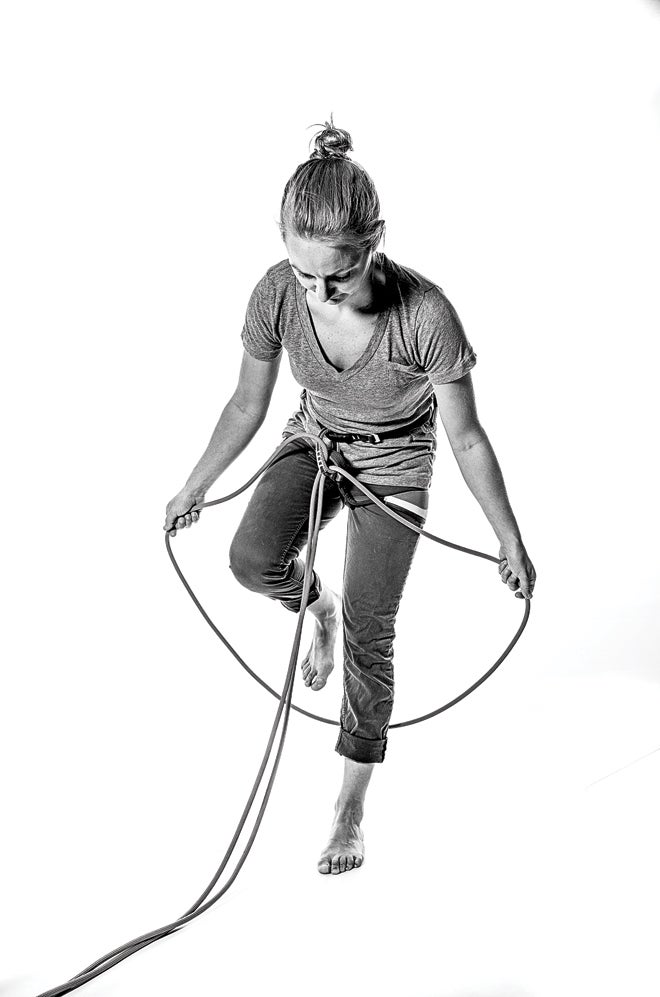
The alpine girth-hitch. The seldom-used alpine butterfly knot has long been considered the gold standard for climbers when tying into the middle of the rope. Prestigious guide services and hallowed tomes like Mountaineering: Freedom of the Hills teach the butterfly for glacier travel and any other time you need to attach yourself to the rope … Continued
The post How to Tie an Alpine Girth-Hitch appeared first on Climbing.
]]>
The seldom-used alpine butterfly knot has long been considered the gold standard for climbers when tying into the middle of the rope. Prestigious guide services and hallowed tomes like Mountaineering: Freedom of the Hills teach the butterfly for glacier travel and any other time you need to attach yourself to the rope quickly without having access to either end. Yet the butterfly doesn’t get used for much else, and such neglected skills tend to get rusty. Fortunately, there’s a faster, simpler, and more secure option that exists: the alpine girth-hitch. Unlike the butterfly, this method doesn’t require using an extra locking carabiner, and it relies on a basic technique that most climbers employ regularly. You simply girth-hitch yourself into the rope.
Step 1

Step 2

Step 3

The Real World
Just like clove-hitching into a carabiner at an anchor, you can easily work a few feet of slack through the hitch in either direction to fine-tune your attachment point without ever disconnecting from the rope. In addition to tying into a rope for glacier travel, this is an excellent way to quickly attach yourself to a secondary point on the rope for shorter pitches when rock climbing. For example, if you had been belaying like normal up a long route, but now you want to keep less rope between you and your partner for a stretch of simul-climbing or a shorter pitch, simply stay tied into the end, throw a few coils around your neck, and girth-hitch yourself into the rope at the desired spot.
The only drawback I have found for this method is that you need a few feet of slack to connect and disconnect from the rope. When you initially create the girth-hitch around your belay loop, cinch up both sides of the rope to snug everything into place. Some benefits: It doesn’t need extra carabiners, uses less rope in its final form, can never be unclipped from your harness like a butterfly, is adjustable without completely undoing it, and is easy to remember. For a quick and easy on/off rope connection that eliminates the need for a carabiner in the system, keep this skill in your bag of tricks.
Blake Herrington writes and climbs in Leavenworth, Washington, and has done more than 15 alpine first ascents in British Columbia, Canada, Alaska, Patagonia, Colorado, and his home range in the Cascades. Follow his adventures at blakeclimbs.blogspot.com.
The post How to Tie an Alpine Girth-Hitch appeared first on Climbing.
]]>
Dripping tufas and one-of-a-kind features characterize the walls in Spain. A liter of wine costs less than two dollars. Plump and juicy olives sit piled high at the corner market fresh from the farmer, and a gaggle of children kick a soccer ball back and forth on their way to school. Every day begins with … Continued
The post The Way to Tranquilo: How Spain is Paradise for Every Climber appeared first on Climbing.
]]>
A liter of wine costs less than two dollars.
Plump and juicy olives sit piled high at the corner market fresh from the farmer, and a gaggle of children kick a soccer ball back and forth on their way to school. Every day begins with a delightfully cheap café latte and a stroll through the warren of narrow back alleys and quaint apartment buildings. We sit among the open-air fruit stands eagerly pawing through a guidebook and drawing curious stares from locals. After loading ropes and water bottles between the seats of our tiny rental car, we’re off—following a maze out of town through the high-walled, cobblestone one-ways. Limestone is calling, and we are on our way.
I flew into Madrid in early February and met my friend and photographer Forest Woodward, and we immediately set off in our impossibly cheap rental car. (Seven weeks for $300, courtesy of Spain’s Priceline equivalent: doyouspain.com.) We took turns on the six-hour drive south and quickly figured out that our miniature car was ideal for navigating the narrow roads of old Spanish towns.
All the hype you’ve heard about Spanish sport climbing is absolutely true: It’s the best in the world—even if you don’t touch 5.14, 5.13, or even 5.12. The J-shaped coastline on the Mediterranean offers everything from limestone caves that never see rain to multi-pitch bolted 5.9s above historic Roman ruins. These aren’t just the 5.impossible overhangs of areas like Siurana, Margalef, and Oliana, but warmer and drier regions with thousands of routes spanning the full range of grades and lengths—there’s something here for climbers of all stripes. For a sunny destination between November and April when your home crags are probably gray and cold, the overlooked southern and eastern edges of the Iberian Peninsula provide a low-priced getaway and the relaxation of a climbing life lived tranquilo. Here’s a sampling of some of the best climbing outside of Catalonia.

El Chorro
The largest climbing area in southern Spain includes the gorge and limestone walls above the hamlet of El Chorro, in the province of Andalucía. With daily trains reaching a station just five minutes from the climbing, it’s an excellent choice for those visiting without a car. A handful of rental homes and hostels nearby means El Chorro is well-suited for a quick trip, those who demand logistical simplicity, and those who want to dig in for a while. Walk to overhanging 5.14s, eight-pitch moderates, and everything in between. A great area intro is a 600-foot 5.9 called Amptrax, which tackles a sweeping buttress on one of El Chorro’s biggest, highest walls. The route’s eight pitches of fully bolted limestone will earn you views of a campground and river valley below. But you’ll stay within sight of the nearby bar and café, making it easy to beeline toward après-climb libations. The area’s showcase wall, the Makinodromo, is a 45-minute walk along the train tracks that wind through the slender El Chorro Gorge. “El Maki” soaks up winter sun, making it pleasant throughout the holidays when temperatures are generally in the 50s and 60s. Water-streaked tufas form El Chorro’s highest quality stone, with varnished stripes, dense route concentration, and lines that angle from vertical to overhanging.
The climbing in Spain, regardless of the region, is typically steep and powerful, with routes conveniently close together. A standard low-5.12 pitch may have no move harder than 5.11-, but you’ll be doing those moves for the entire pitch and lower off more pumped than you’ve ever been. Consequently, it’s easy to have a productive and full climbing day in a few hours by maximizing sun or shade. If you’ve got a car, visit the pipe-like tufas and pockets of Loja, the shady walls of Desplomilandia, and the clean 5.8 to 5.9 slabs of Turon, all covered in El Chorro, by Mark Glaister ($37.50, wolverinepublishing.com). We found helpful route suggestions from bar owners and other patrons as we snacked our way through dinner at various spots, and we gained a serious appreciation for how the Spanish culture fosters the kind of social interactions that are rare back home. Cheap red wine and simple tapas done right probably don’t hurt, either.

On rest days, El Chorro offers a plethora of vacation-worthy activities, and this is where southern Spain truly shines as a destination: The coast is never far away and varies from white-sand beaches to scenic rocky breaks. In February and March, it wasn’t warm enough for us to swim, but wetsuit-clad surfing was popular. The beach-side city of Málaga makes a great destination for a waterfront stroll, or visit the Pablo Picasso Museum near where the artist once lived. Try out the unforgettable via ferrata that twists through El Chorro Gorge. A climbing harness and a couple of long slings keep you on the new steel cables, which run for one kilometer above the Guadalhorce River. Whitewashed buildings and bright red roofs characterize the architecture near El Chorro, but explore the cities casually on foot because the alleys have a tendency to dead-end or suddenly be too narrow for a car. If none of that suits your fancy, then practice the Spanish art of simply living well in a slow-paced culture that honors the daily siesta and embraces quality relaxation time as an unquestioned necessity.
Although I did bring a tent and small stove on the trip, we only used them on a handful of “unplanned roadside bivies” when driving between rural crags. Basic public or government-run campgrounds that abound in the States simply don’t exist in Spain. But one of the best things about the country is the low price of housing. Many of the large climbing areas are served by private campgrounds or hostels with bunks in the $15 to $25/night range, but we found apartments to split for less than that. Learning the language or traveling with a partner fluent in Spanish (as I did, luckily) helps in chatting up a local climber or business owner about private rooms in the area. The entire southern and eastern coast of Spain saw a frenetic housing boom in the 1990s and early 2000s—prior to the current national recession—and the area only bustles with tourists from June to September, so the off-season creates an abundance of inexpensive rentals. We booked the first few days in the hilltop village of Ardales after some basic online searches, and then used locals’ info to find one- or two-bedroom apartments with kitchens and laundry a short walking distance from climbing—all for about $200 per week. When going to a new location, book your first few nights beforehand, but don’t hesitate to ask around for cheaper, unadvertised flats to rent for the rest of your stay.
Costa Blanca

After a few weeks in Andalucía, Forest and I joined more friends and moved east to Costa Blanca, the sheltered Mediterranean shore along Spain’s interior. The Costa Blancan beach towns are a favorite summer spot for northern Europeans, and they host a surprising array of businesses advertising in English, German, Dutch, and Scandinavian languages. We did a few minutes of Googling for cheap rentals, and soon hooked up with an ex-pat British couple who own property in Spain. We rented another apartment, this time a few blocks from the beach in the town of Calpe. The one-bedroom flat with pool access, a kitchen, and a fold-out couch set us back $250 for the week, and the beach was a mere three blocks away. Ten-pitch routes were about one kilometer down the coast. Despite tales of shoulder-to-shoulder crowds in high season, the streets and shorelines were largely empty in March, and we seemed to have local bakeries and markets to ourselves. We could walk along the sea for a few minutes to the Penon d’Ifach, where six- to 10-pitch sport climbs ran up a wave-swept limestone tower. The peak’s walk-off descent traces a well-worn path used for centuries by lookouts of the Roman, Arab, and Spanish empires, though the only aggression apparent to us was that of quarrelsome seagulls fighting over our scraps of salami.
Some beach towns like Benidorm and Alicante are dominated by modern construction and foreign tourism, but just a few miles inland, a different and more traditional Spain emerges. Terraced olive and almond groves spread thousands of feet up hillsides, and tufa-draped crags such as Gandia and Sella sit among rural farming towns 30 minutes from the sea. Though luminaries of Spanish climbing such as Dani Andrada and Ramón Julián have established many of the region’s 5.14 lines, the climbing is varied and unforgettable in the 5.9 to 5.11 range. Sculpted stalactites with deep pockets require acrobatic hero climbing, with big moves and three-dimensional sequences not often found on routes with such moderate grades. South- and west-facing walls receive generous amounts of winter sun, and hot days during the shoulder seasons can be split between cool mornings at an inland crag and warm, pleasant afternoons on a largely empty beach.
Basque Country and the North

Of course, you can’t completely ignore the famed areas in Catalonia, where the sheer volume of hard routes is mind-blowing, but the colder and rainier weather frequently kept us indoors when we visited for a few weeks during early spring. It wasn’t too bad, though, as we acquainted ourselves with the soccer standings and refined our tastes in hard cheeses and local wines. Barcelona proved a very walkable city, with a good subway system and a dense urban center built upon a gently sloping coastal plain. The museums, architecture, and metropolitan feel are unlike anything in the more rural south, and climbers traveling on the cheap will appreciate that many of the town’s art and history museums are free on Sundays. Margalef, Siurana, Montsant, and the Riglos are just a few of the deservedly famous northern Spanish stops for a traveling climber; they offer thousands of stellar routes that are by no means over the heads of moderate sport climbers. But Catalonia and Basque Country tend to be quite cold during midwinter, and they lack the convenient beach access and tend to be more crowded because they are closer to major cities.
After six weeks of wandering Spanish hillsides, crags, and back alleys, we deemed the country a mix of a cleaner, first-world Thailand and a less crime-ridden El Potrero Chico in Mexico. Spain holds the long bolted limestone walls that make Potrero so well-known, but the shorter and steeper climbing is often no less featured, acrobatic, and gymnastic than the cartoonishly juggy, steep walls of Southeast Asia. The Mediterranean coast is an almost-too-perfect winter destination with appealing culture, easy living, and endless limestone that make leaving the hardest part.
Beta
-
Guidebook: The British company RockFax (rockfax.com) has excellent English-language guides to El Chorro/Andalucía and Costa Blanca available for purchase in the U.S. at wolverinepublishing.com.
-
Get There: Fly in and out of Madrid, which typically costs about $1,200 round-trip. Kayak.com was useful for searching and tracking fares. A five- to eight-hour drive gets you to any of the climbing described, but other options would be to connect through on smaller flights (read: more expensive) to Málaga, Alicante, or Granada. Fast and efficient trains also connect daily from Madrid and Barcelona to almost anywhere else in the country.
-
Car: Personal transportation is a necessity for any trip other than a quick visit to El Chorro (accessed via daily trains from Madrid and Málaga). We found one- to two-month rentals from doyouspain.com for $200 to $300. Many credit cards offer built-in car insurance, so see if you’re already covered before shelling out another $50 to $100 for insurance from the rental agency. We rented a car in Madrid but spent little time in the big city where driving was terrifying.
-
Gear: Nearly everything is bolted. Take a single 70-meter rope in the 9.1mm to 9.5mm range, a set of 20 quickdraws, and some slings. Going to Spain for the occasional trad climb would be like going to Yosemite to clip bolts.
-
Season: Although it can be cold and wet during midwinter, the Costa Blanca and Andalucía provinces generally provide excellent climbing conditions from October through April. Be diligent about chasing sun or shade to make the most of your conditions; most areas provide numerous options.
Muscle Memory: How One Backsliding Climber Happily Came Back to the Sport in Montserrat
By Amelia Blanquera

With more than 350 routes on impeccable rock, one has to wonder why Montserrat is not as famous as other Catalonia climbing areas that are known the world over. Top out at dusk, and you see the Pyrenees in one direction and the night lights of Barcelona in the other. There are pinnacles and needles galore. The trailheads are easy to spot, thanks to the handiwork of the Parc Natural de la Muntanya de Montserrat. Effortless access, aesthetics, and year-round climbing beckon to all climbers. Instead, the mountain’s main attraction is La Morenata, a 12th-century statue of the Black Madonna housed in a Benedictine monastery atop the north side of the peak. In this unlikely spot, I rediscovered climbing.
There was a period in my life when I climbed nonstop, hitting Red Rock, Joshua Tree, Yosemite, and Seneca Rocks. I thought of the Gunks as my local crag. But I had become a backslider, “too busy” with work commitments in New York City; I hadn’t touched rock in three years. The day before I left New York, I ran into an old friend who gushed about the climbing in Spain. My harness and climbing shoes were the last things I packed. Climbing was not a primary reason for my trip; I came to Spain as the writer-in-residence at the Can Serrat Artist Residency in El Bruc at the base of Montserrat, about 45 kilometers from Barcelona. Serendipitously, the farmhouse where Can Serrat is located is also the home of the Montserrat Art & Climb Association. Started in February 2013, it’s an association for “people who love the mountain.” Guests are welcome to borrow ropes, draws, harnesses, shoes, topos, maps, and guidebooks. The massif looms large behind the farmhouse.
“The rock is special,” said Lisi Roig, a local guide. We met at the inaugural event for Montserrat Art & Climb Association last April. The big bash included an art exhibit, climbing videos, and live bands. Despite the pouring rain, more than 100 people came, even the guy, I’m told, who lives in a cave. If Lynn Hill were Catalan and a proficient watercolorist, she would be Lisi. We discussed why I don’t climb outdoors as much as I used to. I gave the lame excuse that my partners got married and had kids. She seemed content with that response, although I was not. I needed a local climbing partner, but I was afraid I’d hold Lisi back.
One morning I hiked along the dirt access road at the base of the cliff and ran into Vincenzo Contino, an Italian who had come by Can Serrat. He had been living for a month in a tricked-out van with a platform bed and gear storage. He and I walked to Agulles, an area rife with intermediate sport routes. The gray rock was conglomerate with pockets, crimps, knobs, and lots of pebbles. From the guidebooks I had read back at Can Serrat, I knew the massif had sport, trad, and aid climbs 5.5 to 5.13 starting just off the path, and that footwork and balance were the keys rather than big, powerful moves. I thought it a mellow, straightforward place to get back on the rock. We made plans to come back the next day and climb. During our hike back to El Bruc, we had an easy-flowing conversation about religion, the Spanish economy, and his daughter. Mostly Vincenzo talked and I listened. At one point, something got lost in translation, and he made his move. I dodged his kiss with a laugh, and then he taught me the Spanish phrase No me molesta, which means “Do not bother me.” I decided to find another climbing partner.
Antonio Garcia Picazo is a hero among Montserrat climbers. “We grew up in his shadow,” local 40-something climber Salva Figueras told me. On a rainy morning in Barcelona, I met Antonio’s climbing partner, Miguel Montserrat Armstrong, and he agreed to introduce me to the legend.

Antonio has been climbing since 1973 and has written several books, including the definitive guide to climbing in Montserrat (printed in Spanish only). He put up what is considered one of the classics in Montserrat, ValentÍn-Casanovas (7c/5.12d) in 1976 when he was 19. Of the hundreds of routes he established, Antonio described 60 of them as possessing “supreme elegance.” He says, “Beautiful climbing is what is simple, elegant, aesthetic, logical. There is no substitute. This mountain is full of poetry.”
I asked Antonio why Montserrat wasn’t well-known internationally. “It’s better that it remains unpopular,” he told me—half joking, half serious. I decided to set aside my last week in Spain to focus solely on climbing. I made dates with Antonio and Miguel, and then another with Lisi. And I met another climber-artist, Erin King, and her husband, Rob, from Boulder, Colorado, and borrowed draws, biners, runners, and two ropes. We set out to climb at the areas called Buddha and Gandolf, which had routes starting at 5.8, and just like that, the muscle (and mental) memory kicked in. That knob over there to the right? Yes, that’s a good foothold. Reach up and stick your two fingers into that pocket. They’ll fit, I promise. Where do you want to put your left foot? Not there. Can you get it a little higher? A little bump? Or smear. Nice, that’s it. Now shift your weight and reach left. It looks slopey from below, but—hey!—it’s positive if I lean a tiny bit right. Excellent, now move your right foot up.
When I first arrived, I used not finding a perfect partner as an excuse not to climb, but the truth is that I was afraid of being bad after so much time away. Finally getting back on the rock reminded me that the spirit of climbing isn’t about being good or bad. It’s about enjoying nature and spending time with friends.
Climbing rewards perseverance, but the sport isn’t only for elite athletes. These are essential lessons if you are to climb through every stage of your life as I now aim to.
As a gift to the Montserrat Art & Climb Association, I left my old harness and approach shoes. With little resources, the Association is able to provide support and good cheer to newbies and experts alike. It’s a good place to get acclimated to Catalonia rock and tap into the local climbing scene, not to mention an awesome place to kick back, grab a burger, see some great artwork, and take in a live band.
I considered leaving behind my climbing shoes, too, but I didn’t: My time at Montserrat renewed my passion for climbing. I’ll head home, find a partner, and go straight to the crag.
The post The Way to Tranquilo: How Spain is Paradise for Every Climber appeared first on Climbing.
]]>
4 easy steps to a bomber V-thread, plus tips on how to use it
The post How to Build a V-Thread Ice Anchor appeared first on Climbing.
]]>Long rappel descents can quickly turn into expensive ordeals when you have to leave gear behind for each rappel anchor. Whether you planned to descend by rappel or you have to because the weather went bad or an injury occurred, getting strategic about your rap anchors can save you gear that you might need later on—and save you some cash.
Fortunately for those seeking terra firma in winter or on an alpine objective, ice typically provides a much more favorable medium for descent than bare rock. Not only does the chance of rock fall decrease, but you can rappel with minimal gear using a V-thread ice anchor. The technique below creates a safe, fast, and cheap ice rappel anchor that you construct with a few screws and some alpine ingenuity.
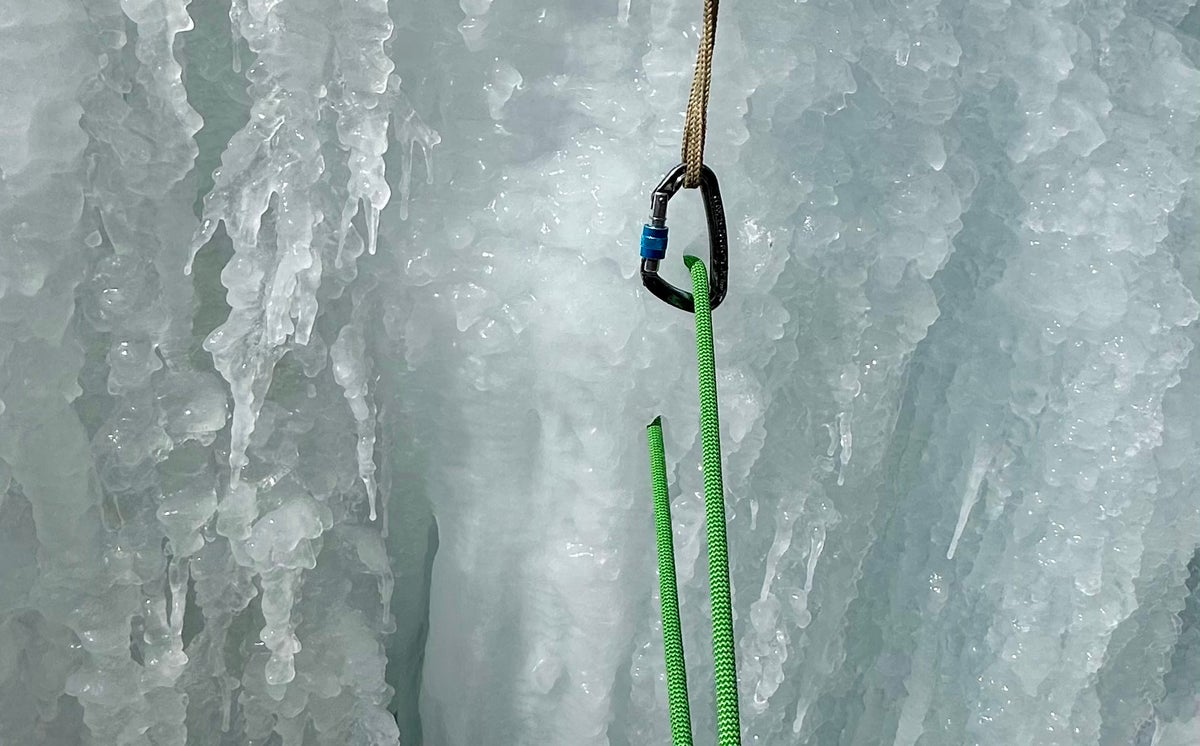
V-thread ice anchors 101
Also known as Abalakov threads, V-threads consist of two connected holes forged with an ice screw through which you can thread your rope. You can also use a V-thread—with an equalized back-up—as a belay anchor to bring your partner up on a multi-pitch climb, or as a top rope anchor.
V-threads are most commonly used as rappel anchors on long ice climbs. Even on alpine rock climbs or mixed routes that don’t require ice screws for protection, carrying a single 19-22cm ice screw opens up more options for rappelling. Using a screw to construct V-thread anchors is cheaper than building rock rappel stations. Since you don’t have to locate cracks for rock anchors, this technique allows you to descend the full length of your ropes each pitch, as long as there’s ice near the ropes’ ends for the next anchor. Once you pull the rope, only two holes remain in the ice.
That said, you should add a back-up for any V-thread ice anchor. Ideally, this back-up consists of an equalized anchor made from two ice screws. In a pinch (and less ideal), you could also back up your V-thread with a single ice screw placed above the V-thread. Whether you use an equalized two-screw anchor or one screw, you’ll attach this back-up to the rope with an alpine draw, without weighting it. In order to avoid leaving this backup screw and draw behind, the heavier climber(s) can rap down first with the back-up intact to test the V-thread anchor. Then, once you’re confident your V-thread rap anchor is bomber, the last (and lightest) climber to rap down can remove the backup before they descend.
Lastly, a V-thread anchor is only as strong as the ice it’s built from. Look for thick stretches of ice without any visible air pockets or color variation that isn’t picked out from past climbers. If the ice shows signs of melting or deterioration, it’s not going to support a strong V-thread.
Naked V-thread vs. cord
While a “naked thread”—wherein the rope is threaded directly through the V-thread—is usually fine, in very cold conditions, your rope can freeze into the V-thread and become stuck. This can make it difficult if not impossible to pull the rope after you rap. Generally speaking, if temperatures are cold (below -22 degrees Fahrenheit/30 degrees Celsius) and wet, you should plan to thread cord or webbing through your V-thread to anchor the rope, instead of threading the rope through directly. However, this will mean leaving your cord/webbing behind, so you’ll need to bring extra for the ride down.
How to build a V-thread ice anchor for rappelling
Visual learners, you’re in luck. We’ve put together a video tutorial demonstrating how to construct a V-thread and backup. At the end, we also demonstrate how to turn a practice V-thread into a refreshing booze luge using just a single ice screw. Choose your drink of choice and experience the true meaning of “ice cold. ”
Need step-by-step instructions? Here’s how to build that V-thread, one step at a time:
Step 1: Make your holes

While clipped into to a two-screw or other equalized anchor, drill your “V” with any 19cm or longer ultralight ice screw. The point of the “V” in the ice should ideally form at least a 60-degree angle. Orienting the two holes in line vertically (one on top of the other) rather than horizontally has shown to produce a slightly stronger anchor. This orientation also makes it easier to thread the rappel rope, as you’ll have gravity working with you as you slide the end into the upper opening. Either orientation in good ice is strong enough for a bomber anchor.
Step 2: Begin threading the cord or rope

To get the cord or rope through the V-thread, you’ll need some sort of wire to guide it through. While specialized “V-threader” tools are available, they aren’t necessary. The cable from a small nut works well, or you can also make your own V-thread tool using a clothing hanger (this is what’s used in the video above).
Slide the wire into one of the ice screw holes, just past the point at which the ends of the holes intersect. If your openings are aligned vertically, slide the wire cable up into the lower opening. Make sure to turn the loop of the wire so it’s facing toward the tube where the cord/rope will come in.
Now slide the cord/rope down the top hole and through the wire, far enough that some rope extends past the wire loop. This tail is necessary to pull the cord/rope through the bottom hole.
Step 3: Pull the cord or rope through

Once you feel confident that the cord/rope is through the wire loop, slowly begin to pull the nut or other end of your V-thread wire tool out of the bottom hole. Sometimes it helps to slightly twist the nut (about a half-turn), so the cord/rope is securely caught in the wire loop.
Once you get the end of the cord/rope out, you should be able to feed the rest through the anchor, just as you would a two-bolt anchor or rappel rings. As with any other rappel, try to get the middle of the rope in the center of the anchor. The same process works for threading sling or cord.
Step 4: Set your backup
Place a screw about the length of an alpine draw above the V-thread. Attach it with an alpine draw to the rope. There should be a little slack in the draw—you don’t want this back-up weighted so that you can effectively test the V-thread anchor with the first rap.
Rappelling from a V-thread
Rappelling is one of the most dangerous aspects of climbing (get some general tips for doing it safely here), so you’ll want to make sure you get the sequence of rapping with a V-thread anchor right. Because you’re creating your own anchors with just a few screws as you go, it’s critical to follow a set sequence so the first person rappelling has the necessary tools to make the next anchor. At each anchor station, you’ll actually be drilling two anchors: one to clip into when waiting to rappel down the next pitch, and one for the next descent.
The first to rap should descend from the original anchor equipped with 2-3 screws and other protection required to build the next anchor. As the second rappels, the first should build an equalized ice screw anchor to clip into, then build the next V-thread anchor at least 12 inches below that anchor. The sling running through the upper anchor can then be clipped onto the rappel rope as a backup with a few inches of slack in the connection.
A veteran alpinist and outdoor writer, Blake Herrington has made dozens of alpine first ascents (and rappels!) without placing a single bolt.
The post How to Build a V-Thread Ice Anchor appeared first on Climbing.
]]>
Bonus uses for your digital camera Halfway up a new route, roofs and blankness loomed above. Where was the long hand crack that had lured us up here? I pulled out my camera and scrolled through photos of the face, taken earlier from camp. After identifying our position on my glowing camera screen, I saw … Continued
The post Worth a Shot appeared first on Climbing.
]]>Bonus uses for your digital camera
Halfway up a new route, roofs and blankness loomed above. Where was the long hand crack that had lured us up here? I pulled out my camera and scrolled through photos of the face, taken earlier from camp. After identifying our position on my glowing camera screen, I saw that a short traverse rightward would bring us below the splitter, and from there the route-finding looked simple.
A digital camera can do more than capture memories of your climbs. Whether new routing in the mountains or redpointing at the crag, put your point-and-shoot to use with these tricks:
Route topos: Paper topos get torn or dropped. Take a few photos of your topo or guidebook pages for mid-route reference.
Redpoint beta video: After a section of climbing that you hope to try again another day, make a voice or video recording of what gear you needed (or wish you’d had) and any move-by-move details you might want to remember for round two.
Terrain overviews: Snap reference photos of a peak, cliff, or a convoluted approach before you begin—this is especially useful on complex or crevassed terrain. If fog or darkness is about to overtake you, take a few shots of the route ahead, and use these images to help identify your position.
Route-finding breadcrumbs: As you do a cross-country approach, take pictures of landmarks behind you for reference during the hike out.
Online beta at your fingertips: When you check online resources for route information, maps, or driving directions, bring it all along by snapping pictures of your computer screen.
Flashlight: The flash of a camera, or the flashlight app for iPhone and iPod Touch, can shed a bit of light when your headlamp goes dead.
The post Worth a Shot appeared first on Climbing.
]]>
Mickey Mouse Wall and the twin summits forming its namesake “ears” loom above the eastern ramparts of the Colorado Rockies. Outside the borders of Eldorado Canyon State Park, Mickey Mouse offers an array of stellar routes. The sandstone has fractured into cleaner vertical lines than nearby Eldorado, leaving splitters and dihedrals in place of face … Continued
The post Captain Beyond (5.10c), Boulder, Colorado appeared first on Climbing.
]]>, Boulder, Colora")
Mickey Mouse Wall and the twin summits forming its namesake “ears” loom above the eastern ramparts of the Colorado Rockies. Outside the borders of Eldorado Canyon State Park, Mickey Mouse offers an array of stellar routes. The sandstone has fractured into cleaner vertical lines than nearby Eldorado, leaving splitters and dihedrals in place of face holds. But despite it being visible on the horizon, a mention of the wall is often met with blank stares. The crowds are kept down by the hour-long approach and by the cliff’s annual raptor closure. For those willing to make the trek, Mickey Mouse’s 500-foot south face holds a classic five-pitch trad route, Captain Beyond.
The route begins with two pitches of 5.10- vertical finger and hand jams. With a paucity of face holds, these pitches require true crack climbing. Above a long, sloping ledge, the 5.8 third pitch starts off with the climb’s mental crux and most dangerous section: a slab just off the belay where a fall would land you back onto the ledge. Higher up, a tall, thin flake juts upward. The steep fist crack separating the flake’s inside edge from the wall’s face comprises the physical 5.10c crux of Captain Beyond. But with a double set of cams up to four inches, the pitch never requires climbing too far above your gear. The final lead shifts left before ascending a spectacular hanging dihedral via well-protected stemming and crack climbing up to 5.10b. Scramble to the Middle Tower of Mickey Mouse for unrestricted views of the Front Range and the planar prairie.
Captain Beyond was first climbed at 5.8 A1 in 1963, by the connoisseur of Colorado classics, Layton Kor. Eleven years later, Boulder’s prolific Briggs brothers, Roger and Bill, freed the entire route. Although the approach may be long by Front Range standards, Mickey Mouse’s 40-plus trad climbs soak up sun and are usually sheltered from the wind, providing a beautiful respite from winter shadows.
The Beta
SEASON: Boulder Open Space and Mountain Parks institutes a yearly raptor closure from February 1 to July 31, and it’s often too hot in spring and summer. The fall and winter months provide the most comfortable conditions on these sunny crags.
GUIDEBOOK:Eldorado Canyon: A Climbing Guide, by Steve Levin
GEAR: A double set of cams to four inches, with a single set of nuts; 10 slings
APPROACH: With a brisk pace and knowledge of the trails, Mickey Mouse Wall can be found in under an hour. First-timers and those with a leisurely pace will want to plan for 90 minutes from the car. Half a mile east of Eldorado Springs, on Hwy. 170/ Eldorado Springs Drive, turn south on CR 67 and park at the gate a quarter-mile up the road. Hike up the gravel roadbed, making an unmarked right turn at a road intersection after a half mile. This gravel road becomes the “Fowler Trail” and is signed as such. Follow the Fowler Trail past multiple smaller paths leading to the right. When a gated road forks off to the right, continue straight for 100 feet and follow a smaller path to the right. This is marked as a “Climbers Only” trail. Follow this straight uphill to the railroad tracks. Turn left and follow the tracks for 10 minutes. The track runs through two tunnels; walking through them is the most popular option, but is illegal. Both tunnels can be skirted by walking around on the hillside, adding five to 10 minutes to the approach. Immediately south of the second tunnel (labeled as “T6”), turn right. The Mickey Mouse Wall will be facing you on the adjacent hillside. Captain Beyond is located roughly in the middle of the Mickey Mouse Wall, beginning with a hand and finger crack through an offwidth slot and roof.
DESCENT: Scramble west (climber’s left) to the first large notch, and make three single-rope rappels with a 60-meter rope.
The post Captain Beyond (5.10c), Boulder, Colorado appeared first on Climbing.
]]>
How to find and quickly collect water in the high alpineWhile in Alaska’s Mendenhall Towers last July, my partner and I found ourselves in the warmest weather system in years. For climbers like us hoping to establish new alpine rock routes, the timing was perfect. But with 20-hour days and a desire for light packs, … Continued
The post The Wetter, the Better appeared first on Climbing.
]]>
How to find and quickly collect water in the high alpineWhile in Alaska’s Mendenhall Towers last July, my partner and I found ourselves in the warmest weather system in years. For climbers like us hoping to establish new alpine rock routes, the timing was perfect. But with 20-hour days and a desire for light packs, we had a serious challenge finding enough to drink on the walls. Whether you’re running a 5.4 ridge or a 20-pitch alpine 5.12, the dilemma is often the same: how to stay hydrated on the go in alpine terrain.
Sure, water usually flows in snowy terrain on a peak’s lower slopes. But when you head up a long ridge or rock face, dehydration becomes a real issue. That’s why on our Mendenhall climbs, though 1,000 feet of granite separated us from flowing water below, we consistently sought out and utilized snow patches and melt pools, supplementing our H?O supply quickly and easily.
Here are a few techniques I’ve learned/refined that will minimize your pack weight while keeping you hydrated for the crux pitch.
On the ApproachIt doesn’t make sense to save weight on the walk-in with a trimmeddown rack, but then schlep several pounds of water past flowing streams. I use a map, local Beta, or distant views to determine where I can find water on the hike. Will I encounter a moraine stream? Stumble across tarns? Cross beneath a seeping glacier? Rather than haul extra pounds, I’ll stop to drink water when/where it’s flowing. Purifying drops, iodine, or an inline Frontier Pro filter each weigh fewer than two ounces.
Prepping to ClimbIf overnight temperatures won’t drop too far below freezing, collect or melt all your water the pre-climb evening, and ideally have enough already melted in your cookpot for coffee or breakfast. You can also add an electrolyte powder to your drinking water that evening, making it less likely to freeze and making you more likely to drink on route. Meanwhile, if melting dirty or debris-laden snow, reuse a cleaned-out coffee filter to strain out pine needles and spruce beetles (unless you want to include the latter “protein booster”).
What To CarryA dromedary bag becomes smaller as it’s drained, taking up less pack space. However, it’s hard to gather flowing water with only a bag. I’ll also add one wide-mouth bottle per person — total water carried will be about 6.5 liters (including the four-liter dromedary bag for the team). With a goal of drinking four liters each during the day, you and your partner would want to collect an additional liter each while you climb.
Packing Water should represent the heaviest item in your pack and, as such, should sit low in the bag and close to your body. Use a hose system for drinking, which will allow you and your partner to share water and drink with the pack on, reducing the risk of droppage or spillage. Drink from the collapsible bladder first (see above), refilling it with your bottles, which are better suited for collecting drips and snow.
Water-Gathering Techniques Never pass up an opportunity to refill or rehydrate. I’ve learned and employed the following methods to keep myself and my water bottles topped off while climbing.
Belay StrategyBuild belays on ledges that contain snowpatches or seepage. An auto-locking device allows you more easily to collect water or drink from what’s “on tap” while you belay.
The Harvest
When you grab or cut snow chunks to add to your water bottle, collect from the
bottom
edge of a snowfield or serac. This snow is heavily saturated with percolation and will add more water than the same snow volume gathered from above. If climbing across easy ground, harness-clip your bottle and frequently add handfuls of snow to your water, without stopping. On a warm, sunny day, this snow will melt or form a drinkable slush — bring a 7-Eleven straw and some Gatorade powder for a poor-man’s Slurpee.

Curtain Call
Water running down a face in a broad, yet shallow, curtain can be hard to collect. Here’s a trick: remove your jacket and long-sleeved shirt, and then spread and flatten your hand across the rock, giving the wet slab a chest-level “high-five.” The water will collect on your fingers and run down to your elbow in a stream; fill your bottle from this drippage point.

Straw Man
Pocket a straw and a small Ziploc baggy, to collect or drink from drips and puddles. Press your Ziploc against a seeping face, conforming it to the rock. Now fill the baggy, empty it into your bottle, and climb on. Even if you don’t feel thirsty, small pools on route represent some of the quickest and easiest water sources. In cases like this, leave your water bottle packed, pull out the straw, and drink. Another bonus: alpine drips and pristine melt-pools generally don’t require purification, and you can pick up that free straw while restocking your supply of Wendy’s spoons en route to the trailhead.
Blake Herrington’s love of free condiments and Saltines has led him to creatively use straws, spoons, and other gas-station freebies while climbing on three continents. His skill with scarce H2O conditions is ironic, since he lives in the waterlogged North Cascades.
MORE TECH TIPS:
The post The Wetter, the Better appeared first on Climbing.
]]>
If it’s not quite big-wall free climbing, it’s the next best thing. It sure felt big to me when my first trip up Davis-Holland to Lovin’ Arms yielded close-up views of BASE jumpers and bald eagles, both taking flight as I tried my best not to. With a crux of well-protected 5.10 moves and a … Continued
The post Davis-Holland to Lovin' Arms (5.10c), Index, Washington appeared first on Climbing.
]]>If it’s not quite big-wall free climbing, it’s the next best thing. It sure felt big to me when my first trip up Davis-Holland to Lovin’ Arms yielded close-up views of BASE jumpers and bald eagles, both taking flight as I tried my best not to. With a crux of well-protected 5.10 moves and a stunning position above the Central Cascades’ Skykomish Valley, this six-pitch line on Index’s Upper Town Wall provides even the weekend warrior with an unforgettable dose of exposure.

Looming above the mossy hamlet of Index, Washington, the Upper Town Wall provided Yosemite training (and adventures in their own right) to folks like Fred Beckey and Jim Madsen. The Davis-Holland route was climbed by Dan Davis and John Holland in 1964, offering a direct passage for three pitches before veering left and finishing up a major, vegetated weakness. In 1980, Don Brooks pushed a line straight above pitch three’s belay, creating the Lovin’ Arms extension, which goes at 5.11b by the original route or 5.10c by a later variation that most climbers now follow.
Regarded by many as the best 5.10 in the region, Davis-Holland to Lovin’ Arms (DHLAto the Index faithful) stands out for its amazingly consistent difficulty, regardless of the type of climbing. From pitch two’s left-leaning, thin-hands corner to the overhanging quartz edges of the route’s final 40 feet, the grade seldom varies by more than a letter. But as the 200-foot firs grow smaller beneath your feet, it won’t be the grades so much as the quality of stone that will impress.
The route is bordered by classic aid routes (now 5.13 testpieces), and it’s not unusual to see a portaledge hanging nearby. Yet the unfolding array of too-good-to-be-true holds only runs out with pitch six’s climactic mantel atop the wall. Pitches one, two, and four all offer sustained crack sections and jamming cruxes, while pitches three, five, and six present challenges of gear-protected face climbing.
With a set of nuts, doubles of cams from fingers to three inches, and an extra thin-hands piece for pitch two, you’ll have enough pro to sew up all the leads. An optional five-inch cam protects the undercling above the belay to start pitch three. However, secure edges and an encouraging nearby partner (all belays are bolted) will likely allow most climbers to power through this pitch’s opening sequence sans big piece. On a big route like this, your partner needs to be encouraging, even if he’s just trying to prevent a BASE jump… back onto the belay.
The Beta
Getting There: Index is located just north off U.S. Hwy. 2, about 60 minutes east of Seattle or 50 minutes west of Leavenworth. The gravel parking lot is on the north side of Avenue A, a mile west of town along the Skykomish River. Walk across the railroad tracks, turn right (east), and walk along the tracks for five minutes, until a trail leads left through the woods toward an obvious crag. Follow the unmarked trail past the base of this crag (The Country), and uphill through old-growth fir and spruce trees. Take right-hand turns at both unmarked trail junctions, and switchback up to the base of the 600-foot upper wall. Walk left for five minutes, aiming for a hand crack below the leaning, right-facing dihedral of pitch two. Allow 30 minutes from the car.
Guidebooks:Sky Valley Rock, by Darryl Cramer (Sky Valley Press, 2000).
Descent: Rappel with a single 70m or walk off.
Equipment: You can purchase snacks and guidebooks (but no gear) at the combination general store, deli counter, and post office in Index.
Season: Generally, May through September are the best months, with a fairly predictable window of nice weather each year in February. The route dries quickly, but the 5.9 hand crack on pitch one can remain damp.
Camping: There is free camping next to the Skykomish River across the road from the gravel parking lot, with water and bathrooms located one mile east in Index. The closest full-facility camping is at Money Creek, 14 miles east along Hwy. 2; $16/night; (425) 783-6000.
The post Davis-Holland to Lovin' Arms (5.10c), Index, Washington appeared first on Climbing.
]]>The post Worth a Shot appeared first on Climbing.
]]>Halfway up a new route, roofs and blankness loomed above. Where was the long hand crack that had lured us up here? I pulled out my camera and scrolled through photos of the face, taken earlier from camp. After identifying our position on my glowing camera screen, I saw that a short traverse rightward would bring us below the splitter, and from there the route-finding looked simple.
A digital camera can do more than capture memories of your climbs. Whether newrouting in the mountains or redpointing at the crag, put your point-and-shoot to use with these tricks:
Route topos: Paper topos get torn or dropped. Take a few photos of your topo or guidebook pages for mid-route reference.
Redpoint beta video: After a section of climbing that you hope to try again another day, make a voice or video recording of what gear you needed (or wish you’d had) and any move-by-move details you might want to remember for round two.
Terrain overviews: Snap reference photos of a peak, cliff, or a convoluted approach before you begin—this is especially useful on complex or crevassed terrain. If fog or darkness is about to overtake you, take a few shots of the route ahead, and use these images to help identify your position.
Route-finding breadcrumbs: As you do a cross-country approach, take pictures of landmarks behind you for reference during the hike out.
Online beta at your fingertips: When you check online resources for route information, maps, or driving directions, bring it all along by snapping pictures of your computer screen.
Flashlight: The flash of a camera, or the flashlight app for iPhone and iPod Touch, can shed a bit of light when your headlamp goes dead.
The post Worth a Shot appeared first on Climbing.
]]>
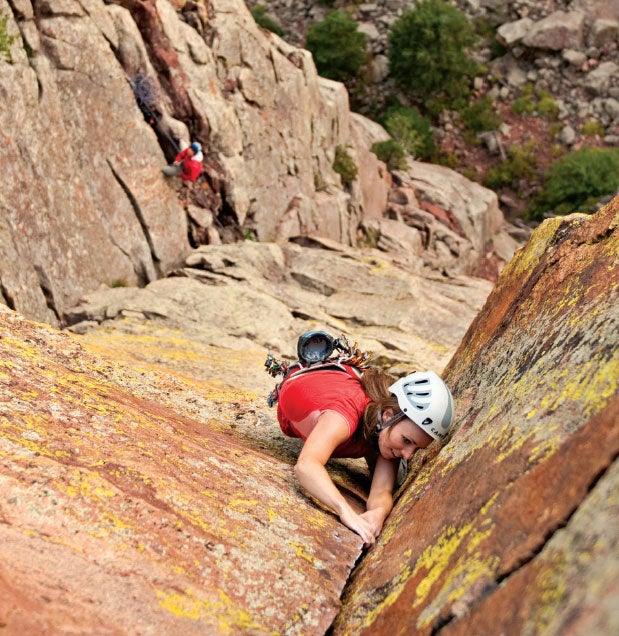
Allison Herrington makes her way up pitch five Mickey Mouse Wall and the twin summits forming its namesake “ears” loom above the eastern ramparts of the Colorado Rockies. Outside the borders of Eldorado Canyon State Park, Mickey Mouse offers an array of stellar routes. The sandstone has fractured into cleaner vertical lines than nearby Eldorado, … Continued
The post Captain Beyond (5.10c), Boulder, Colorado appeared first on Climbing.
]]>
Mickey Mouse Wall and the twin summits forming its namesake “ears” loom above the eastern ramparts of the Colorado Rockies. Outside the borders of Eldorado Canyon State Park, Mickey Mouse offers an array of stellar routes. The sandstone has fractured into cleaner vertical lines than nearby Eldorado, leaving splitters and dihedrals in place of face holds. But despite its being visible on the horizon, a mention of the wall is often met with blank stares. The crowds are kept down by the hour-long approach and by the cliff’s annual raptor closure. For those willing to make the trek, Mickey Mouse’s 500-foot south face holds a classic five-pitch trad route, Captain Beyond.
The route begins with two pitches of 5.10- vertical finger and hand jams. With a paucity of face holds, these pitches require true crack climbing. Above a long, sloping ledge, the 5.8 third pitch starts off with the climb’s mental crux and most dangerous section: a slab just off the belay where a fall would land you back onto the ledge. Higher up, a tall, thin flake juts upward. The steep fist crack separating the flake’s inside edge from the wall’s face comprises the physical 5.10c crux of Captain Beyond. But with a double set of cams up to four inches, the pitch never requires climbing too far above your gear. The final lead shifts left before ascending a spectacular hanging dihedral via well-protected stemming and crack climbing up to 5.10b. Scramble to the Middle Tower of Mickey Mouse for unrestricted views of the Front Range and the planar prairie.
Captain Beyond was first climbed at 5.8 A1 in 1963, by the connoisseur of Colorado classics, Layton Kor. Eleven years later, Boulder’s prolific Briggs brothers, Roger and Bill, freed the entire route. Although the approach may be long by Front Range standards, Mickey Mouse’s 40-plus trad climbs soak up sun and are usually sheltered from the wind, providing a beautiful respite from winter shadows.
The Beta
SEASON: Boulder Open Space and Mountain Parks institutes a yearly raptor closure from February 1 to July 31, and it’s often too hot in spring and summer. The fall and winter months provide the most comfortable conditions on these sunny crags.
GUIDEBOOK:Eldorado Canyon: A Climbing Guide, by Steve Levin
GEAR: A double set of cams to four inches, with a single set of nuts; 10 slings
APPROACH: With a brisk pace and knowledge of the trails, Mickey Mouse Wall can be found in under an hour. First-timers and those with a leisurely pace will want to plan for 90 minutes from the car. Half a mile east of Eldorado Springs, on Hwy. 170/ Eldorado Springs Drive, turn south on CR 67 and park at the gate a quarter-mile up the road. Hike up the gravel roadbed, making an unmarked right turn at a road intersection after a half mile. This gravel road becomes the “Fowler Trail” and is signed as such. Follow the Fowler Trail past multiple smaller paths leading to the right. When a gated road forks off to the right, continue straight for 100 feet and follow a smaller path to the right. This is marked as a “Climbers Only” trail. Follow this straight uphill to the railroad tracks. Turn left and follow the tracks for 10 minutes. The track runs through two tunnels; walking through them is the most popular option, but is illegal. Both tunnels can be skirted by walking around on the hillside, adding five to 10 minutes to the approach. Immediately south of the second tunnel (labeled as “T6”), turn right. The Mickey Mouse Wall will be facing you on the adjacent hillside. Captain Beyond is located roughly in the middle of the Mickey Mouse Wall, beginning with a hand and finger crack through an offwidth slot and roof.
DESCENT: Scramble west (climber’s left) to the first large notch, and make three single-rope rappels with a 60-meter rope.
The post Captain Beyond (5.10c), Boulder, Colorado appeared first on Climbing.
]]>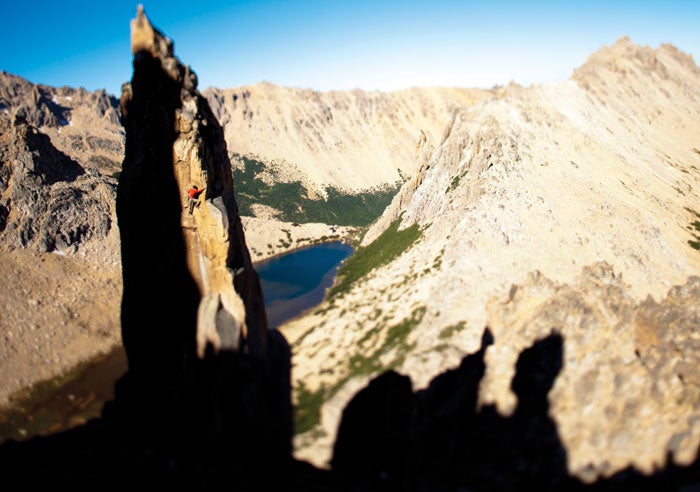
Evening shadows creep toward the lake and the Frey Refugio below, as Scott Bennett explores an aesthetic route (5.11 R) on Aguja M2. Frey’s blissful granite spires To climbers, Patagonia means rumbling glaciers, ceaseless wind, and world-class alpinism. To the general public, it provokes apparel-inspired images of outdoor fun, with a Jack Johnson tune somewhere … Continued
The post Patagonian Paradise appeared first on Climbing.
]]>
Frey’s blissful granite spires
To climbers, Patagonia means rumbling glaciers, ceaseless wind, and world-class alpinism. To the general public, it provokes apparel-inspired images of outdoor fun, with a Jack Johnson tune somewhere in the background. Frey, a pair of connected alpine cirques in northern Argentine Patagonia, borrows from both of these perceptions. It’s the Patagonia of steep splitters and looming spires, and also the Patagonia of the endless summer vacation. If you’d rather climb than scowl over bleak forecasts, Frey’s one- to 10-pitch granite routes, following steep splitters and huecoed faces, might just be Patagonian paradise.
A two-story stone hut, or refugio, sits adjacent to a free camping area, both straddling treeline, a mere frisbee toss from frigid Lake Toncek. Two American friends—my climbing partner, Scott, and photographer, Forest—and I arrived in Frey on a scorching summer afternoon in late January. Our dusty, three-hour hike was followed by a dare-induced plunge into the lake, ridding us of sweat and trail grime. Now clean and presentable (neither, as it turns out, prerequisites for entrance), we followed our noses to the climber-filled dining room inside the refugio.
The building’s wood-lined downstairs serves as a restaurant and gathering place, with an attached kitchen available to those camping nearby. The refugio’s cast of culinary wizards ensures that, despite being several hours from the nearest trailhead, your biggest on-route epic can quickly be followed by delicious pizza and a bottle of local wine. The loft houses simple bunks adequate for a crowd of tentless hikers. When the sun goes down, tabletop candles and LED headlamps illuminate card games, jam sessions, and the language barrier–defying pantomime of crux beta. I don’t know how to say “ring lock” in Spanish, Portuguese, or German, but when I’d make a scrunched “OK” symbol and grimace, I don’t recall anyone reaching for his phrase book.

From November to March, annotated and dog-eared copies of topos circulate among the callused hands of the refugio’s international crowd. A pocket-sized paperback, written and illustrated by local Rolando Garibotti, is Frey’s totality of published information. As we add a second bottle of local wine to our tab, I solicit opinions for Frey’s must-do routes. The staff and long-time locals holding court in the refugio eagerly oblige, and several favorites emerge from the crowd. But after shuffling through a messy pile of grease-stained topos, Scott suggests another route: No TEOlvidaremos. TEO has six pitches up to 5.12-, located on perhaps Frey’s coldest and windiest face on Torre Principal. Though unmentioned and unclimbed by everyone we talk with at the refugio, this route gets fi ve stars in Garibotti’s book; for everything else, the scale ends at three.
No TEOlvidaremos (Teo, we won’t forget you) was named by friends of the late Argentine climber Teo Plaza, an alpinist responsible for new routes across the country. From a windy col to the south of the Torre Principal, I crane my neck upward at Frey’s largest spire. I can’t help being intimidated. When the first pitch (5+/5.9) includes an overhanging thin-hands splitter, we decide that a few more pluses are warranted on the topo. But with every wild overhang, opportunities for protection surprise us—and the techy 5.12- crux features two bolts. While pulling another roof on “is this for real?” jugs, Scott hollers out, “This is the best rock climb in the world!” From my belay above a hanging corner, I don’t demur.
After summiting at midday, we descend below the west face of the Torre Principal, opposite our backpacks but beneath the first pitch of Siniestro Total. As training for future adventures on larger Patagonian peaks, we commit to the nine-pitch route for our second trip up the “principal” that day. Our snacks and water are gone, and darkness can’t be too far away. Without a watch or headlamp, and with fears of a forced bivy, I take off.
Siniestro’s starting slabs lead to an overhanging face, the route’s 5.10d original crux. From atop the third pitch, a short pendulum (free at reach-dependent 5.11) gains access to a major dihedral and several consecutive pitches of immaculate jamming and stemming. Then comes the route’s signature pitch, a laser-cut fist crack taken straight from Indian Creek. The angle and difficulty relent just in time for Scott to encounter a few antiquated wooden pitons. We reach the summit at dusk. Darkness-induced drama on the final raps confirms that biting off too much in Frey can leave climbers with a memorable taste of Patagonia.
At the end of our week together, Forest, Scott, and I cross to the head of the adjacent valley. The Aguja Campanile Esloveno, a 40-story granite skyscraper, is reached by two hours of hiking. Around the summit glides an Andean condor, never flapping its 11-foot wingspan. Whoops of encouragement echo outward from our team on the Campanile’s overhanging north arête. If granite climbing gets better than this, I’ve yet to find it.

Recommended Routes
The routes at Frey are mostly 5.9 to 5.12, though harder and easier pitches can be found. The following four spires provide an excellent introduction to the area’s climbing.
AGUJA FREY: The obvious, 300-foot spire just a few minutes south of the camping area.
-
Fisura de Jim (5.7/5.8): A clean open book leads to an even cleaner, perfect-hands splitter on a slab overlooking the lake.
-
Sifuentes-Weber (5.9): Four pitches of varied climbing weave past roofs and corners overlooking the Refugio Frey.
-
Lost Fingers (5.10): Stellar, sustained finger and hand cracks. You can sleep in and still catch the morning shade on this route, just 10 minutes from camp.
AGUJA M2: Located on the ridge dividing the area’s twin cirques. From the low saddle between valleys, follow the ridge east for 15 minutes on a circuitous climbers’ trail.
-
Socotroco (5.10): The west and north faces of Aguja M2 are covered in excellent, one-pitch routes from 5.9 to 5.11+. Socotroco, the central line of cracks and incuts, might be the best.
AGUJA CAMPANILE ESLOVENO: This 400- to 500-foot tower is reached by a two-hour hike to the head of the valley immediately to the south.
-
Imaginate (5.10): An unlikely passage up the Campanile’s sheer east face, Imaginate features crack and hueco climbing, an unforgettable cave belay, and a final run-out pitch (5.7) that will leave you smiling amid a sea of giant huecos.
-
Excuse Me Señora, Give Me La Hora (5.11d): Five pitches of mostly bolted climbing up the Campanile’s distinct north arête. Look left into Argentina, rightward into Chile, or straight up at overhanging granite laced with in-cuts.

TORRE PRINCIPAL: The largest spire in the area, the “principal” crowns the ridge line 1.5 hours west of the camping area.
-
Siniestro Total (5.10+ A0 or 5.11): At roughly 10 pitches, the longest route in Frey is often considered the best. The original pendulum atop pitch three (fixed pendulum anchor) can be freed at height-dependent 5.11. Borrow an extra #3 Camalot or equivalent for the splitter fist crack on pitch six.
-
No TEOlvidaremos (5.12a): My vote for the area’s best, TEO tackles the steepest and cleanest piece of stone around. Six pitches of unforgettable 5.11 crack and face climbing, with two sections of bolt-protected 5.12.
THE BETA
GUIDEBOOK: Rolando Garibotti’s hand-drawn topos are the only option. It’s best to print these ahead of time from pataclimb.com; consider donating to support the site. Some copies of the guide are free to browse in the refugio.
SEASON: October through April, the Austral summer, is the prime season for rock climbing. Spring and fall feature less stable weather, and demand a strong tent. Holidays during December and January mark the busiest time of year.
RACK: Standard rack, with doubles up to 3” and a single 4” piece
CAMPING: There is free informal camping adjacent to the refugio, with water and outhouses nearby. Meals, drinks, and desserts can be purchased in the refugio. Beds in the loft can be rented for $13 per night.
GETTING THERE: Reaching Frey means a flight to Buenos Aires and a deluxe tour bus ride, or a direct flight to reach San Carlos de Bariloche. Backpacking hostels such as the Condor Andino (bunks are $20/night) are scattered throughout the town. Outdoor stores and supermarkets carry local guidebooks and all supplies, but the high prices of climbing gear will make you glad you brought your own rack. Nearby sport climbing (Lake Trebol) and tasty fare (Morphy’s sandwiches for the pre-hike carbo load) will keep you happy if you want to spend a day closer to town. The trailhead is at the Cerro Catedral ski area, 30 minutes via city bus from Bariloche’s downtown.
The post Patagonian Paradise appeared first on Climbing.
]]>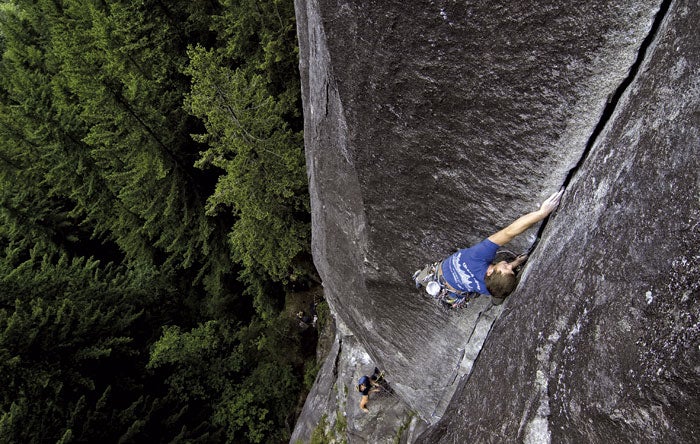
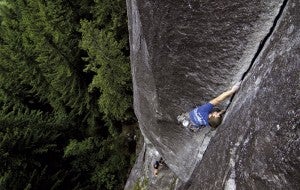
Drew Schick locks up the Davis-Holland If it’s not quite big-wall free climbing, it’s the next best thing. It sure felt big to me when my first trip up Davis-Holland to Lovin’ Arms yielded close-up views of BASE jumpers and bald eagles, both taking flight as I tried my best not to. With a crux … Continued
The post Davis-Holland to Lovin' Arms (5.10c), Index, Washington appeared first on Climbing.
]]>
If it’s not quite big-wall free climbing, it’s the next best thing. It sure felt big to me when my first trip up Davis-Holland to Lovin’ Arms yielded close-up views of BASE jumpers and bald eagles, both taking flight as I tried my best not to. With a crux of well-protected 5.10 moves and a stunning position above the Central Cascades’ Skykomish Valley, this six-pitch line on Index’s Upper Town Wall provides even the weekend warrior with an unforgettable dose of exposure.
Looming above the mossy hamlet of Index, Washington, the Upper Town Wall provided Yosemite training (and adventures in their own right) to folks like Fred Beckey and Jim Madsen. The Davis-Holland route was climbed by Dan Davis and John Holland in 1964, offering a direct passage for three pitches before veering left and finishing up a major, vegetated weakness. In 1980, Don Brooks pushed a line straight above pitch three’s belay, creating the Lovin’ Arms extension, which goes at 5.11b by the original route or 5.10c by a later variation that most climbers now follow.

Regarded by many as the best 5.10 in the region, Davis-Holland to Lovin’ Arms (DHLA to the Index faithful) stands out for its amazingly consistent difficulty, regardless of the type of climbing. From pitch two’s left-leaning, thin-hands corner to the overhanging quartz edges of the route’s final 40 feet, the grade seldom varies by more than a letter. But as the 200-foot firs grow smaller beneath your feet, it won’t be the grades so much as the quality of stone that will impress.
The route is bordered by classic aid routes (now 5.13 testpieces), and it’s not unusual to see a portaledge hanging nearby. Yet the unfolding array of too-good-to-be-true holds only runs out with pitch six’s climactic mantel atop the wall. Pitches one, two, and four all offer sustained crack sections and jamming cruxes, while pitches three, five, and six present challenges of gearprotected face climbing.
With a set of nuts, doubles of cams from fingers to three inches, and an extra thin-hands piece for pitch two, you’ll have enough pro to sew up all the leads. An optional five-inch cam protects the undercling above the belay to start pitch three. However, secure edges and an encouraging nearby partner (all belays are bolted) will likely allow most climbers to power through this pitch’s opening sequence sans big piece. On a big route like this, your partner needs to be encouraging, even if he’s just trying to prevent a BASE jump… back onto the belay.

The Beta
Getting There: Index is located just north off U.S. Hwy. 2, about 60 minutes east of Seattle or 50 minutes west of Leavenworth. The gravel parking lot is on the north side of Avenue A, a mile west of town along the Skykomish River. Walk across the railroad tracks, turn right (east), and walk along the tracks for five minutes, until a trail leads left through the woods toward an obvious crag. Follow the unmarked trail past the base of this crag (The Country), and uphill through old-growth fir and spruce trees. Take right-hand turns at both unmarked trail junctions, and switchback up to the base of the 600-foot upper wall. Walk left for five minutes, aiming for a hand crack below the leaning, right-facing dihedral of pitch two. Allow 30 minutes from the car.
Guidebooks:Sky Valley Rock, by Darryl Cramer (Sky Valley Press, 2000).
Descent: Rappel with a single 70m or walk off.
Equipment: You can purchase snacks and guidebooks (but no gear) at the combination general store, deli counter, and post office in Index.
Season: Generally, May through September are the best months, with a fairly predictable window of nice weather each year in February. The route dries quickly, but the 5.9 hand crack on pitch one can remain damp.
Camping: There is free camping next to the Skykomish River across the road from the gravel parking lot, with water and bathrooms located one mile east in Index. The closest full-facility camping is at Money Creek, 14 miles east along Hwy. 2; $16/night; (425) 783-6000.
The post Davis-Holland to Lovin' Arms (5.10c), Index, Washington appeared first on Climbing.
]]>