When we fail on large moves, most of us tend to think we just need to pull more and pull harder—and our training reflects this bias toward the upper body.
The post Struggling With Powerful Moves? Don’t Just Train Your Fingers. appeared first on Climbing.
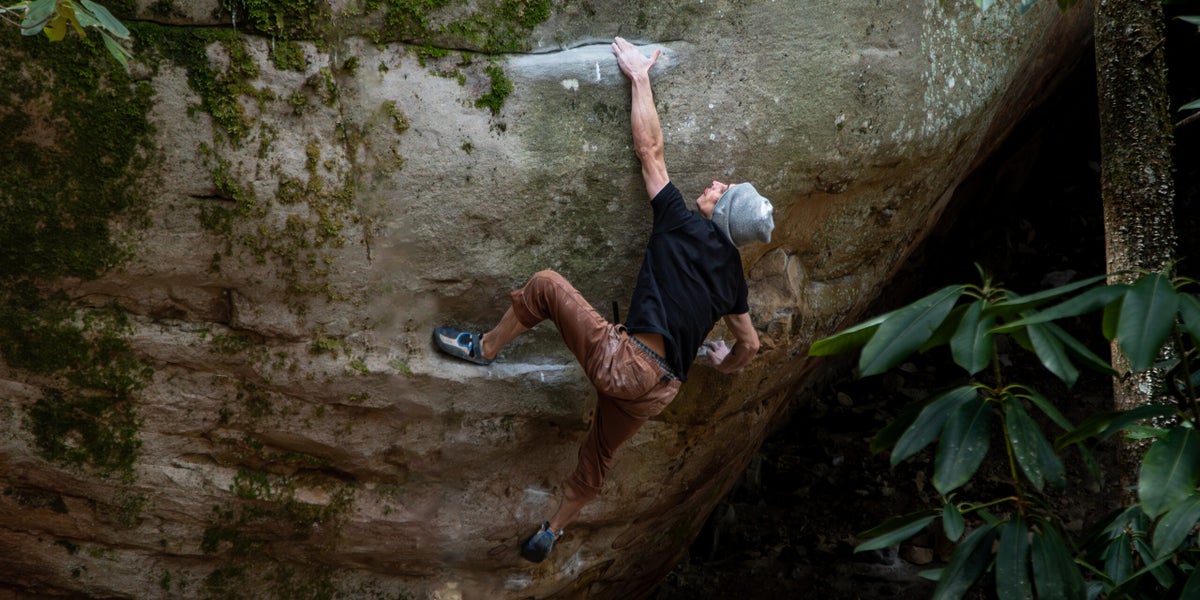
]]>In my experience as a climbing coach, many of my clients come to me thinking a lack of upper-body strength is holding them back. But after the initial assessment, it often turns out that their pulling strength is not the problem at all. Rather, the way they coordinate their hips with the rest of their body needs to be a larger focus of their program.
The purpose of the hip
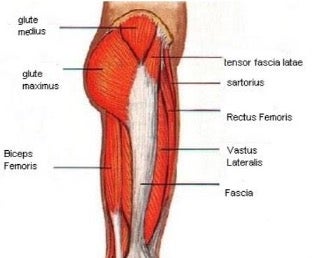
The hip is a ball-and-socket joint where the leg attaches to our torso. It is a very mobile joint that allows for a large range of motion, including forward-backward, side-to-side, and rotational movements. Our hips support our body weight as part of everyday movements like walking, running, sitting, standing, going up/down stairs, etc. Because of this, the hip musculature is very robust, comprising the notably strong muscles of the glutes, quads, and hamstrings.
Why do we care about our hips while climbing?
For one, our hips are our center of gravity—they are where we generate movement and where gravity exerts its greatest influence. In a sport like climbing in which we are trying to defy gravity, being able to manipulate our center of mass is crucial. Secondly, as mentioned, our glutes are actually the biggest muscles in our body—they’re incredibly strong. It’s advantageous to be able to use and control these muscles for efficient and favorable movement. Lastly, our hips are part of a very powerful chain of muscles—one that runs all the way from our feet through our core. This chain is especially important for dynamic movement; it’s activated when we spring off our feet when deadpointing or dynoing. Because of this, the hips create a lot of momentum and power, which can reduce the workload required of our upper body.
“Hip-centric” climbing moves
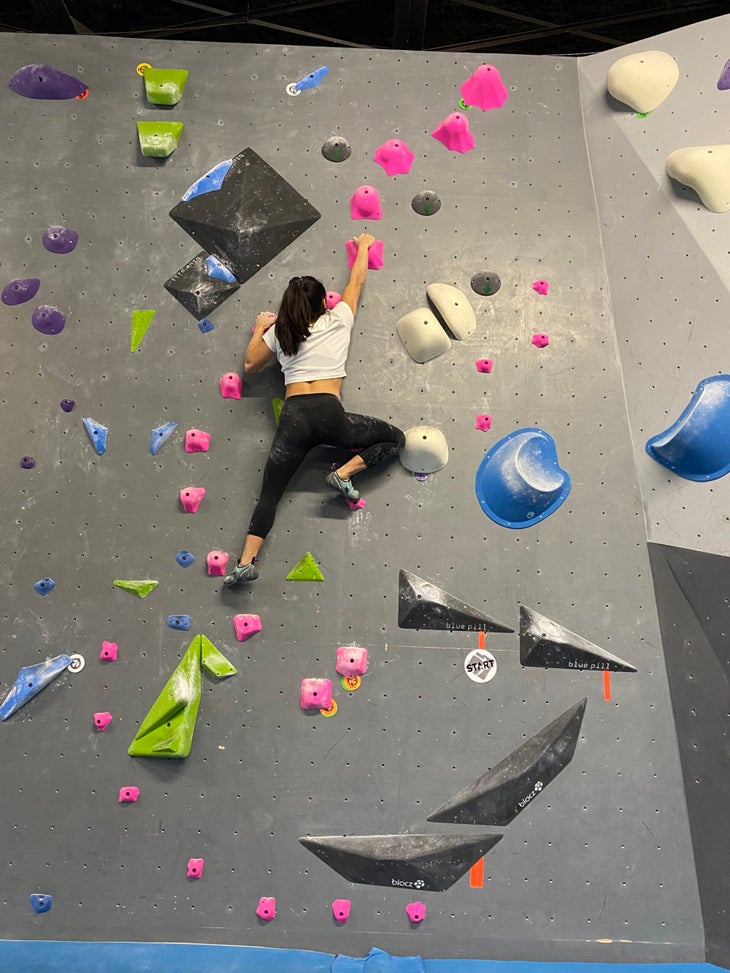
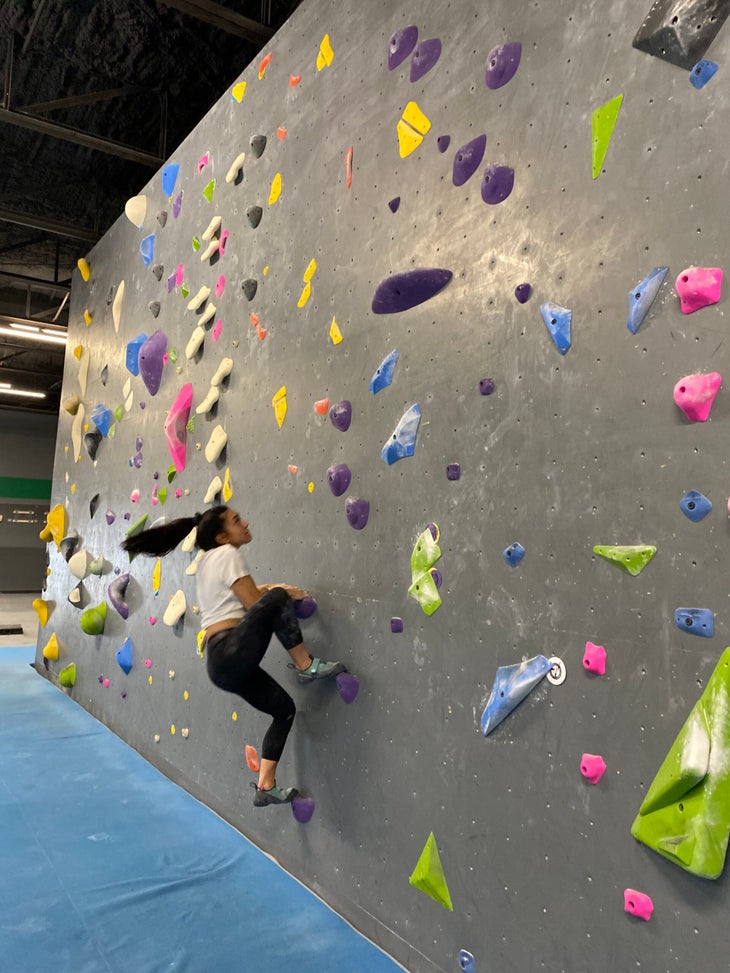
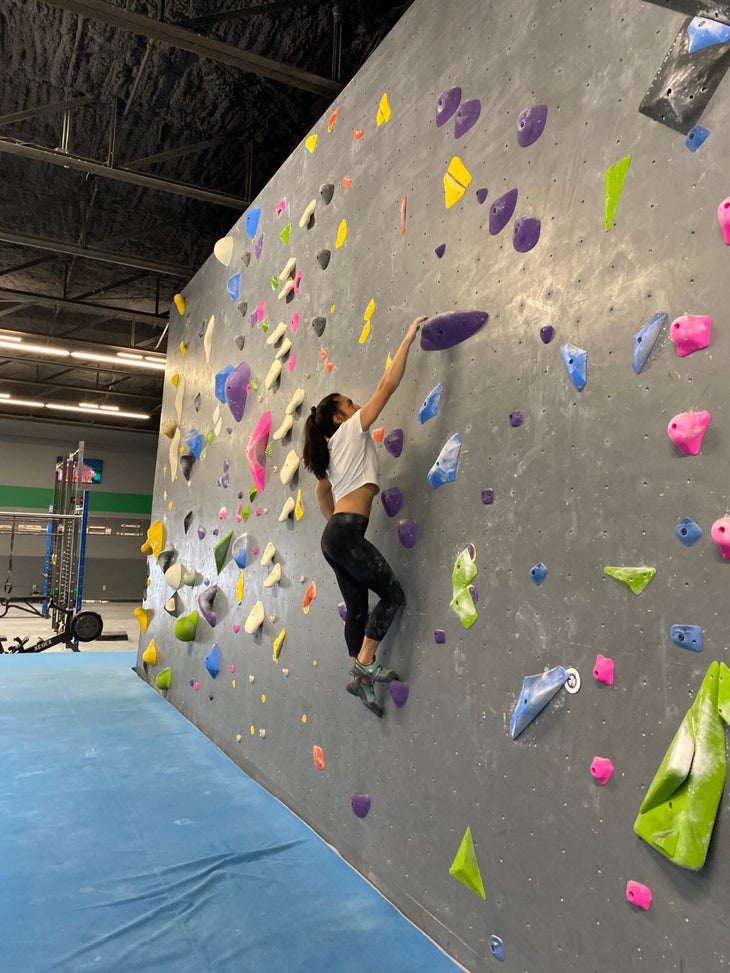
Specific climbing moves that involve our hips include highsteps, rockovers, dynos, deadpoints, heel hooks, and toe hooks, to name a few. As a rule, because our hips are our center of gravity, we generally want to keep them close to the wall (exceptions on this later), often parallel to the surface of the rock. On the spectrum of the endless possible hip shapes we can get into while climbing, it’s useful to conceive of a different shape on either end: The first shape is open (aka square) hips, and the second is closed (aka turned) hips.
 |
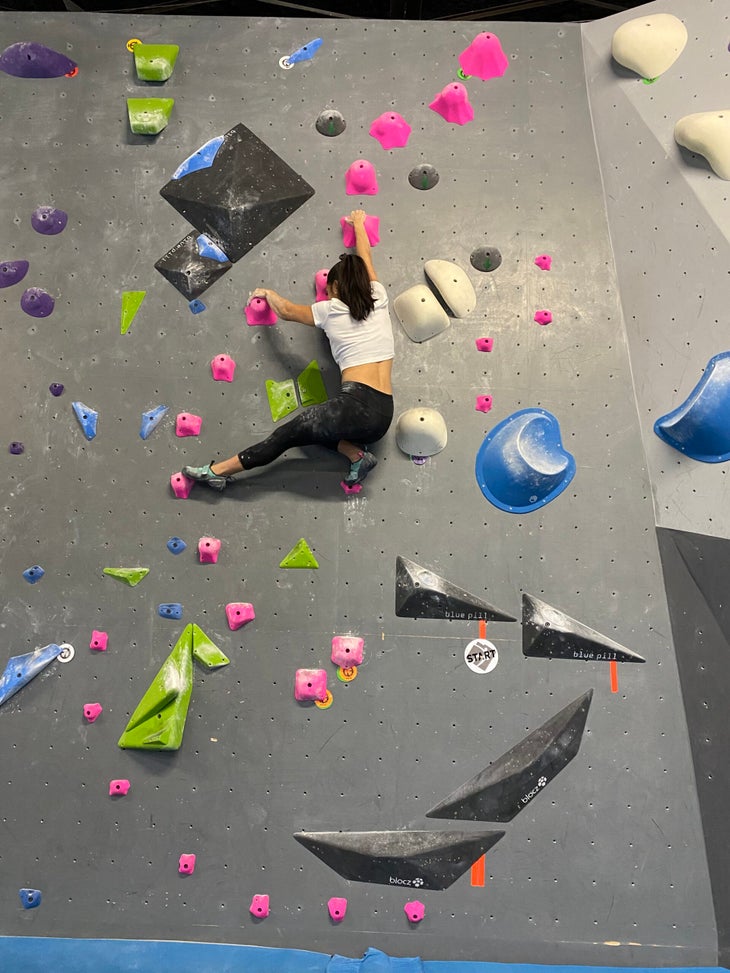 |
The appropriate hip shape and the degree of exaggeration depend on the situation. Climbing is extremely variable, and things like wall angle, hold direction, movement direction, movement speed, etc. all affect which hip shape we employ. Most climbers naturally trend toward one end of the hip-shape spectrum or the other. However, because of the variability of our sport, it’s important to master both ends of the spectrum so that you’re prepared for any situation.
The hips and power
When it comes to power, the hips play a crucial role in both generating and directing momentum—the difference between sticking a hold and falling away from the wall too early often comes down to where the hips are in space. Think about this: Have you ever experienced a moment of weightlessness on a move—that split second when your momentum toward the hold stops but gravity has yet to take hold of your body? This moment is what we are trying to maximize when it comes to power. We want to create enough momentum so that we have time to grab the hold before we fall away from the wall.
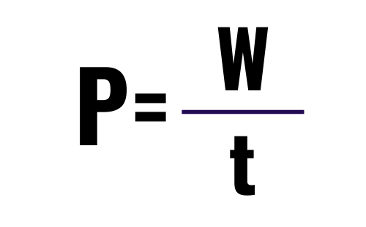
Power can be described as a force expressed over a certain distance (also known as Work) in a certain amount of time. Because of this, there are two main ways to create more power. One is to generate more work—more specifically, because the distance to the next hold is a static factor in the equation, to perform more work, we must generate more force. The other way to create more power is to perform the work more quickly.
 |
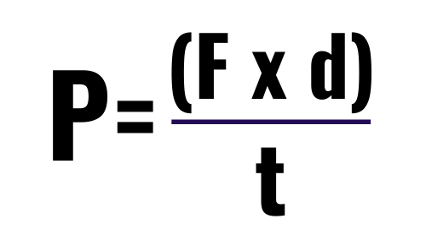 |
- P: power
- W: Work
- t: time
- F: force
- d: distance/displacement
Let’s look at power in terms of the deadpoint, a dynamic movement in which momentum is required to reach the next hold, but your feet stay on the wall (vs. a dyno, in which your feet leave the wall).
Here’s how to incorporate the hips skillfully into your deadpoint. Note that these actions need to happen in sequence.
| 1. Create space by sagging the hips away from the wall opposite your direction of travel to the target hold: So, if your next hold is up and to the right, sag down and to the left as a countermovement. The space between your hips and the wall allows you room to create force. |
 |
| 2. As you launch into the deadpoint from the bottom of your sag, create maximal force by pushing with the legs and extending the hips back into the wall, in the desired direction of travel. |
 |
| 3. Once you generate momentum, the arms can then take advantage of the force created and continue the movement, pulling after the hips start to extend |
 |
| 4. Snap for the hold quickly—the quicker you can perform the hip extension and strike for the grip like a cobra, the more power you create. A phrase I like to remember is “Snappy hips are happy hips.” If you’re not quite getting to the hold and you feel like you’re doing everything right, try to do the movement just a little faster. |
 |
Practicing your hip skills while climbing
Next time you’re in the gym, add some intention to your warmup. Drills are best done on easier terrain so that you can focus on the movement. Practice both ends of the hip-shapes spectrum, being as exaggerated and dramatic as possible. Climb an easy climb with open hips only—frogged up and square to the wall—then perform the same climb with closed hips, doing backsteps and drop knees to suck your hips in. Compare and contrast your experience on the climb: which moves each of the shapes felt best on and which they felt awkward on.
You can also practice your deadpoint sequence, as described above, in a controlled setting at the gym. Practicing on easier terrain allows you to nail down the coordination of the movement. I recommend practicing on an easy, medium, and then difficult deadpoint.
Off-the-wall hip strengtheners
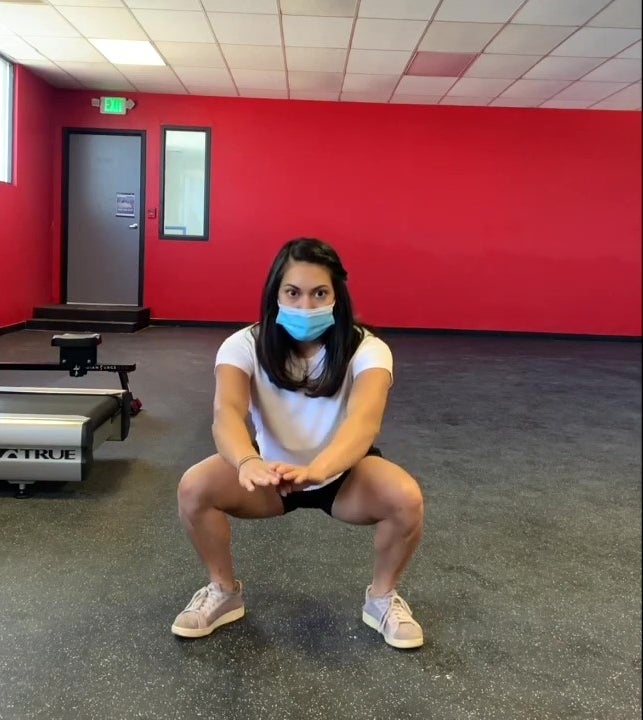
For strengthening the hips off-the-wall, the best-bang-for-your-buck exercise is going to be the squat. The squat is a functional movement that strengthens the hips, legs, and core while also increasing mobility. Squatting prepares you well to handle the different hip positions climbing throws at us. Below are some guidelines for performing squats. When adding weight, make sure to follow proper form and progress appropriately. If you’re unsure of how to properly perform the lift, seek professional guidance.
- Proper stance: Feet shoulder-width apart, toes turned out 30 degrees
- Weight in midfoot and back half of foot
- Neutral spine: No arching or rounding
- Chest stays up: Does not fall forward
- Knees track with toes
- Squat to a depth slightly below parallel—i.e., your quads should be just below parallel to the floor
Related: The Training Bible: A Complete One-Year Training Plan
Juliet Hammer (julietamanda.com) is a remote climbing coach based out of Chattanooga, Tennessee. She helps climbers of all levels reach their goals through technique and strength training.
The post Struggling With Powerful Moves? Don’t Just Train Your Fingers. appeared first on Climbing.
]]>
The reality is that you likely need to eliminate some training protocols and narrow your focus to become a better climber.
The post Build Your Training Around Your Life (And Not The Reverse) appeared first on Climbing.
]]>You may think that as a climbing coach, my primary job is to load a ton of work onto my clients. You might be surprised to hear that when new clients come to me I often have to reduce their training quantity. Many climbers are doing too much. As a coach, I help my clients pare down their routines and figure out what to focus on.
There is nearly an infinite amount of training information on the Internet and about a million different protocols. And you may often feel as if you are missing out on something important or aren’t doing enough to push yourself toward your goals. But the reality is that you likely need to eliminate some training protocols and narrow your focus.
Here are three questions I ask my clients that you can ask yourself to simplify your training and create an effective plan.
What are your goals?
A favorite quote of mine when it comes to goal setting is, “If you don’t know where you are going, you’ll end up someplace else.” —Yogi Berra
Without laying out your goals for a training program, it’s impossible to productively direct your energy. You may work tirelessly for a couple of months without being able to see what came of your effort. Goals give you clarity on the what, when, where, and why of your training. Setting goals also has psychological benefits that improve performance including increased motivation and confidence.
Also Read: The Training Bible, Everything You Need For A Full Year
For example, let’s say you have a climbing trip coming up that you want to prepare for. You heard that max hangs on the hangboard were really helpful for gaining finger strength, so you’ve been prioritizing heavy half-crimp hangs. Also, your friends love to Moonboard so you’ve been joining them there twice a week. Your fingers are feeling super strong and your power is on point. But when you show up to your 90 foot resistance sport climbing project at the Red River Gorge, you pump off the open-handed mini jugs before you even get to the crux.
Because your training effort wasn’t organized around your goals, you are now on your trip in the best bouldering shape of your life, but without the necessary endurance or fitness for your objectives.
Before you begin a training program, spell out what climbs or what types of climbs, you want to succeed on, and tailor your training to focus on that style of climbing.
What are your strengths and weaknesses?
Another important factor in deciding where to focus your training is identifying what you’re already good at versus your areas needing development. Continuing to work on only your strengths puts you in the land of diminishing returns: the same amount of effort yields fewer and fewer results. Instead, that effort could be focused on your weaknesses. Working on this low-hanging fruit will more quickly help you become a well-rounded climber and better athlete overall.
For example, maybe you’re a really good competition climber. You can read complex sequences and have great body awareness. You are able to flash tricky dynos and are technically proficient. But when you encounter pure strength moves, you struggle. Though you’re able to contort your way past some moves, your general strength is lacking. You find that you’re able to do the climbs that fit you quickly, and get shut down on the ones that don’t. Though you could keep spending three hours on each new set that goes up, one of those hours could be better spent building foundational strength where your gains will be noticeable and can soon be applied back on the wall. Working a weakness will ultimately be a more productive use of your time.
What are your non-negotiables?
Committing to a training plan inevitably means making some sacrifices. But you shouldn’t dread each time you go to the gym for your workout, or loathe everything you’re doing. A negative attitude can lead to burnout. Showing up consistently is one of the most important parts of training, so think of what is necessary to keep your stoke alive.
As an example, perhaps one of your favorite parts of climbing is connecting with others. While not every session can be a social one during your training program, you can decide that the bouldering meetup you and your friends do every Thursday is non-negotiable. Based on this, you plan your workouts so that your limit bouldering session is on Thursday. This way you can work on projects with your friends and use your conversations to take the necessary longer rests between attempts. Knowing you get to climb with your friends helps you push through the tougher workouts and keeps you motivated throughout the program.
To create your training plan, start by choosing two to three priorities based on your goals, strengths/weaknesses, and non-negotiables. Perform these priorities consistently for at least three to four weeks before trying to add more. If you feel like you have the capacity to take more on, you can introduce other training activities that support your priorities. However, if these items start to take time and energy from your original priorities, you’re better off paring down.
Simple does not always mean easy and sticking to two to three priorities over time will yield better results than doing too much and burning out after only two weeks.
Juliet Hammer (julietamanda.com) is a remote climbing coach based out of Chattanooga, Tennessee. She helps climbers of all levels reach their goals through technique and strength training.
The post Build Your Training Around Your Life (And Not The Reverse) appeared first on Climbing.
]]>
Training too hard and too much without allowing adequate rest and recovery can quickly get us into an overtraining cycle, which ultimately stunts progress.
The post What Is Overtraining? And a Pro Coach’s Advice for Avoiding It appeared first on Climbing.
]]>When looking to push our performance, we climbers often become obsessed with finding the regimen that will help us get the strongest, the fastest. However, in our zeal, we can overdo it: Training too hard and too much without allowing adequate rest and recovery can quickly get us into an overtraining cycle, which ultimately stunts progress.
I remember the first training plan I followed before I became a coach. A friend wrote it for me, with six days per week of workouts, based on what he did himself. At the beginning, I saw a steady upward progression. But then I started regressing in both my training and climbing, and couldn’t get my energy back even after rest days. Because of the sheer volume and because I was new to training, I became exhausted within weeks—it turns out that what worked for my buddy resulted in overtraining for me. In fact, after the program ended, I had to take a full two weeks of rest before I felt like my normal self and could start working toward my climbing goals again.
Since then, I’ve learned that there is an important balance for how much you should train, including the intensity of that training, and how much you should rest.
How Training Works
Training works through a predictable process called the General Adaptation Syndrome (GAS; see graphic below). During training, a stressor (aka a training stimulus) is applied to the body. This stimulus may be a novel stress (e.g., a brand-new exercise) or a more intense version of a familiar stress (e.g., adding more weight to a lift). How your body adapts to the stimulus depends on the volume and intensity of the stressor. To get the desired performance outcome, you need to find the sweet spot of volume and intensity: There needs to be some degree of overload, because too little stimulus won’t elicit an adaptation or progress. However, too much overload results in overtraining.
Also Read: A Full Year of Training—A step-by-step guide to maximizing your climbing.
What Is Overtraining?
Overtraining is the body’s response when the total stress it’s exposed to is too high for too long, preventing us from adapting or recovering. This can show up directly in your climbing. For example, say you can consistently boulder V5, but recently have only had the energy to climb V3. It can also show up as an inability to progress or maintain your typical intensity of training exercises. For example, you can normally hang on a 20-mm edge for 10 seconds with 25 pounds added, but for the past three weeks you’ve only been able to hang with five pounds added even though you’ve been consistently hangboarding.
It’s important to note that total stress includes not only physical stressors like training and manual labor but also mental stress—e.g., midterms or a deadline at work. Our body does not differentiate between the sources of stress, so it’s important to adjust training when other stressors are high.
Common Symptoms of Overtraining
• Extended performance loss
• Sustained fatigue (lasting weeks to months)
• Excessive soreness
• Chronic and frequent injuries/tweaks
• Decreased coordination, brain fog, lack of focus
• Potential sleep-pattern, mood, and hormonal disturbances
Functional Overreaching
To reduce your risk of overtraining, it’s important to understand the difference between functional overreaching and overtraining. Functional overreaching is another way to describe how much harder you need to train to stimulate adaptation. This means going beyond those casual, social gym sessions and holistically challenging your body. If, for example, you can bench 100 pounds without any trouble and you up the number to 110, and have to work at that, you have functionally overreached.
However, there is a difference between the expected fatigue created by functional overreaching, and overtraining. As previously noted in the How Training Works section, it’s normal to see an initial decrease in performance during a training phase—the bulk of your energy is dedicated to getting stronger, and some fatigue is normal. In functional overreaching, the decrease in performance is planned in order to reach the supercompensation phase, in which the training load is tapered and your body reaches a new level of performance.
Also Read: Failing on Redpoints? Success Could Be As Simple As Sitting Up Straight.
However, in overtraining, the decrease in performance is prolonged and your fatigue is extended, lasting weeks to months. Even if you started your program out of shape or new to training, with appropriate training loads you shouldn’t feel extended fatigue, lack of recovery, or other related symptoms. Essentially, with overtraining, you dig yourself into such a deep hole that there’s no supercompensation phase; rather, the decrease in performance is sustained, with no end in sight.
Keep a Training Journal
Tracking each training session is key for planning your next session. Ensure appropriate progressive overload by understanding how much stress you’ve applied to your body, as well as how much rest and recovery you need afterward. Factors to track include:
Overall time: Time spent warming up versus time spent on higher-intensity exercises like projecting, power-endurance, etc.
Volume: Number of tries on the project, route laps, etc.
Qualitative notes on energy levels at the beginning and end of each session.
Next-day energy levels/duration of recovery (another good way to gauge recovery is via your performance during each session).
Reducing Your Risk of Overtraining
The best thing you can do is avoid overtraining in the first place. And the number-one way to do this is to keep a simple training journal (see above). This journal lets you track both the actual training and your recovery; it will help you understand the stress you’re exposing your body to as well as how you’re adapting. If you notice that your training progress has halted, the quality of your sessions has declined, and your energy levels have diminished, it could be time for an extra rest day. Catch these signs early to stay on track.
Especially if you’re new to training, going low and slow is important at the start. It’s better to work up to the appropriate volume and intensity than to go too hard and have to dial it back. A good rule of thumb is to increase the volume and/or intensity of each session by no more than 10 percent. This can look like increasing your session time from 90 to 100 minutes, adding two pounds to your 20-pound max hangs, or giving 11 burns on your bouldering project after trying it 10 times your last session. Additionally, you should never go to complete failure; rather, always end your session with some gas in the tank. If you’re unsure of how to begin training or need help structuring, invest in a coach or a program.
Lastly, note that training volume and intensity are extremely individual. Everybody has various responses to stress. So, copying what your overstoker friend does may not yield the same results: Beware the comparison trap, and instead focus on what works for your body, energy levels, and recovery.
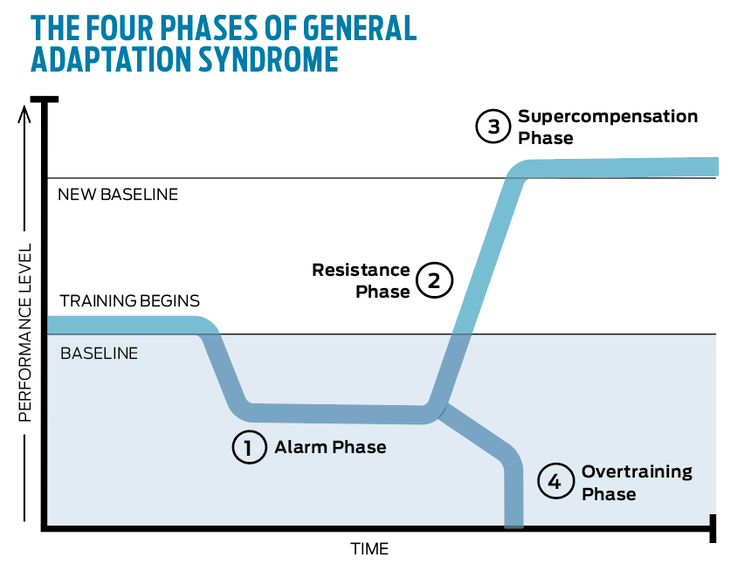
Phase 1: Alarm Phase
This is the body’s initial response to a new training stressor and is marked by soreness, fatigue (albeit manageable), and a short-term decrease in performance. This reaction is a natural response to functional overreaching, and symptoms should subside within one to two weeks.
Phase 2: Resistance Phase
With continued exposure to the training stressor, your body becomes stronger and more capable of handling the stress—you build resistance to the training stimulus.
Phase 3: Supercompensation Phase
Through properly progressing the training stress and appropriately managing recovery, you’ll adapt to exceed your previous level of performance. With increased strength, capacity, and other physiological adaptations, you reach a new performance baseline.
Phase 4: Overtraining
When training stress and recovery are not properly managed, you begin to see a prolonged decrease in performance, as well as other symptoms.
So You’ve Overtrained—Now What?
The number-one way to recover from overtraining is rest. Overtraining is caused by a mismanaged overload of stress, and so the treatment is to decrease stress to your body. It’s easy to think of all the training you’ve already done as a “sunk cost,” and it can be challenging to apply the brakes. But in the long run, you’ll be in a better place with performance if you begin recovery as soon as possible, instead of digging the hole even deeper.
Depending on the severity of the overtraining, rest can look like anything from dialing back volume and intensity (i.e., just doing some mellower climbing), to taking a few days or a week off all climbing and training, to, in more extreme cases, taking an extended break lasting a few weeks or more. Ways to support recovery include getting plenty of sleep, staying hydrated, and eating well. And remember, stress from other parts of your life has an impact, so manage that, too.
Returning to regular training is appropriate when the experienced overtraining symptoms have completely resolved. If you think you’re severely overtrained, consult your physician or relevant medical professional.
Overtraining happens, but it doesn’t have to define your climbing journey. After my experience, I was able to better understand what works for my body. With proper management of my training and recovery, I have since been able to have my best days climbing, including a send of a V11 and a V10 in one day. Training shouldn’t mean feeling completely exhausted session after session; it should mean feeling stronger and more confident over the long-term.
Juliet Hammer (julietamanda.com) is a remote climbing coach based out of Chattanooga, Tennessee. She helps climbers of all levels reach their goals through technique coaching and strength training.
Also Read
- Here’s Why Some “Weak” People Climb Harder Than Some “Strong” People
- Are These the Most Annoying Climbing Phrases of All Time?
- Steve Roper on Yosemite in the ‘60s, Writing “50 Classic Climbs,” and What’s “Just As Good” as Climbing Half Dome
The post What Is Overtraining? And a Pro Coach’s Advice for Avoiding It appeared first on Climbing.
]]>
Many of us attempt to perform at our highest ability all the time. With access to outdoor climbing and the constant availability of the gym, it’s easy to be in “go” mode 24/7. However, in order to push to your true limits, you also need careful planning and preparation to create discrete performance peaks.
The post One Major Thing Your Training is Lacking: “Sport Seasons” appeared first on Climbing.
]]>I remember when I first moved from Virginia to Denver, Colorado: I was fresh out of college and ecstatic to move west to the mountains. During my four years in college, the closest climbing gym had been over an hour away and the closest outdoor destination was over three hours away. Now, in Denver, the gym was a mere 10 minutes down the road and world-class bouldering was in my backyard. To say I was psyched would have been an understatement.
I moved to Denver in the thick of the summer alpine bouldering season. It was long days of hiking and climbing at altitude on the weekends, then intense gym sessions during the week. By the time the alpine season ended, I was feeling rugged and tired… but there was still an opportunity to climb! Subalpine areas had cooled down enough to explore, and Joe’s Valley, Utah, beckoned that fall. Winter rolled in, but the 300 days of annual sunshine in Colorado meant that climbing in the lower Front Range was still a go. Soon enough, spring arrived, cycling back to perfect subalpine conditions and right back into summer alpine season.
I loved how much climbing I was able to throw myself at throughout the year, but I soon started to notice a plateau in performance coupled with lower energy levels. I was trying to push my limits every day, every week, and every season, but after a year I’d begun to realize this wasn’t sustainable. In fact, attempting to be at peak performance level full-time had had the opposite effect: My overall performance took a hit. It wasn’t until I became a coach that I realized there is a big conversation missing from climbing: one about seasonal planning.

https://www.climbing.com/skills/the-hips-dont-lie/
What is seasonal planning?
In short, seasonal planning is the act of zooming out past only thinking about your next session or your next week to instead encompass a big-picture view of your entire year. From here, you then work backward to decide when you want to peak. There are four general sport seasons: off-season, preseason, in-season, and postseason. Each season prioritizes training versus sport performance differently.
In-Season
The best way to plan out your year is to first nail down what will be in-season for you, then work backward from there to determine the other phases. In-season should be a performance-focused period—for example, when conditions are prime at the local crag, a planned climbing trip, a competition season, etc. All available time and energy are dedicated to performing at a peak level, while training is put into maintenance mode. The length of this performance period can vary. It could be a three-month stretch of good conditions or a 10-day trip. Generally, however, the shorter the desired performance window, the closer to your limit you can push.
So what did I do when I lived in Colorado and there was climbing available year-round—how did I choose when to peak? The answer lay in goal setting. I looked at what I wanted to accomplish during my year. If there were particular projects I wanted to send, then I would base my peak around the best conditions for those specific climbs. If it wasn’t in-season, I had to be OK with hunkering down in the gym to prepare even if it was climbable outside.For example, when I wanted to send my project at Area A in Mount Evans, a lower-elevation alpine-bouldering area, I decided to take July and August to train for it. Even though others were still climbing and sending at higher-elevation alpine areas during those months, I knew that the training would pay off for me in early autumn. In contrast, if my goal was to climb more volume, then a discrete peak was less important. Either way, taking this step back helped me gain clarity.
Off-Season
Once you’ve figured out your in-season time frame, the next step is to figure out when to prepare for your performance goals. This is exactly what the off-season is for: It’s a season to focus your energy on preparation, one during which you prioritize training, putting performance on the back burner. I generally recommend planning for eight to 12 weeks of off-season training prior to a performance peak. This allows sufficient time for training adaptations to occur without the risk of burnout of overtraining that can come from longer training durations.
https://www.climbing.com/skills/rock-climbing-how-much-training-optimal-amount/
Preseason
Think of the preseason as a transitional season. Rather than dedicating 100 percent of your time and energy to either performing or training, you instead go for a 50/50 split. The length of the preseason can be anywhere from a quick two-week transition to a full eight-week period, depending on when you’ve timed your in-season performance peak for. This is a great way to ease the switch from training to performance by reintroducing more climbing-specific training and skill practice than is typically present in the training/off-season.
During this period, you increase the frequency and duration of your climbing sessions. Additionally, you can work on climbing adaptations specific to your goals—for example, increasing capacity for longer projecting sessions, or working power-endurance or endurance. You can also combine general strength sessions with skill practice sessions.
Postseason
Lastly, the postseason prioritizes rest and recovery—in other words, taking a break. This break can look different for different athletes. It might be a full break from climbing and training, for example enjoying some summer beach time. Or it could look like climbing purely for fun at a lower level, without any pressure or expectations on performance. You can also dedicate the postseason to focusing on a different sport. For example, if you enjoy both climbing and running, you could put climbing on the back burner and train for running. The postseason ultimately can help your increase athletic longevity by helping you avoid overtraining and burnout.
Customize Your Plan
Here are a few steps to help plan out your sport seasons:
- Write out a list of goals. Include both short-term goals (a time frame within a couple of months) and long-term goals (annual or multiannual).
- Create a rough draft of an annual plan: When are conditions ideal in your area? When are you taking a trip? When do you want to take a break?
- Determine your performance peaks (in-season)
- Determine your training periods (off-season)
- Determine your transitional periods (preseason)
- Determine your recovery periods (postseason)
Juliet Hammer (julietamanda.com) is a remote climbing coach based out of Chattanooga, Tennessee. She helps climbers of all levels reach their goals through technique and strength training.
The post One Major Thing Your Training is Lacking: “Sport Seasons” appeared first on Climbing.
]]>
Climbing is a unique sport that requires both strength and technique. But it can be difficult to figure out where to focus your efforts: Do I need to get stronger? Do I need to improve my movement skills? Do I need to do both? The answer can be surprising.
The post Should I train strength or technique? appeared first on Climbing.
]]>As a climbing coach, the first thing I do with my clients is perform a strength and technique assessment. Understanding a climber’s current level in each helps me create a more personalized program. If a client is outclimbing their strength, I know that their technique is in a good spot and prioritizing strength will be the best plan of action. In contrast, if a client is stronger than the current grade they’re climbing, I know that focusing on technique will be the most helpful.
For example, a rough benchmark of the V4–V5 level is being able to do around five pullups. If a client comes to me climbing V5 but is only able to do two pull ups, upper-body strength is an easily identifiable “low-hanging fruit” to focus on. In contrast, if a client comes to me climbing V5 and is able to do 10 pullups, it’s clear that strength is not their limiting factor and technique should be the priority.
Let’s begin by more clearly defining both strength and technique.
What Is Strength?
Strength is the ability to exert force. This is exactly what we do all the time on the wall, whether that’s pulling down during a lockoff and exerting force through our upper body and fingers, or standing up through a highstep and exerting force through our hips, legs, and toes. Strength can be specific to a particular move (such as a difficult heel hook or a tricky mantel), specific to climbing (such as finger strength and upper-body pulling strength), or general (such as hip strength and core strength). To become a well-rounded climber, it’s important to cultivate all three types of strength.
What Is Technique?
Movement is getting from point A to B, but technique is getting from point A to B efficiently. There’s often more than one way to get through a climb, but some ways are better than others. Examples of good technique include being accurate with footwork, finding ideal hip positions for tricky moves, and moving at a pace that’s appropriate for the terrain. Having good technique means both being able to execute a climb as well as to figure out the best way to do so.
Strength vs. Technique
While at first glance strength and technique may seem like contrasting aspects of climbing, they are actually interdependent components that comprise the integral climber. In other words, you’ll only get so far with only one or the other—both are necessary for becoming the best climber you can be. Meanwhile, there are benefits to excelling in each but there are also limits.
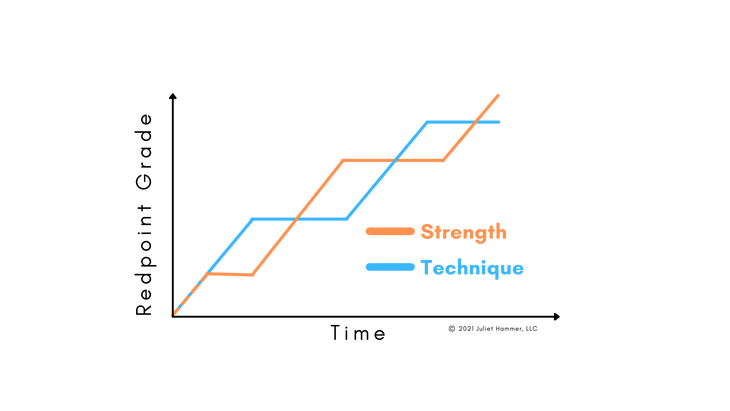
The relationship between strength and technique is an ebb and a flow, as depicted in this diagram. Oftentimes it’s difficult to make huge progress in both simultaneously (the exception to this is when you are a newer climber: In this case, it’s not unusual to see rapid improvement in both.) While one of these components of climbing is improving, the other is often plateaued.
For example, you may find that you’ve stalled in your climbing after making good gains in your technique—you’ve reached a point where you’ve learned all of the movement you can execute at your current strength level. Therefore in order to level up your climbing (breaking into the next grade, becoming more solid at your current redpoint level, improving your foundation of climbs below your redpoint grade, etc.), you need more strength. Once you gain more strength, you then need to learn how to apply this new strength to the wall, and your technique begins to improve again. This process repeats itself over and over again: Improving in one aspect of your climbing can help you break through a plateau in the other.
Assessing Your Climbing
So, how do you figure out which aspect to work on? Here is a simple self-assessment you can do at the gym or your local crag.
Choose four different climbs:
- A technical vertical climb
- A strength-based vertical climb
- A technical overhanging climb
- A strength-based overhanging climb
| Examples of a technical vertical climb would be a competition-style boulder or a delicate slab with poor footholds. Success here will depend on learning the movement and executing the skill; you’ll need some strength, but it’s not the determining factor. |
 |
| For the strength-based vertical climb, such as a straightforward crimp ladder with highsteps and deep lockoffs, success is dependent on stability in movement and execution of force—for example, having the hip strength to stand up through the highsteps or having the finger and shoulder strength to pull through the deep lockoff. Technique will be important here, but is not the determining factor for success. |
 |
| On a technical overhanging climb, for example a tricky roof climb that requires kneebars, toe hooks, and bicycles, specific footwork skills and movement efficiency are necessary for success. You need to know how to execute technical footwork while optimizing momentum and hip positioning. Strength tends to be more important on steeper climbs, but the application of this strength will be reliant on good technique. |
 |
| Lastly, on a strength-based overhanging climb, such as a dynamic, yet simply sequenced, steep climb that requires big pulls and toeing in hard, success is dependent on power, upper-body strength, and core strength. In this case, the application of technique is reliant on strength. |
 |
Perform each of these styles of climbs, videoing yourself for reference. Score yourself on a scale from 1 to 3.
- 1: Unable to complete the climb, encountering a lot of difficulty figuring out and performing the movements
- 2: Able to complete the climb but with a moderate amount of difficulty. Feeling like the climb could have been executed better.
- 3: Able to complete the climb with little difficulty and satisfied with the execution.
When taking a look at your scores, you can then determine what your strengths are and where your weaknesses lie. Use this information to then target these areas for improvement.
If you find that strength is holding you back, a good starting point is to do some structured strength training. If you’re new to strength training, it’s recommended to hire a coach or find an instructional program. If you find that technique is your deficit, a good starting point is to create intentional practice with your climbing and have a goal for each session (for example, focusing on footwork during your warm-up, taking video of yourself on your project, etc.). Again, a coach or instructional program can be additionally helpful.
Juliet Hammer (julietamanda.com) is a remote climbing coach based out of Chattanooga, Tennessee. She helps climbers of all levels reach their goals through technique and strength training.
The post Should I train strength or technique? appeared first on Climbing.
]]>