OTG is ideal for boulderers and sport climbers with a performance-oriented mindset, particularly those who have an interest in combining training with nutrition. I was surprised to see numerical gains in my testing after just 4 weeks of training.
The post I Took Matt Fultz’s Training Program and Saw Surprisingly Quick Gains appeared first on Climbing.
]]>Our Thoughts
These days, it seems as if every strong climber works a side hustle as a coach, and there’s no shortage of remote training programs. Matt Fultz, however, isn’t just another pro who’s pivoted to coaching. His passion for training stems back to 2001 when he first started climbing. There weren’t many teams, coaches, or mentors where he lived (first in Indiana, then in Idaho), so he had to learn on the fly. That drive led him to getting a degree in exercise science—and it’s clearly served him well with his own climbing. Fultz’s education, combined with his compassion and more than two decades of experience, is Off the Ground’s recipe for success.
Fultz kindly let me test his flagship APEX training program, which included a fully personalized training plan, video analysis, and daily direct messaging with Matt, along with nutrition coaching from Hailey. I tested the plan for six weeks, and, despite the very short timespan, I saw incremental gains in my workouts from week to week, plus some surprising improvements in my testing scores. Most importantly, my body felt great throughout the training. I was recovering adequately between workouts and maintaining good energy levels, which I can attribute to Matt’s skilled programming paired with Hailey’s nutrition recommendations.
About the Tester
I grew up in the Northeast, where the rock season lasts a full two months if we’re lucky. Winters are long and cold and for ice climbing. Spring is frustratingly wet. Summers are stymied by humidity and black flies. But in the fall, there is generally a glorious month or two with perfectly dry, crisp conditions. Growing up, those were the days I lived for—and in the dark epochs between seasons, I trained.
Training for climbing has been a continuous thread through my life. It led me to a job at Rock and Ice (R.I.P.), then to a role as a fitness columnist for Outside magazine, which gave me an excuse to pick the brains of top coaches, PTs, and athletes the world over. When friends started asking for training advice, those informal sessions evolved into official clinics and a professional coaching gig. I’m not coaching much anymore, but I’m still training, so when Climbing mag asked me to test Matt Fultz’s program, I jumped at the opportunity to let another coach take the reins.
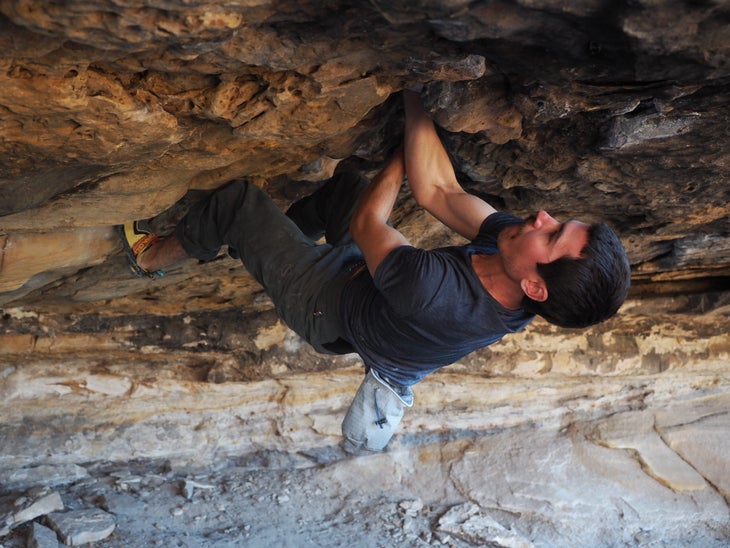
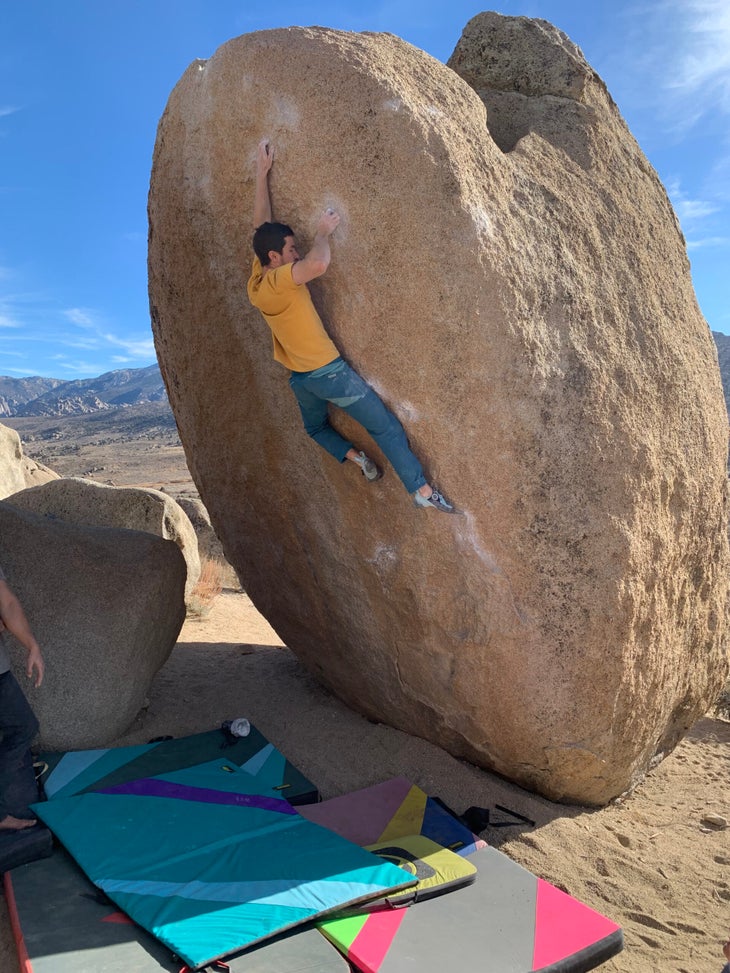
While most of us mortals with desk jobs (myself included) will never match Fultz’s V16 level we can still get joy from seeing continuous improvement over time—and the most efficient way to generate those gains on a busy schedule is to engage in structured training.
An Inside Look at Fultz’s Off the Ground training programs
Pick a program
OTG offers several training programs and plans designed to improve bouldering or sport climbing potential while building injury resilience. All options run on a flexible monthly basis. They range in price from $99 to $299 per month and vary based on the level of personalization. The premium APEX and Performance Ready plans include nutrition coaching, though it can also be purchased as a standalone for $99 per month.
The personalized training programs start at $200 per month with the Focus tier. Apex—OTG’s flagship program and the one we tested for this review—combines the Focus plan with nutrition coaching. You can also upgrade to the Performance Ready plan for $299 per month, which is an Apex plus a monthly 30-minute phone call with Matt and Hailey to talk about your goals, projects, and next steps. Lower tiers include the Boost plan, a pre-written training regimen with video reviews and messaging, and the Siege plan, a pre-written program designed to supplement an outdoor performance climbing-season. Both cost $99.
Matt Fultz writes all of the individualized training programs while Hailey Fultz tackles the nutrition side. A benefit to a small organization like OTG is that you know exactly who will be coaching you before you commit, which isn’t always the case with other training companies.
Onboarding process
Once you select a plan, you start by filling out a survey on your climbing interests, past and present injuries, access to training equipment, short- and long-term goals, training history, and scheduling. If you opted for the nutrition add-on, you’ll complete a second form, with questions on height, weight, body fat estimate, goals, food allergies and restrictions, and diet and eating habits. Each takes upwards of 30 minutes to complete. When you submit the forms, OTG promises to respond within 48 hours, but Matt responded to me in less than 24, following up with a TrueCoach account invitation and information about testing week.
Strength assessment and analysis
A lot of people dread fitness tests, but OTG’s isn’t something you should fear. Fultz has everyone complete the same assessment, spread across a full week, which is divided into four individual testing days, two rest days, and one flexible day. Climbers repeat the same assessment at the end of each training cycle to measure progress.
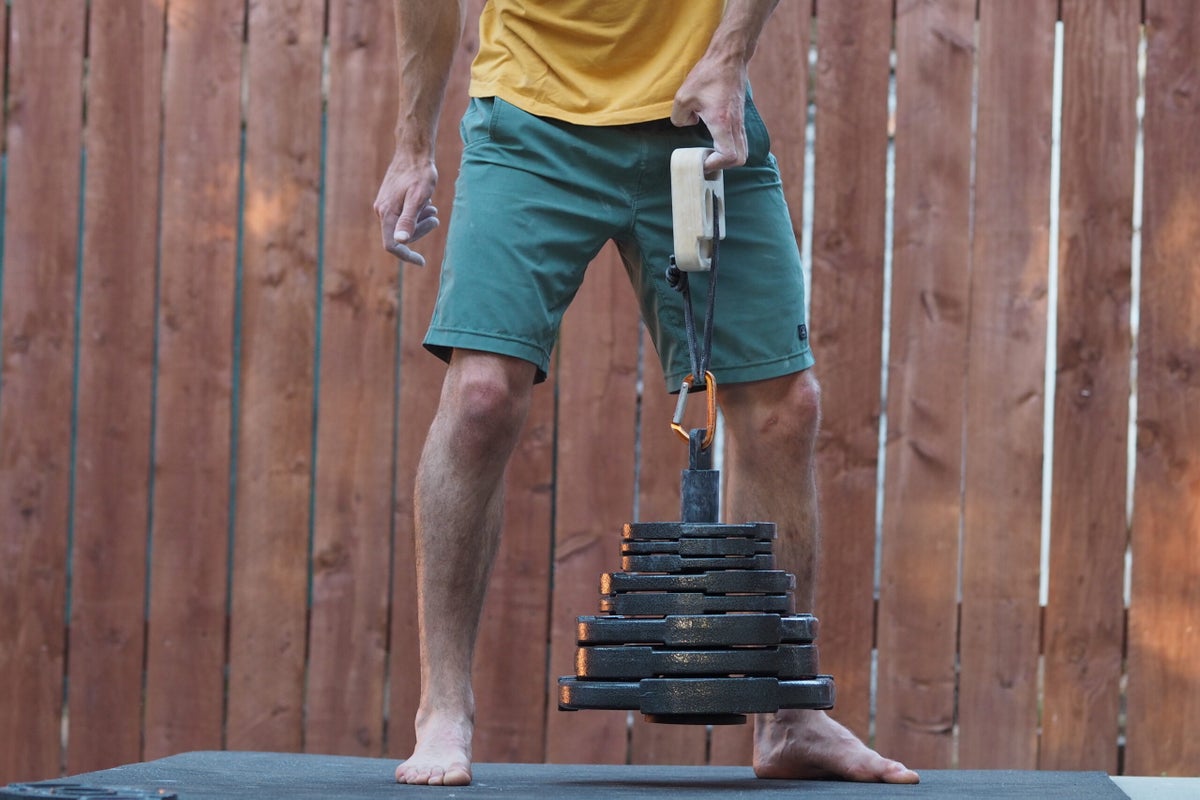
Each testing day focuses on a specific attribute—such as strength, fingers, or movement and technique—which makes the setup and logistics easy. Each day typically involves only three to four exercises, with time to spare for open climbing. These exercises include everything from max pull-ups and standard 20mm deadhangs to OTG’s namesake “Off the Ground” lifts.
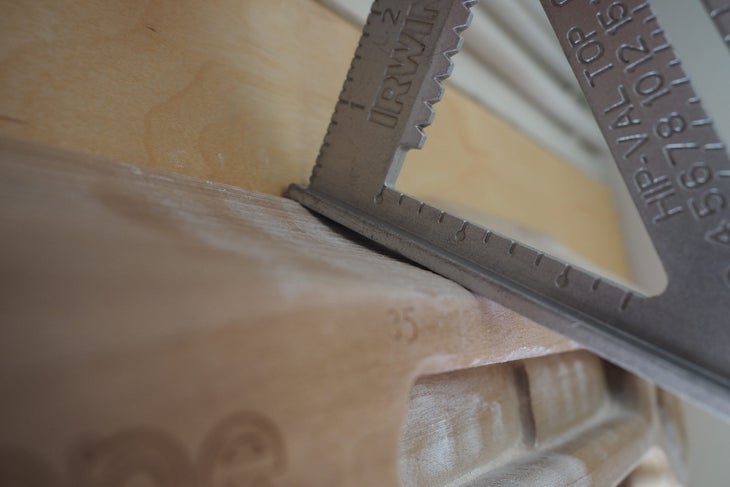
I completed the prescribed exercises each day within the duration of an average gym session, and I finished feeling satisfyingly fatigued, but not completely wrecked. My one mistake, however, was attempting to do the OTG day at home. Despite hitching together every kettlebell, dumbbell, and odd weight that I could find, I ran out before I could reach my max. So a word of advice: read the descriptions beforehand and make sure you have all the necessary tools at your disposal.
Meanwhile, to get a sense of your average nutritional intake, Hailey has you log everything you consume for four days (three training days, one rest day) using a nutrition tracking app.
Once your testing is complete, Matt sends an analysis and your first few weeks of programming—and he does so within a day or two, which is impressively fast.
From my experience, his analysis felt thorough and nuanced and included a nice combination of positive feedback and criticism. I was particularly impressed with the climbing video review, where he used a compliment sandwich formula to point out what I was doing wrong without damaging my ego. He called out my strengths along with my areas for improvement, and recommended key areas for focus in the coming months, while keeping my strengths on the backburner for consistency.
Delivery and communication
OTG uses the TrueCoach app (which is free for clients) to send training programs, communicate through messages, review videos, and manage billing. While it’s nice to have everything in one place, I’m not a huge fan of the app overall.
First of all, the interface just feels clunky. Workouts are organized chronologically, which makes it challenging to find past exercises when you need to repeat a workout or check the previous load. Secondly, the exercise descriptions are in paragraph format (versus a table with set/rep protocols), which is harder to quickly digest mid-workout. Same goes for the results. You must log everything in paragraph format instead of simply punching numbers into a table.
That said, Fultz’s exercise descriptions, often accompanied by demo videos, were clear and concise. And when I wasn’t sure about something, I could always ask since OTG allows daily messaging through the app. Fultz only requests that you give him 24 hours to respond, which seems more than fair, since he’s a one-coach show and a climber himself. In my experience, Fultz always responded within 24 hours, and often within a few hours.
The nutrition communication with Hailey is mostly conducted over email, along with any nutrition tracking app. (She recommends MyFitnessPal, which has a free version). The nutrition coaching also involves a weekly email check in during which the climber answers half a dozen reflection questions and Hailey responds at length. She also sends a steady stream of PDFs with nutritional information, meal prep ideas, and other tips.
Training structure and workouts
Fultz typically structures his programs into 12-week cycles, broken down into blocks with specific areas of focus, such as capacity, power endurance, strength and power, board work, non-linear pre-performance, and linear pre-performance. Each training program is individualized, so where you begin depends on your initial assessment, goals, and timeline. While I didn’t get to experience the whole shebang for the purpose of this review, I did get a six-week snapshot.
During my program, each week of training had a nice balance of workouts, rest days, active rest days at home, and flexible days when I could choose between a few options (rest, projecting, repeating a workout), depending on how I was feeling. The time commitment ranged between 6 to 10 hours per week, and felt manageable for me as a 9-to-5 weekend warrior.
Fultz designed individual workouts around a specific training stimulus, such as strength, climbing stamina, or movement, which made them pretty efficient. I could complete an entire session in the weight room one day and another on a systems board the next. The average workout took less than two hours—or roughly the same amount of time as a typical gym session.
The training volume felt on target for me—I was recovering adequately between workouts and maintaining good energy levels. Overall, the programming felt well matched to my level, goals, and schedule.
There were no official check-in calls with the coach (for that, you’d need to upgrade to the Performance Ready plan), but Matt allows daily messaging and video review, which felt adequate to me, though climbers going through their first structured training plans might benefit from occasional in-person calls. He also occasionally reached out to see how I was getting along.
Nutrition coaching
This was a new experience for me. I generally eat pretty healthy and have been fortunate enough to never worry about my diet or weight, so I haven’t paid much attention to macros and calories before.
As mentioned above, during the first-week nutrition assessment, Hailey asked me to log four full days of nutrition—everything I ate or drank, down to the calorie—so she could get a sense of my baseline diet. After that I reduced logging to a couple of days per week as I responded to Hailey’s advice about my needs. The idea, here, is that you can learn as you go versus following a strict meal plan. There’s no one-size-fits-all recipe, afterall.
Logging nutrition was far harder and more time consuming than I imagined. The more complex the meal, the harder it was to calculate. How many grams of protein were in this taco? What’s in a little dash of adobo sauce? Does it even matter? I confess that my estimates were, at times, far from accurate.
There was also a real learning curve for me here, and, at first, I felt I was drinking straight from a fire hose of nutritional information. Hailey’s feedback emails often ran as long as 1,500 words, with five to seven PDF attachments, which usually contained bright, multi-colored fonts and highlighting. It was all… a bit hard to digest.
Nevertheless, Hailey, a certified sport nutrition coach through the National Association of Sports Medicine, was patient and encouraging. Her feedback never felt judgemental—even when I logged the same NYT’s slow cooker chipotle-honey chicken tacos three meals in a row, because, leftovers. And when I ate an entire box of Annie’s mac and cheese (no veggies! no protein!), she responded, “Matt likes this kind of macaroni, too,” before suggesting I add some steamed broccoli next time.
The traditional problem with eating healthily, at least for me, is time. After a long day of work, the commute to the gym, a two-hour training session, and the commute home, I often won’t start cooking until 8 or 9 pm, at which point I’m focusing less on quality than on convenience. I know what I’m eating isn’t ideal, but in those moments I don’t have the bandwidth for anything else. Hailey understood this, however, and frequently encouraged me to “focus on progress, not perfection,” which was helpful. (I now steam the broccoli some of the time.) And, overall, I felt like she listened to my goals and gave me valuable insights for areas of improvement, particularly when it comes to things like optimal protein timing, time-saving meal prep tips, and easy on-the-go recipes for climbing trips.
I fully respect that nutrition is an important piece to the puzzle; I also recognize that life-long habits are hard to change. My one wish for the nutrition coaching was that I had had more time and mental energy to put into it. Over a longer duration, I think Hailey’s feedback would have had more time to simmer.
My results from Off The Ground’s program
I tested the OTG Apex training program for six weeks, which included an initial testing week and a retesting week at the end, so I only experienced four weeks of dedicated training, which is a very short amount of time to see tangible results in my climbing performance. But I nonetheless saw incremental gains in the exercises from week to week and some surprising improvements in my final testing scores.
I saw the greatest gains in strength endurance, which is unsurprising because it was one of my areas of focus and is a type of adaptation that tends to come faster than something like max strength or finger strength, which were my existing strengths and take longer to develop. For example, on the two-handed 15 mm deadhang test (a bodyweight hang for max duration), I managed 60 seconds the first time around and 70 seconds after four weeks of training—an increase of 16 percent. But with the 20 mm deadhang test (max load, 5 second hold), I went from +132 pounds to +135 pounds—only a 2.3 percent increase.
Most importantly, however, my body felt great throughout the training, with no aches and pains or injuries. One of the most challenging things about coaching other climbers is getting the stress-rest balance right. I felt like Matt did a great job ensuring that I had a good ratio of exercise to recovery, and I think I can attribute my high energy levels in part to Hailey’s nutrition recommendations. (Matt said he and Hailey often work at the same table and chat about athletes together, which is certainly an added benefit to OTG.)
Lastly, I’ve been climbing in all styles for over 15 years, and I thought my technique was pretty dialed. But Matt still found areas for improvement, which has given me a better awareness of my body and movement overall, and I’ll continue to carry that forward.
If I had more time in the program, I’m confident I would have seen further gains, and also see those improvements translate to the rock. And maybe, just maybe, I would have been able to take down an old nemesis project or two.
Who is Off the Ground training for?
OTG is ideal for boulderers and sport climbers with a performance-oriented mindset, particularly those who have an interest in combining training with nutrition. While they do cater to all skill levels, experienced climbers will likely get more out of the program.
The time commitment ranges from 6 to 10 hours per week, with the average workout taking one to two hours, which feels reasonable for those who hold down a full-time job. Each week also has a nice balance of strength workouts and on-the-wall exercises, board climbing, movement work, or open climbing at the end, satisfying those who are always itching to climb.
The flexible month-to-month commitment makes it easy to join, cancel, or pause and restart seasonally, so you can fit the training into your life, as needed (i.e. train through the heat of summer to be ready to send in the autumn).
The ideal training setup includes access to a modern climbing gym or a home wall, hangboard, crimp/pinch block, and free weights (preferably a barbell, although dumbbells can work). But Fultz says he can create a program around personal constraints, which he commonly did during the pandemic lockdowns.
Bottom line: Matt and Hailey Fultz know what they’re doing
Off the Ground’s Apex training program is well designed for intrinsically motivated boulders and sport climbers who want to push their performance to the next level. The training itself feels highly individualized—the right intensity and volume for one’s current fitness, based on one’s goals—and has a nice balance of off-the-wall workouts and actual climbing.
Matt Fultz not only brings decades of hard bouldering experience to his coaching, he’s also a strong communicator who makes himself readily available for questions and personalized feedback.
The combined training and nutrition coaching, spearheaded by Hailey Fultz, is a huge benefit, because if you can recover more efficiently and have more productive sessions, you can absorb more quality training stimulus, which ultimately leads to more sends. The caveat is that it does take extra time and mental effort, at least at first, so you need the bandwidth to take full advantage of it.
Overall, the fully individualized training, ongoing video review, and direct access to responsive coaches make the program a high value for a reasonable price. Plus, the flexible month-to-month commitment makes it a great option for those who want to get in shape for climbing season or tune up before a climbing trip.
The post I Took Matt Fultz’s Training Program and Saw Surprisingly Quick Gains appeared first on Climbing.
]]>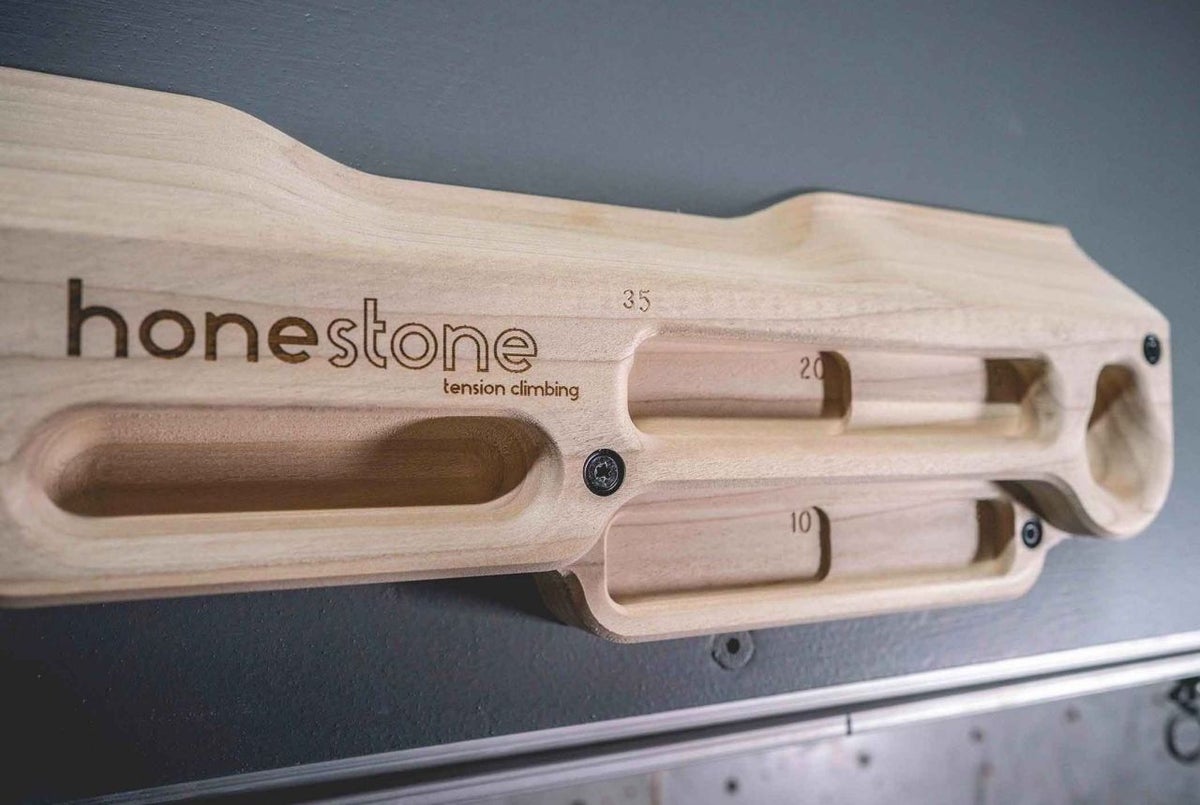
The Honestone is no doubt one of the best hangboards on the market.
The post The Tension Honestone: One Hangboard to Rule Them All appeared first on Climbing.
]]>About the Tester
Some people seek therapy; others hangboard. Fortunately for me, I used to live in a crumbling adobe casita whose only redeemable qualities were an absentee landlord and a long covered porch. My hangboard collection grew at pace with my frustration in the desert heat—and I turned those exposed beams into Swiss cheese.
I had a favorite board for max hangs and a favorite for repeaters; one for one-arms and one for eliminations; one positioned for shade on summer evenings and another for optimal sunlight on winter mornings. Neat rows of micros filled the gaps in between. At any given point, I’d have five or six boards mounted on the porch (and another inside a bathroom skylight), which I’d occasionally swap out for testing or when a classic was usurped by a newcomer.
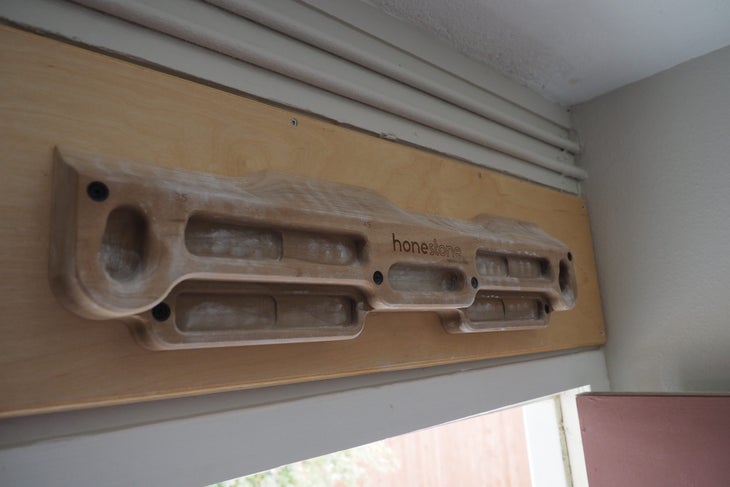
Throughout the 15-plus years I’ve been climbing, I’ve owned 18 different hangboards and four sets of micros; plus I’ve tested dozens more. Ever since its release in 2020, the Tension Grindstone Mk2 has ranked among my favorites, so when I heard the Denver-based company was releasing two new boards this year, the Honestone and the Whetstone, I had to have them. There’s always room for one or three more, right?
I’ve now tested the Honestone for nearly eight months, using it for a variety of training protocols, including density hangs, long max hangs, one-rep max hangs, one-arm hangs, repeaters, and velocity pulls, along with general finger-strength assessments and at-home warm-ups before heading out to local boulders.
First Impressions
Occupying prime real estate on my porch was the Tension Grindstone Mk2, my favorite hangboard to date. The board was damn near perfect, so I had high expectations for the Honestone, but I also wondered if there was much room for improvement and whether Tension was cannibalizing my favorite hangboard of all time by releasing these two new hangboards. (As of this writing, the Grindstone is still in stock.)
The overall layout of the Honestone is similar to that of the Grindstone, with considerable overlap in edge depths, and yet it somehow looks sleeker, more futuristic even. There’s asymmetrically-aligned pairs of edges at 20mm, 15mm, 10mm, and 8mm (all present on the Grindstone). The main differences are new 25mm mono pockets; an incut 25mm center edge for one-arm hangs (it’s 50mm and flat on the Grindstone); and macro-textured slopers at 35- and 45-degrees on top to replace the Grindstone’s jug rail.
What’s missing on the Honestone from the Grindstone is a third tier of edges and the 25mm and 30mm depths, which doesn’t feel like a big loss, especially since the Whetstone fills that gap. The missing top jug, however, is a sacrifice in utility, which we’ll get into later.
Let’s dive into the main features:
Edge pairs and profiles: Like the Grindstone, the Honestone has asymmetrically-aligned edge pairs to maintain consistent shoulder width, all of which are engraved with their corresponding depths in millimeters. The 20mm and 15mm edges—the workhorse depths—have Tension’s undisclosed “custom edge radius” designed for maximum comfort, while the 10mm and 8mm have a 1/8-inch edge radius to “balance bite and comfort,” according to Tension. There’s a noticeable difference in comfort between the two, which isn’t necessarily a bad thing.
Developing finger tissue capacity and strength takes years of consistent hangboard practice, and comfort is the key to that consistency. This is where Tension really shines. I find the 20mm and 15mm edges to be some of the most comfortable for the finger joints, the tendons, and the skin that I’ve used, even with one-arm hangs or elimination grips like three-finger drag and two-finger pairs. This comfort negates the need for dedicated pockets.
Although still pleasant, the smaller edges do have a little more bite to them, but that helps you stick and can also help with skin conditioning ahead of a climbing trip or as a warm up for micro edges.
Incut center edge: The 25mm center edge, which is incut by 10 degrees, is a nice improvement over the Grindstone’s 50mm flat center slot, which didn’t seem to serve much of a purpose beyond one-arm pull-ups or plugging a cam for a makeshift pulley system. It provides a nice stepping stone for those looking to make the challenging transition from weighted two-arm hangs to one-arms.
For my hands, the center edge starts to round right at the distal interphalangeal (DIP) joint before it gradually drops to vertical toward the distal third of the middle phalange. Compared to the standard test depth of 20mm, this provides a little more surface contact, and therefore friction, yet because of the rounded edge radius it’s still extremely comfortable at high loads. The subtle incut also makes it feel a bit easier.
Mono pockets: For the Grindstone, Tension’s description states, “The custom edge profile eliminates the typical pressure points of a standard rounded edge, making it possible to train 4, 3, 2, or even 1 finger at a time without the need for designated pockets.” So what’s the point of the new mono pockets on the Honestone?
As I mentioned earlier, I find Tension’s edge profiles to be comfortable enough for two-finger pairs, but I’ve usually shied away from trying to hang from the edges with just one finger because it felt too tweaky and dangerous. The Honestone’s mono pockets, however, have rounded bases that gently cup the fingers, which increases friction (more surface contact) and also stability (less side-to-side wobble). These pockets not only feel more comfortable, but also safer, as far as mono pockets go.

The “macro-textured” slopers: Tension traded a top jug for a set of asymmetrically aligned slopers, and honestly I wish they hadn’t. When it comes to training slopers on a hangboard, especially on a wooden board, friction is almost always the limiting factor, not strength, so it’s nearly impossible for a well-trained climber to reach full motor unit recruitment through load alone.
Likely in an attempt to increase the amount of friction, Tension machined in what it calls “macro-texture,” but these washboard-like grooves, which run perpendicular to the fingers, don’t seem to add much.
Moreover, the slopers are labeled as 35 and 45 degrees, but their angles are (purposely) inconsistent across the depth of the holds. Tension describes this as “continuously variable curvature.” In practice it looks like a slight concave, or cupping, where the back is steeper than the front of the hold. This curvature is the opposite of what the fingers want to do and seems to inhibit consistent pressure along the length of the digits. The result, for me, is that when I use the slopers, my fingertips slide down the steep part at the back and settle somewhere in the middle, so I end up hanging from only the front half of the holds, reducing contact area (and therefore friction) even further.
Slopers are important to train, of course, but I don’t think training them on a hangboard is an efficient use of time. I’d rather target them through climbing itself. For me, the utility of a nice top jug for pulling and core exercises trumps the benefit of slopers.
Attention to detail: Tension has set the standard for hangboards with their modern designs, thoughtful attention to detail, and quality hardwood, machining, and finishing. Here I wanted to point out a few of the finer touches that elevate this board.
The hold depths, in millimeters, are engraved on each edge, and while this is becoming more common, I’m still amazed it isn’t the standard.
The pre-drilled screw holes are not placed within edges, so you never have to feel them with your fingertips while you hang. Again, I’m surprised this isn’t standard, yet I see—and feel!—this on too many boards (Beastmaker, Rock Prodigy, Metolius, Frictitious).
This might seem trivial, but I appreciate that the Honestone comes with countersunk washers for the mounting screws. With my Tension Simple Boards (yes, I have those, too), the first time I backed out the screws to move the boards, a couple of the heads caught and peeled up splinters of wood. The washers prevent that from happening and also stop people from overdriving the screws into the wood.
Who is the Tension Honestone for?
The Honestone is no doubt one of the best hangboards on the market. Its smaller edge range and mono pockets make it a step up in difficulty from its more beginner-friendly sibling the Whetstone, yet I wouldn’t label it as an “experts only” board. With a little direction, anyone can use this board effectively and safely, regardless of training age. That said, a climber with a deeper history of structured hangboard training will likely get more out of it.
Bottom Line
Does the perfect quiver-killer hangboard exist? Tension’s Honestone comes close. It’s a high-quality wooden board with all of the edge depths a dedicated climber needs for structured hangboard training, and it’s very skin- and tendon-friendly to boot. Updates like the incut 25mm center edge and comfortable mono pockets give it a leg up on the older Grindstone. The lack of a top jug, however, limits the versatility of this board for pulling and core exercises, so one still needs to fill that gap with a pull-up bar or another board.
Since I started testing the Honestone, I’ve moved away from the desert, leaving behind my beloved front porch, which had more hangboards than the average climbing gym. In my new place, I only have room to mount two boards (gasp), so I have been forced to whittle down my stash and make some hard choices. After much deliberation, I have settled on the Grindstone Mk2 and the Honestone.
The post The Tension Honestone: One Hangboard to Rule Them All appeared first on Climbing.
]]>
It's the world's most convenient workout. And the possibilities are endless.
The post The Essential Push-Up, Why It Helps And How To Do It (And 12 Variations) Correctly appeared first on Climbing.
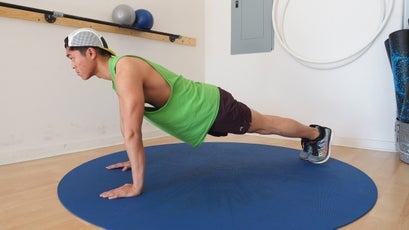
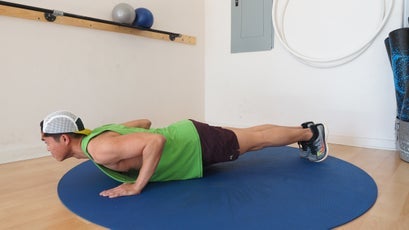
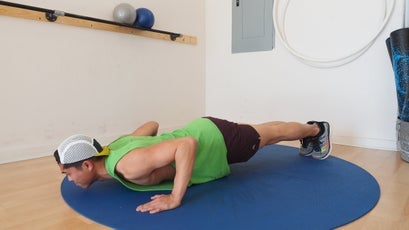
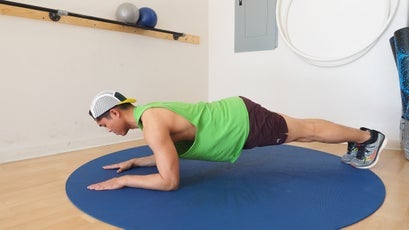
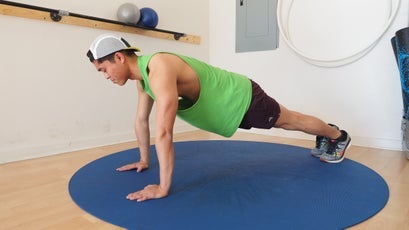
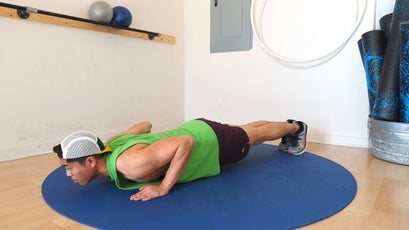
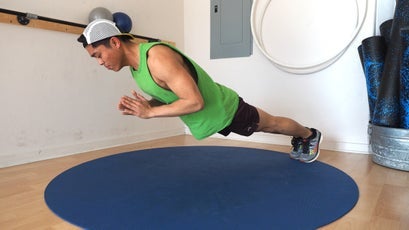
]]>The humble push-up is one of the greatest general conditioning exercises for climbers, and you can do them anywhere, no equipment required. “You always have ground,” says Steve House, co-founder of mountain athlete training program Uphill Athlete. Push-ups target the chest, shoulders, and triceps and work your core, back, and legs. They pack a serious punch for such a seemingly simple exercise, but you aren’t doing yourself any favors if your form isn’t dialed.
Great push-up form starts with a rigid plank. Your arms should be fully extended, with your hands, elbows, and shoulders all in line, and your feet should be no more than 12 inches apart—the closer together, the more difficult the push-up, because it requires more core activation for stability. Throughout the push-up movement (unless otherwise specified by a variation), your spine should be neutral, so that your body forms a straight line from your feet to the crown of your head. Remember to engage your core and thighs to keep your hips flat and level.
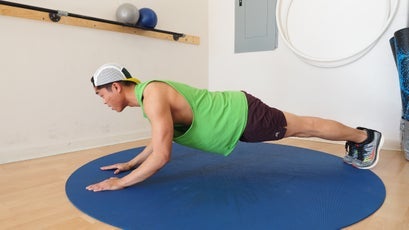
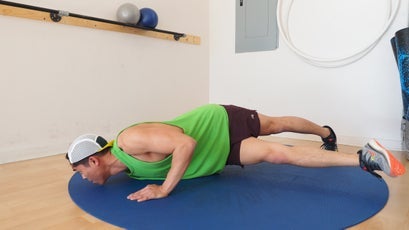
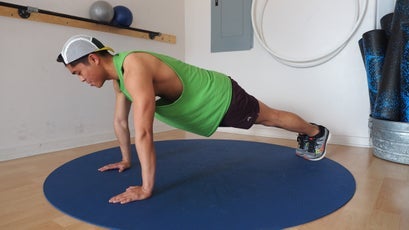
You can bend your elbows out to the side in a T formation, which fires up your pecs, or keep them tucked in along your rib cage, which biases the triceps, says Jared Vagy, a doctor of physical therapy and a certified strength-and-conditioning specialist. House coaches his athletes to always keep their elbows tracking back in the more triceps-oriented position. As an outdoor or endurance athlete, he says, “You’ve got to carry the engine. You don’t want unnecessary weight.” For functional movements, you rarely need bulging pecs, but the triceps are important—think poling when skiing, mantling when climbing, and maintaining balance as you move through uneven terrain. The elbows are also sensitive, especially for climbers who are prone to elbow pain, so having them track backwards can reduce the stress on the joint.
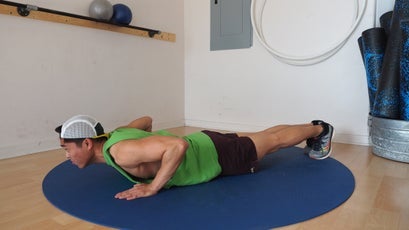
To protect your shoulders, Vagy recommends that you lower your chest just past the level of your bent elbow so that your upper arms are parallel to the floor. Dropping any farther increases stress on the anterior capsule of the shoulder.
As for speed, there’s no reason to pound out 30 fast ones. Proper form is much more important. Always move slowly and in control. Make it meditative, and focus on your breathing: breathe in when lowering; breathe out when pushing back up.
Once you’ve perfected your form, push-ups are an excellent way to warm up at the crag, and they’re great mixed into workouts for general conditioning. Plus, there are endless ways to modify them for your own specific needs. Here’s a guide to the classic push-up and our 12 favorite variations, in more or less ascending order of difficulty.
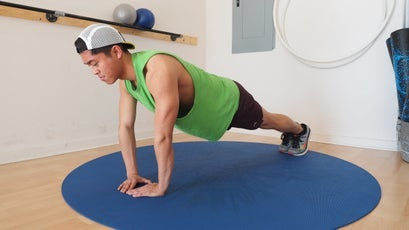
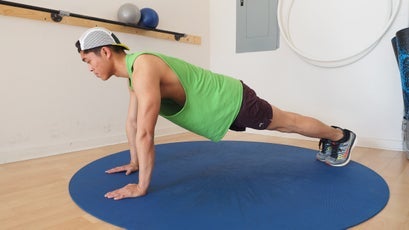
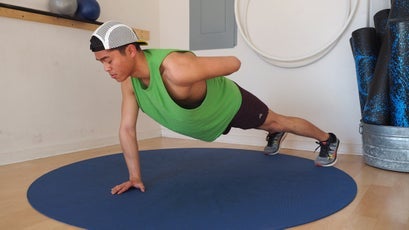
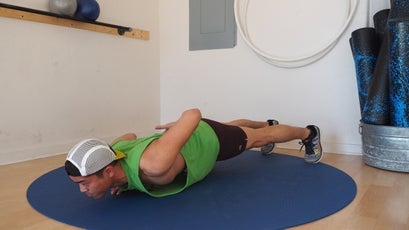
MILITARY PUSH-UP
What It Does
Strengthens the upper body—primarily the chest, shoulders, and triceps—as well as the core and back muscles.
How to Do It
Start in a standard push-up position (as described above), with your feet together or no more than 12 inches apart, hands flat on the ground below your shoulders, and arms straight. Breathe in as you bend your elbows—keep them tracking back alongside your body—to lower your chest to slightly below the level of your bent elbow, and then breathe out as you push back up to the starting position for one repetition.
Wide Hands Push-Up
What It Does
Strengthens the upper body and core, with more focus on the pectoral muscles.
How to Do It
Do a strict push-up, as described above, but with your hands farther out to each side, roughly 2.5 to three feet apart (the farther apart, the more difficult). Keep your elbows tracking back throughout the movement.
Triangle (Diamond) Push-Up
What It Does
Strengthens the upper body and core, with more focus on the triceps.
How to Do It
Begin in a plank position, with your hands together and angled inward at 45 degrees so that your index fingers and thumbs touch to form a triangle (or diamond). Keep your elbows tight to your body and bend them to lower your chest toward the triangle. Reverse the movement to the starting position for one repetition. Keep the triangle directly below your chest throughout the movement.
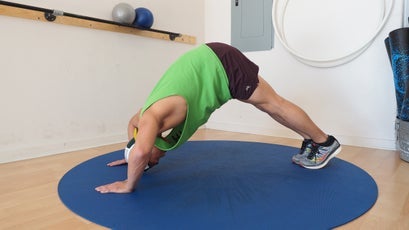
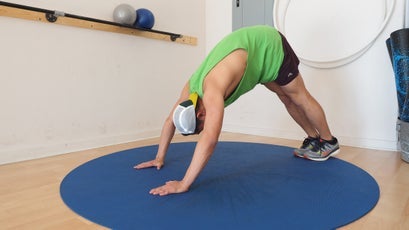
Pike Push-Up
What It Does
Strengthens the upper body and core, with more focus on the shoulders.
How to Do It
Begin in a downward dog yoga position, with your feet and hands just wider than shoulder width. Keep your hips high, heels low, and maintain the inverted-V position as you bend your elbows and lower your head toward the floor between your hands. Reverse the movement to the starting position for one repetition.
Super Push-Up
What It Does
Works the shoulders, triceps, and core and improves flexibility.
How to Do It
Slowly swoop from downward dog to cobra pose: from the downward dog position, bend your elbows and lower your nose to the floor between your hands, like a pike push-up, but then, without rising, continue moving your torso forward to slide your chin, chest, and then rib cage between your hands. As your ribs meet your hands, begin to arc your head and torso upward. Continue this upward arc until your arms are straight, hips are pressed toward the ground, and your back is hyperextended in cobra pose. Reverse the movement exactly until you’re back in downward dog.

Staggered Hands Push-Up
What It Does
Trains the push-up muscles asymmetrically across the body and requires more core activation for stability.
How to Do It
From a standard push-up position, move one hand forward and the other backward so they’re offset by about six to 12 inches (the farther, the more difficult). Bend your elbows to lower your chest until it is slightly below the level of your bent elbow, and then extend your elbows to push back up to the starting position. Keep your elbows tight to your body throughout the movement. After one or more repetitions, switch the fore and aft positions of your hands to work each side evenly.


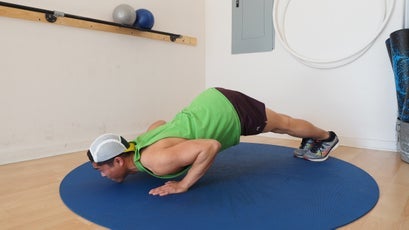
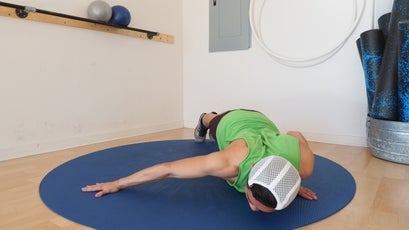
Sphinx Push-Up (Triceps Extension)
What It Does
Strengthens the upper body and core, with more focus on the triceps.
How to Do It
Start in a plank position, with your forearms flat on the ground, shoulder-width apart and parallel. Push up with your triceps to lift your elbows off the ground; continue until your arms are fully extended, then lower your elbows until just above the ground (don’t weight your forearms again) for one repetition. The farther forward you place your arms, the more difficult.

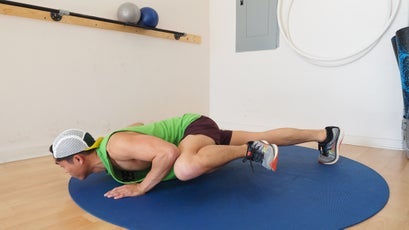
Spiderman (Side Kick) Push-Up
What It Does
Strengthens the core in addition to the typical push-up muscles.
How to Do It
Assume a standard push-up position. As you lower yourself toward the ground, simultaneously bring one knee out to the side and up to touch your elbow, with your leg parallel to the ground. Your knee should touch your elbow at the lowest point of the push-up. Reverse the movement to the starting position and repeat on the other side.
Cross-Body Push-Up
What It Does
Strengthens the upper body, with more focus on the core, hip flexors, and shoulders.
How to Do It
Assume a standard push-up position. As you lower yourself to the ground, simultaneously pick up one leg and cross it beneath your body as you rotate your hip toward the ground. Reverse the movement to the starting position and repeat on the other side.
Archer Push-Up
What It Does
Applies a higher percentage of body weight to a single arm, while the opposite arm assists (a good way to build up to a one-arm push-up).
How to Do It
Assume a push-up position, with wide hands angled outward at about 45 degrees. Lower yourself at an angle to one side so that you bring your shoulder down to your hand of the same side, while the other arm stretches to become fully extended. (It’s okay if your hands pivot during the movement.) Push back up to reverse the movement and return to the starting position. Repeat to the other side. It might help to keep your feet wider.
Typewriter Push-Up: This variation is similar to the archer, but instead of returning to the starting position between every push-up, move your chest from side to side horizontally along and just above the ground, while fully extending the opposite arm each time.

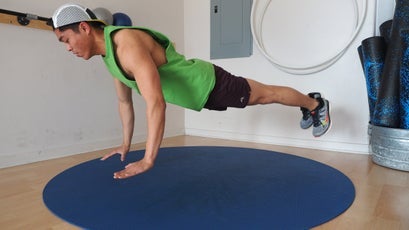
Power and Clap Push-Ups
What It Does
Develops power in the chest, triceps, and shoulders.
How to Do It
From a standard push-up position, lower your chest until it’s slightly below the level of your bent elbow, and then push upward with enough force so that your hands leave the ground by a few inches. Land with soft elbows in push-up form and continue the lowering motion toward the ground. Repeat. Make sure to keep your back flat and hips level throughout the movement.
Claps (Harder): Once you get a handle on power push-ups, you can progress the exercise by adding in claps, which require more power to achieve the necessary airtime. For regular clap push-ups, perform a power push-up but with even more upward force. While your hands are in the air, clap below your chest. Like before, land with soft elbows in push-up form and continue lowering until your chest is slightly below the level of your bent elbow. Repeat.
Behind-the-Back Claps (Even Harder): Do the same exercise, but clap behind your back instead of below your chest. Be careful not to bend at the hips (cheating), and watch your face on this one.
Triple Claps (Hardest): Do the same exercise, but clap under your chest, then behind your back, and then under your chest again, all before touching the ground.

Flying Push-Ups
What It Does
Develops even more dynamic power.
How to Do It
Like with claps, start in a standard push-up position and lower your chest until it’s slightly below the level of your bent elbow. Then explode upwards and lift both your hands and feet off the ground. Try to keep your back as flat as possible, but you may need to lift your hips slightly to generate momentum. It also helps to keep your feet wider. Land with soft elbows in push-up form and continue lowering toward the ground. Repeat.
Clapping Jacks (Harder): Do the same exercise, but clap your hands and feet together while in the air. Requires more airtime and power.
Superman Push-Up (hardest): Do the same exercise, but while in the air, fully extend your arms in front of you so that your body is in a single plane, parallel to the ground, like a flying Superman. Requires even more airtime and power.
One-Arm Push-Up
What It Does
Doubles the weight on a single arm and further activates the core for stability.
How to Do It
Just like it sounds—perform a push-up with one arm centered below your chest and the unweighted arm behind your pack. This one takes a bit more balance; it helps to keep your feet wider. Maintain a flat back and level hips (don’t let them twist one way or the other) throughout the movement. If you want an added challenge, opt for a two-point push-up: assume a standard push-up position with wide feet, then raise the opposite hand and leg to form a two-point plank. While maintaining a rigid plank, perform a push-up. Keep your back flat and hips level throughout the movement.
Even More Modifications
Many of these moves can be made easier or harder with these modifications, although not every modification will work with every type of push-up.
Make It Easier
- Knees: Perform push-ups on your knees instead of your feet to ease the difficulty on your upper body. This is a great way to build up to more difficult variations.
- Incline: Elevate your hands on a bench, chair, or table—the higher above your feet, the easier.
- Negatives: Utilize the lowering phase of a push-up (when muscle fibers elongate under load). “Muscles can handle a heavier load under eccentric contraction than they can under concentric contraction,” says Scott Johnston, a master coach at Uphill Athlete and the co-author of Training for the New Alpinism and Training for the Uphill Athlete. Therefore, he says, “[Negatives] are able to stress the muscle to a much higher degree, so you get a bigger strength-training effect.” In other words, if you’re not yet strong enough to do some of these push-up variations with proper form, perform only the eccentric phase (the lowering half) to build up strength for the concentric phase (the pushing-back-up half), when muscles shorten under load.
Make It Harder
- Feet Stacked: Cross one ankle over the other so only one foot is on the ground. This requires more core activation for stability.
- Decline: Elevate your feet on a box, bench, or step to increase the activation of the upper chest muscles and the front of the shoulders (anterior deltoids). The higher your feet, the more difficult.
- Weighted: Wear a weight vest or have a friend place a weight plate on your back for an added strength challenge.
- Eccentric Push-Ups: The benefits of the eccentric muscle phase are twofold. First, as stated above, negatives are a good way to build up to more difficult exercises. But because you can handle a heavier load under eccentric contraction, you can lower yourself slowly (over three to five seconds) to milk the eccentric phase for added training effect.
- Weighted Negatives: You can also add external weight during the eccentric phase for a greater strength-training effect. Start in a standard push-up position and have a friend place plate weights on your back. Lower yourself until your chest almost touches the floor (eccentric phase), and then have your friend remove the weight (or some of it) before you push back up (concentric phase).
- Plyometric Combinations: Transition between different types of push-ups. For example, go back and forth between narrow and wide hands or the fore and aft positions of staggered hands. Get creative.
The post The Essential Push-Up, Why It Helps And How To Do It (And 12 Variations) Correctly appeared first on Climbing.
]]>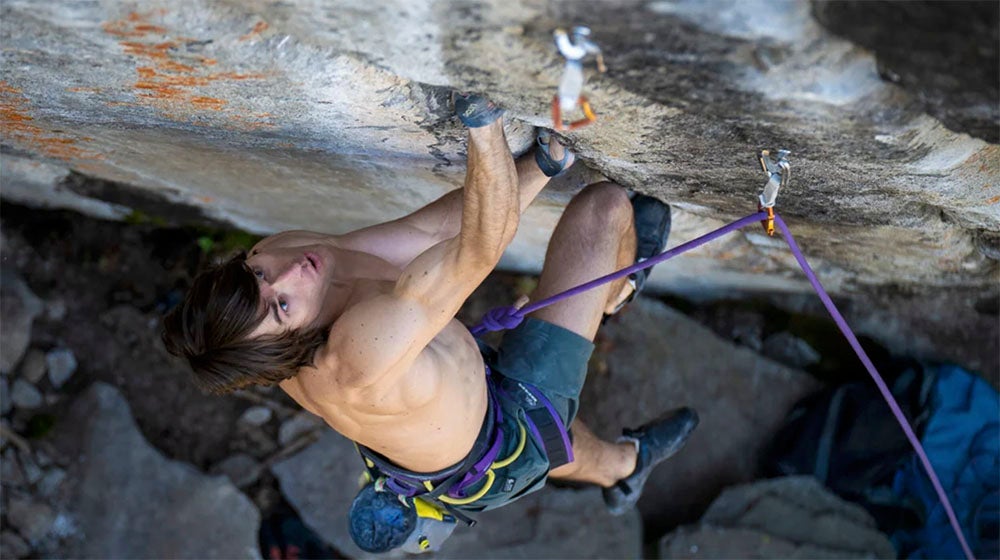
Few feelings trump that glorious moment when, with an outstretched hand clutching a bite of rope, you clip the chains of a climb you have put serious effort and thought into...
The post Ethan Pringle’s 10 Tips for Sending Your Project appeared first on Climbing.
]]>Want to learn more about how to succeed on your project? Then check our online course, 4 Weeks to Sending Fitness by Madaleine Sorkin, and get on your way to clipping those elusive chains.
Sending a project is about as good as it gets. Few feelings trump that glorious moment when, with an outstretched hand clutching a bite of rope, you clip the chains of a climb you have put serious effort and thought into. But that tingling feeling that envelops your whole being for the next few hours wouldn’t be half as sweet without the struggle.
That’s why projecting a climb is so intriguing and rewarding. One day you’re having trouble even comprehending how to execute a sequence of moves, and then, after plowing through doubts and morphing physically, it happens … and suddenly you’re at the top of your project, experiencing that elusive wave of satisfaction.
Stoked on sending your best? Then sign up for our online course “4 Weeks to Sending Fitness,” and clip those chains!
Though there is no easy way to climb to the top of your project, there are methods and tactics you can use that will help improve your success rate. If you’ve pushed your limits before, you’ve probably already experienced the setbacks and failures that are part of projecting. However, have you ever noticed how some climbers seem to send more than others?
Ethan Pringle is one of those climbers. Though he has been crushing hard sport-climbs since the age of 10, Pringle is constantly challenging himself with new projects. For example, in 2008, he decided to learn trad climbing. Applying his already-honed projecting tactics, Pringle quickly sent some of the world’s hardest naturally protected routes, including the third ascent of the famed Cobra Crack (5.14) in Squamish, Canada.
Pringle reflected on his methods and provided his top 10 tactics for sending success:
The post Ethan Pringle’s 10 Tips for Sending Your Project appeared first on Climbing.
]]>