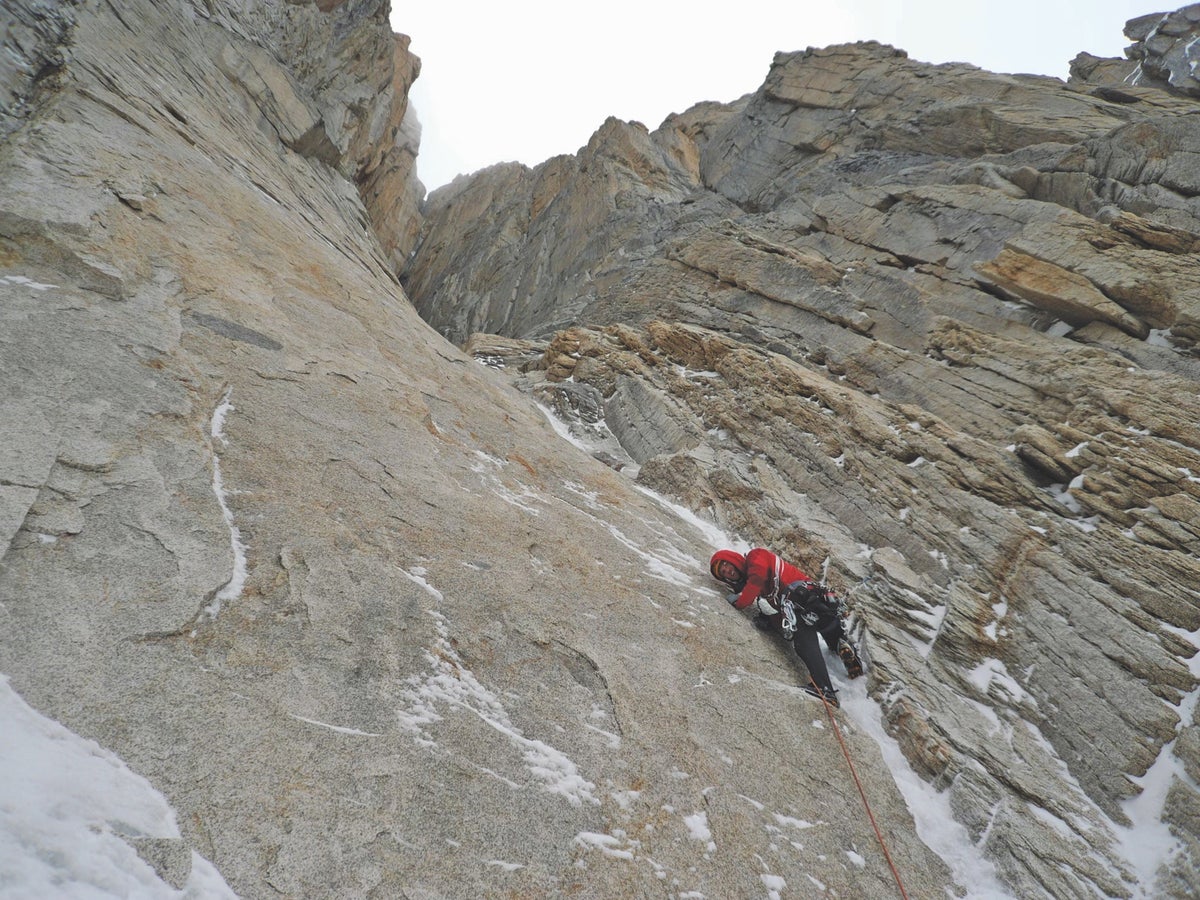
In this excerpt from Ian Nicholson's new book, "Climbing Self-Rescue," two young climbers get over their heads in Alaska’s Ruth Gorge and wish that they knew the sorts of specialized rappelling techniques that Nicholson describes in Chapter 4.
The post This Is Why Climbers Need to Know Advanced Rappelling Tactics appeared first on Climbing.
]]>No matter how experienced a climber you are, one day, you will find yourself in a precarious situation. It could be a stuck rope, a dropped rappel device, ropes that won’t reach the next rappel, an injured leader, or any number of problematic situations. Elite climber Ian Nicholson has written Climbing Self-Rescue with this in mind, offering technical systems that follow patterns that are easy to remember and that can be applied to solve a wide range of problems.
This lavishly illustrated guide teaches the skills a climbing team needs to execute a successful technical rescue on its own. Written for climbers with experience on multipitch routes, Climbing Self-Rescue addresses key skills including escaping the belay, lowering a climber, dealing with a stuck rope, improvising ascenders and using aid-climbing techniques in rescues, rescuing an injured leader, and so much more.
In the excerpts below, you’ll find a real-life scenario in which Zack “Bones” Smith and Aaron Martin get a bit over their heads in Alaska’s Ruth Gorge and wish that they knew the sorts of specialized rappelling techniques that Ian Nicholson describes in Chapter 4 of Climbing Self-Rescue.
The following is excerpted from Climbing Self-Rescue: Essential Skills, Technical Tips, and Improvised Solutions by Ian Nicholson (March 2024). Published by Mountaineers Books. All rights reserved. Reprinted with permission.
You can buy Climbing Self-Rescue here. You can see other articles by Ian Nicholson here—including his “How to Rappel Without a Belay Device”
The post This Is Why Climbers Need to Know Advanced Rappelling Tactics appeared first on Climbing.
]]>
Build a maximum-strength anchor in ice with two pieces
The post How to Build Bomber Ice Anchors appeared first on Climbing.
]]>Standard ice anchors often involve only two pieces of protection, instead of the three pieces that we typically use in rock climbing, because in strong, reliable ice, two ice screws are plenty strong enough. Plus, placing two screws takes way less time and helps you move faster in this super-cold environment. Because of this standard, ice enthusiasts need to be very specific about the structure of the anchor, particularly the angle of the ice screws in the ice as well as the orientation of the two pieces in relation to each other. Building the anchor in this specific configuration doesn’t take any extra time, but it will maximize the strength of this minimalist anchor.
First and Foremost
Once you’ve found where you want to build your belay, visually inspect the ice to make sure it’s as solid as possible. The ice should be clear or slightly blue; if it is solid white, then the ice is rotten. Obviously, cracks and running water (even water running behind thin ice) are bad. Avoid building your anchor on bulges where the ice bends outward and is less supported; instead, aim for depressions and concavities where the ice bends inward, which typically will be more solid because of the strength and support from surrounding ice.
Screw Placement

First, the ice screws need to be at least 12” apart, with 18” to 24” being ideal, especially if the ice is suspect. If the ice fractures, the greater distance will reduce the chance that both screws will be affected by the same crack. When placing these screws, offset them from each other vertically, so one sits at least 12” to 18” higher (fig. 1). They can even be stacked perfectly in line as long as one is above the other. This does two major things. It reduces the vector forces put on the ice screws. To put it simply, the lower the angle between the two screws, the less force is applied to each and the closer you’ll get to each screw taking about the same amount of load. The second reason for offsetting screws vertically is that water ice tends to fracture horizontally as opposed to vertically. So if the ice does crack, having both your screws in one horizontal plane could be bad news. Equalize these pieces with a sling or cordelette, just like with rock anchors.
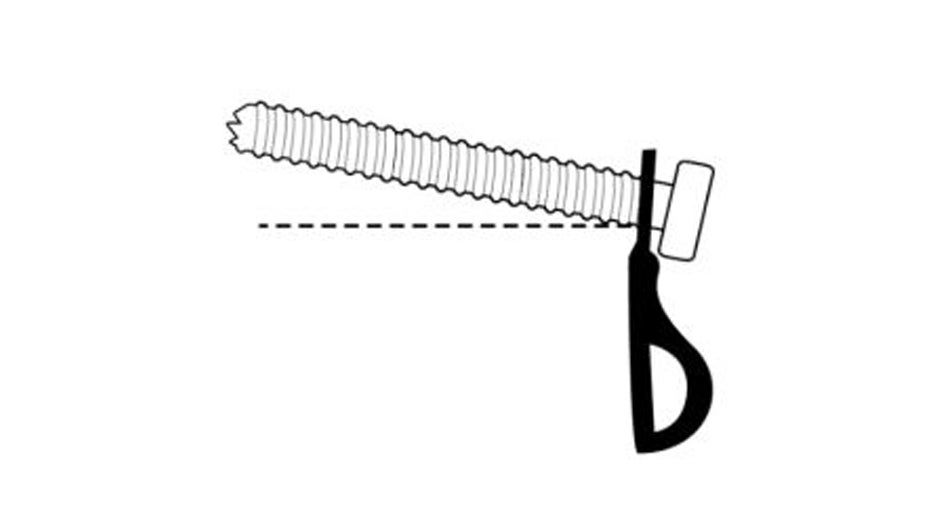
Ice Screw Angle

Contrary to what you might think, the best angle for the screws is slightly upward, meaning the hanger is slightly lower than the teeth in the ice. This counterintuitive method is better because the holding power comes from the threads themselves and not from a “snow picket” effect, meaning you don’t get any mechanical advantage having the shaft of the screw levered against the ice (Fig. 2). That levering action is actually bad for the screw’s overall holding power because when an ice screw fails, it’s because the ice near the surface right below the hanger has failed. When the ice at the surface gives way, the shaft becomes exposed and only adds more torque, which will cause the ice to deteriorate further. Eventually with enough force, total failure occurs. Place ice screws at a 5° to 10° upward angle. More than 10° is too much because it will lever the screw as well. Pointing the screw slightly upward keeps the screw more in line with the load, minimizes the torque, and lets the threads do their job.

Ian Nicholson
As an AMGA-certified alpine and rock guide, Ian Nicholson lives in Seattle with his wife, Rebecca, and he loves climbing in the North Cascades so much that he authored the guidebook to it (SuperTopo: Washington Pass Climbing).
The post How to Build Bomber Ice Anchors appeared first on Climbing.
]]>
You’re lying if you say you’ve never dropped your belay device and watched it go “tink, tink, tink” all the way down to the base of a route. That’s where you want to get, and you just let go of the one piece of gear that will get you there most conveniently. It can happen … Continued
The post Rappel Without a Belay Device appeared first on Climbing.
]]>You’re lying if you say you’ve never dropped your belay device and watched it go “tink, tink, tink” all the way down to the base of a route. That’s where you want to get, and you just let go of the one piece of gear that will get you there most conveniently. It can happen to anyone. But have no fear: If you have four carabiners of any shape or gate type, plus a locking belay biner, you can make it to the ground. The double carabiner brake rappel is the best way to descend without a traditional rappel device. It is far more practical and efficient than sharing one device between two people, and it puts fewer twists and kinks in your rope than a Munter hitch does. Plus, you can set it up with the gear you’re already carrying.

BINER TYPE
Climbers used this setup to rappel in the 1970s, before modern belay devices became the standard. Back then, solid-gate (not wire), oval-shaped carabiners were the norm. While a carabiner brake with ovals is still the easiest to set up and smoothest to rappel with, they’re not necessary; you can rig this with any type of biner: non-locker, locker, wire-gate, or bent-gate. To set up, you need four non-locking biners and one locker (you can use two opposite non-lockers in place of the one locker). However, you shouldn’t use micro-biners, which might not be big enough, or biners with sharp spines, which can damage the rope. Radically bent-gate or pear-shaped biners will suffice if that’s all you have, but they won’t feed as smoothly; the closer to full-sized, oval- or D-shaped, the easier the setup and smoother the rappel.
SETUP
If you have a locking biner, clip it to your belay loop. If you don’t, clip two non-lockers to your belay loop, oriented with the gates facing opposite directions and opposed (head of one biner is matched with tail of other biner, and vice versa). Now clip two more non-lockers with gates opposite and opposed to the biner or biners on your belay loop (A). Push a bight of both rappel ropes through these two non-lockers (B). Then clip two more non-lockers around both sides of the other two biners and through the bight of rope (C)—make sure the rope runs over the spine of these biners (not the gates). These biners are what act as the brake, and they should have the noses opposed—facing in opposite directions, so one sits on the right side and one sits on the left.
TIPS
This rappel gives you a ton of braking power, but it doesn’t feel as smooth as rappelling with a normal belay device. To brake, you still change the angle of the rope by pulling it down (and vice versa for speeding up), but the angle change doesn’t correspond as directly to changing the speed of the rappel as it does with a typical device. It feels a little more erratic, so be aware of your speed and positioning.
A downside is that it’s pretty much impossible to go back up the rope. With a tube-style belay device, you can often quickly “hop up” a short section by pulling rope up and through your device before quickly locking off again to gain upward progress. You can’t do this maneuver with the carabiner brake rappel because there is too much friction, but it will help you succeed at your most immediate concern: getting down safely.
The post Rappel Without a Belay Device appeared first on Climbing.
]]>
Load-limiter knots and chaining In the mountains or on long rock routes, anchor efficiency can be the difference between a comfortable finish and a forced bivouac. Using a cordelette to equalize an anchor is easy and strong, but it takes a lot of extra time to set up, and even longer to break down. There … Continued
The post Alpine Anchors appeared first on Climbing.
]]>Load-limiter knots and chaining
In the mountains or on long rock routes, anchor efficiency can be the difference between a comfortable finish and a forced bivouac. Using a cordelette to equalize an anchor is easy and strong, but it takes a lot of extra time to set up, and even longer to break down. There is a faster, easier, and often equally safe solution: the “alpine anchor.”
An alpine anchor “chains” pieces by clipping together the full-strength loops and slings on nuts, cams, or fixed pro. These anchors are equalized, redundant, and have very little or no extension. Examples:
-
Clipping two or three cams and nuts in a row with nonlocking carabiners(1); your master point is in the lowest of the cam slings.
-
Clipping two cams or nuts together, equalized with a third piece via a sling.
-
Incorporating a horn or tree by throwing a sling around it and equalizing with one or two pieces of protection (2).
To equalize alpine anchors, many climbers create a socalled “magic X” (aka “sliding X”) by putting a twist in one strand of a sling connecting two pieces of protection. This system has the advantage of “auto equalizing” the pull on the pieces as the belayer moves around. The disadvantages are that the magic X is not redundant, and in most cases the slings climbers use are weaker than the bolts or pieces of gear they are equalizing. Why double up on what’s strong— the protection—and not on the weaker slings?
There is a simple answer: Load-limiter knots make the anchor completely redundant but still offer some range of auto adjustability.

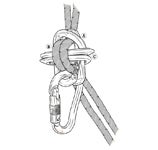
First, clip the ends of the sling to the pieces of protection you are trying to equalize. Grab both loops of the sling and pull downward to gather them at the center. Twist one of the strands of sling to create a small loop, and clip a locking carabiner through this loop as well as the other strand (3). Pull this master point side to side to make sure it’s clipped correctly and equalizes the load on the anchors. This is the magic X.
Now unclip one strand from the protection and tie a load-limiting overhand knot a short distance above the master point. (4) Reclip to the pro. Repeat the process on the other side. If the protection at one end of the anchor sling fails, these knots will limit the sling’s extension and thus the amount of force the other anchor(s) have to bear.
If you don’t have enough sling to tie two load-limiting knots, put one in the longer arm of the sling. This will limit shock-loading in case the piece farthest from the master point fails, but there will be no redundancy at the clip-in point.
The post Alpine Anchors appeared first on Climbing.
]]>
Stacking ropes on multi-pitch climbsGood rope management at belays saves time and headaches. When you belay on a ledge, feed the rope into a small pile, about two feet around, as you take it in. Compact the growing rope pile with your hands or feet to keep it stacking bottom to top, and to keep … Continued
The post No More Tangles appeared first on Climbing.
]]>
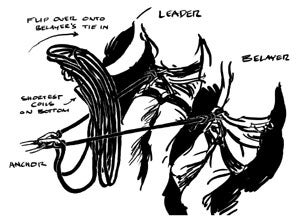
Stacking ropes on multi-pitch climbsGood rope management at belays saves time and headaches. When you belay on a ledge, feed the rope into a small pile, about two feet around, as you take it in. Compact the growing rope pile with your hands or feet to keep it stacking bottom to top, and to keep it from sliding off the ledge. If your partner leads the next pitch, just pay out rope from the top of the pile. If you’re leading in blocks, you’ll want to “pancake” the pile: Once your partner has arrived at the belay, flip the rope pile like a pancake so your end is now on top.On tiny ledges or hanging belays, you won’t be able to pile the rope. Instead, stack the rope in loops, draped back and forth across your tie-in point. If you make the loops all the same length, they’ll tend to tangle. Instead, make them gradually longer or shorter, depending on who’s leading the next pitch.
If you are swinging leads, make the first loops long—I like them to hang down about 10 feet on each side—and make each successive loop about three inches shorter than the last. This allows the rope to pay out without the top loop tucking under other loops and forming tangles when your partner is leading.
If you’ll be staying in the lead for the next pitch as well, start with onefoot loops and make each gradually longer. When the second climber is anchored at the belay, have him grab the stack of loops by its center and bring it toward his lap. Then, while he holds the stack, flip it onto his tie-in so it ends up with the short loops on top, ready to feed out cleanly.
The post No More Tangles appeared first on Climbing.
]]>
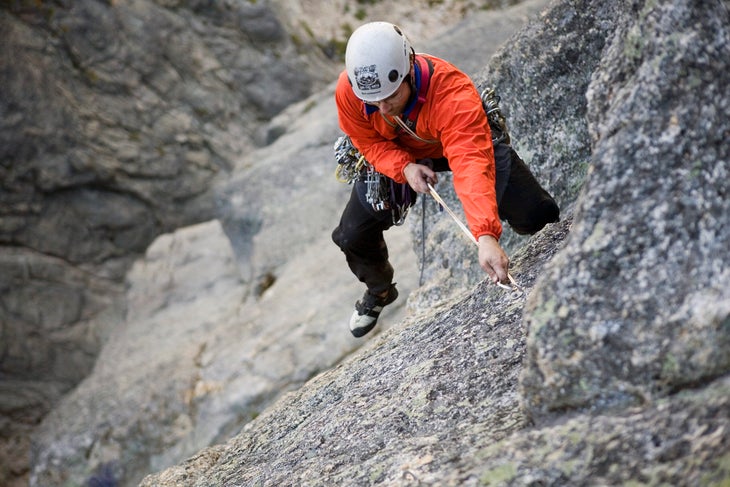
Stick clipping, big-wall styleMany big-wall climbers see stick clips (aka cheater sticks) solely as emergency tools to use when they run across a broken rivet or missing copperhead. However, a stick clip also can greatly assist in retreating off overhanging walls like the right side of El Capitan or Leaning Tower. Some overhanging rappels may … Continued
The post The Safety Stick appeared first on Climbing.
]]>Stick clipping, big-wall styleMany big-wall climbers see stick clips (aka cheater sticks) solely as emergency tools to use when they run across a broken rivet or missing copperhead. However, a stick clip also can greatly assist in retreating off overhanging walls like the right side of El Capitan or Leaning Tower. Some overhanging rappels may leave you dangling in space, unable to reach the next anchors. In such cases, the usual solution is down-aiding instead of rappelling—a slow and awkward task. With a stick clip, you can often simply rappel down, reach in with your stick to clip the anchors, and reel yourself in.
To make a big-wall stick clip, start with a collapsible tent pole approximately 10 feet long. Attach any lightweight sport-climbing stick-clipping head to one end. (Epic makes a $10 attachment that works great; epicsport.com.) Now, start with a piece of 9/16” webbing about twice as long as your tent pole, and tie a small overhand loop near one end, leaving a onefoot tail. This loop will be clipped through the biner on the end of the stick. Duct-tape the tail of the webbing to the end of the pole just behind the clipping head, leaving enough slack to keep the webbing from being ripped off the pole when you tension the clipping biner. Then, tie small overhand loops every one to two feet for the length of the webbing until the strand of loops is as long as the tent pole, and cut off the excess webbing.
You’re done! To use the stick, clip the webbing’s end loop into a biner and clamp the biner in the clipping head. After you clip an anchor, the webbing is your lifeline to the wall. Pull yourself in, either by hand-over-handing the loops, or by clipping them with your aiders. On very steep or diagonal rappels, you may need to use the stick to clip intermediate pieces as you descend.
The post The Safety Stick appeared first on Climbing.
]]>
Illustration by Jamie Givens Stacking ropes on multi-pitch climbs Good rope management at belays saves time and headaches. When you belay on a ledge, feed the rope into a small pile, about two feet around, as you take it in. Compact the growing rope pile with your hands or feet to keep it stacking bottom … Continued
The post No More Tangles appeared first on Climbing.
]]>
Stacking ropes on multi-pitch climbs
Good rope management at belays saves time and headaches. When you belay on a ledge, feed the rope into a small pile, about two feet around, as you take it in. Compact the growing rope pile with your hands or feet to keep it stacking bottom to top, and to keep it from sliding off the ledge. If your partner leads the next pitch, just pay out rope from the top of the pile. If you’re leading in blocks, you’ll want to “pancake” the pile: Once your partner has arrived at the belay, flip the rope pile like a pancake so your end is now on top.
On tiny ledges or hanging belays, you won’t be able to pile the rope. Instead, stack the rope in loops, draped back and forth across your tie-in point. If you make the loops all the same length, they’ll tend to tangle. Instead, make them gradually longer or shorter, depending on who’s leading the next pitch.
If you are swinging leads, make the first loops long—I like them to hang down about 10 feet on each side—and make each successive loop about three inches shorter than the last. This allows the rope to pay out without the top loop tucking under other loops and forming tangles when your partner is leading.
If you’ll be staying in the lead for the next pitch as well, start with onefoot loops and make each gradually longer. When the second climber is anchored at the belay, have him grab the stack of loops by its center and bring it toward his lap. Then, while he holds the stack, flip it onto his tie-in so it ends up with the short loops on top, ready to feed out cleanly.
The post No More Tangles appeared first on Climbing.
]]>
Illustration by Jamie Givens Stick clipping, big-wall style Many big-wall climbers see stick clips (aka cheater sticks) solely as emergency tools to use when they run across a broken rivet or missing copperhead. However, a stick clip also can greatly assist in retreating off overhanging walls like the right side of El Capitan or Leaning … Continued
The post Tech Tips: The Safety Stick appeared first on Climbing.
]]>
Stick clipping, big-wall style
Many big-wall climbers see stick clips (aka cheater sticks) solely as emergency tools to use when they run across a broken rivet or missing copperhead. However, a stick clip also can greatly assist in retreating off overhanging walls like the right side of El Capitan or Leaning Tower. Some overhanging rappels may leave you dangling in space, unable to reach the next anchors. In such cases, the usual solution is down-aiding instead of rappelling—a slow and awkward task. With a stick clip, you can often simply rappel down, reach in with your stick to clip the anchors, and reel yourself in.
To make a big-wall stick clip, start with a collapsible tent pole approximately 10 feet long. Attach any lightweight sport-climbing stick-clipping head to one end. (Epic makes a $10 attachment that works great; epicsport.com.) Now, start with a piece of 9/16” webbing about twice as long as your tent pole, and tie a small overhand loop near one end, leaving a onefoot tail. This loop will be clipped through the biner on the end of the stick. Duct-tape the tail of the webbing to the end of the pole just behind the clipping head, leaving enough slack to keep the webbing from being ripped off the pole when you tension the clipping biner. Then, tie small overhand loops every one to two feet for the length of the webbing until the strand of loops is as long as the tent pole, and cut off the excess webbing.
You’re done! To use the stick, clip the webbing’s end loop into a biner and clamp the biner in the clipping head. After you clip an anchor, the webbing is your lifeline to the wall. Pull yourself in, either by hand-over-handing the loops, or by clipping them with your aiders. On very steep or diagonal rappels, you may need to use the stick to clip intermediate pieces as you descend.
The post Tech Tips: The Safety Stick appeared first on Climbing.
]]>