Learn how to extend your draws to minimize rope drag and rope abrasion while making falls less dangerous.
The post Why, How, and When to Extend Your Draws appeared first on Climbing.
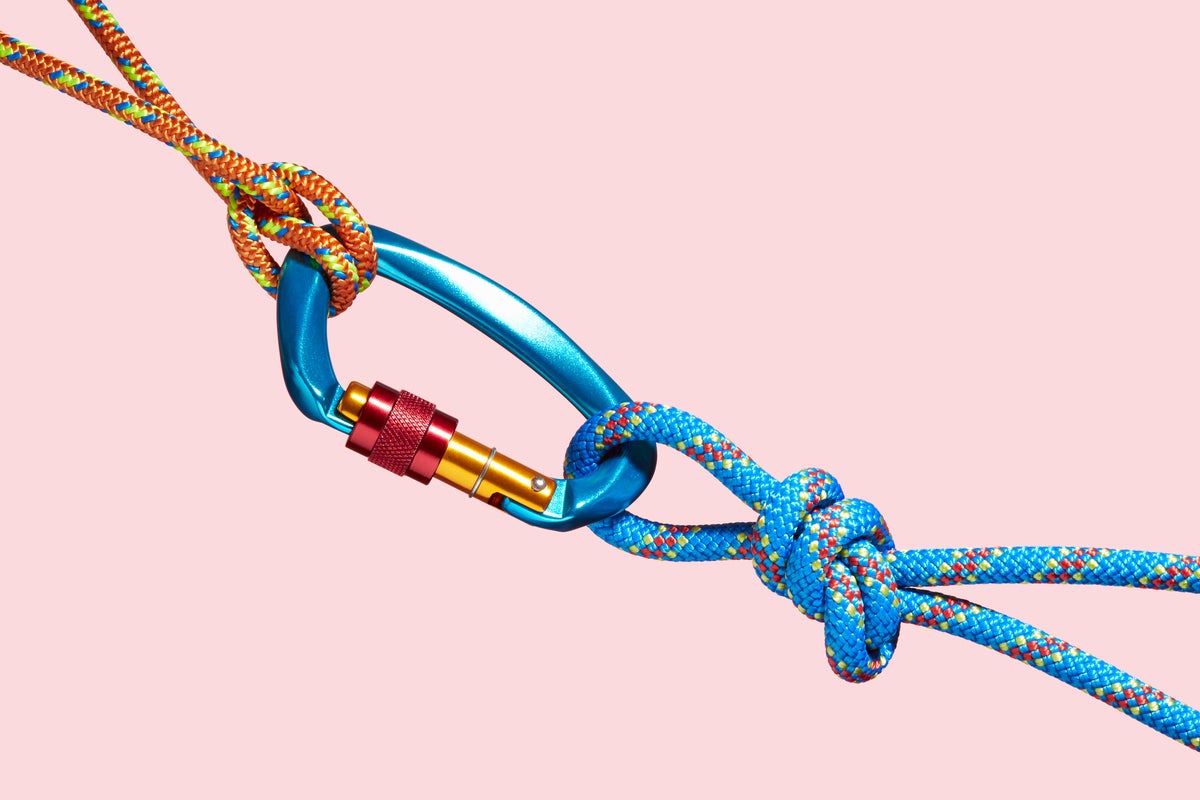
]]>Every beginning trad climber learns the basics of “extension”—using slings or quickdraws to create more space between the rope and a piece of gear. (Check out Extension Basics for a quick refresher course.) There are three main reasons behind extension—reducing rope drag, keeping pro in its proper place, and preventing the rope from running over sharp edges—and there are plenty of subtleties that can make you a fast, smooth, and expert extender. These tips aren’t just for trad climbers. Bolt-clippers can improve their safety and sending success with these techniques as well.
The Tools
Quickdraws, single-length slings (sometimes called full-length), double-length slings, and carabiners are essential parts of any trad climber’s standard kit. (You’ll also hear slings called runners, which is short for “running belay,” meaning any protection point between stationary belay stances.) With a combination of these four main components, you can extend pieces from three inches to four feet.
Quickdraws are the go-to tool for clipping fixed gear and making short extensions. Draws vary widely in cosmetics and price, but more importantly they vary in their designated purpose. For sport climbing, you want full-size, wear-resistant biners on stiff, beefy slings (think Petzl Express or Trango Smooth draw). For trad, however, much lighter draws work better—featherweight biners on thin, supple slings to reduce bulk and weight and provide a more flexible attachment to nuts (think Black Diamond Oz). For sport and trad, carry at least two different lengths of draws, so you have options if a bolt or gear placement pinches the rope against an edge or leaves a carabiner levering over it. The number of bolts (plus two for the anchor and at least one extra for insurance) will determine how many draws to carry for a sport route, but on trad routes, six to eight dedicated draws is typically about right. If there are any “must-hold” clips (e.g., the first bolt or a piece above a ledge) consider putting a lightweight locker on the rope end of the draw.
Single-length slings should be the mainstay of your sling collection. They’re sized to fit neatly over one shoulder and give approximately 24 inches of extension when clipped with a biner on each end. Standard slings are 48-inch sewn loops, but individual runners can vary a few inches, to better fit larger- or smaller-chested climbers. For versatility, try to mix it up a bit when racking—a few inches of difference in length can come in handy when trying to equalize two placements, and different materials have different uses. Sewn 3/8” (or 10mm) tape is a good standard width for slings, but consider hand-tying a few with a simple water knot, so they can be undone for threading bolts or pitons during unplanned rappels. For even more versatility, tie these slings with 5 to 7mm cord, so they can double as prusiks if necessary or be used as pro when threading narrow holes or slinging chickenheads and knobs. (If your tied slings have been used for a while, make sure you can still get the knots undone before you leave the ground.) Bring at least six single-length slings total, and up to twice that for complex terrain with lengthy pitches, or on long routes if an unplanned retreat seems possible.
Double-length slings provide a whopping four feet of extension and are more useful for rigging and anchors than for extending a single piece of pro. If you extend a piece four feet, you’ve added eight feet to your fall, which is a bit much for safe travel on most blocky trad terrain. However, doubles come into their own when building belay anchors, when slinging cliff-top trees, as mini cordelettes for equalizing placements, and for using in rap anchors (or when creating a mini belay seat, see p. 41). Carry two or three double-length slings, more if you might have to bail.
Carabiners that are loose and not designated for a certain piece of gear are crucial, so carry an assortment to employ during extension. These can be carried a variety of ways: Some people prefer to stack them in sets of five on a gear sling or loop of their harness (clip one biner to the sling or loop and the other biners to that first one), while others prefer to clip a single biner to each sling over the shoulder.
The Rabbit Runner
An efficient alternative to the double-length sling is the Rabbit Runner, a 1970s Bill Forrest (legendary Colorado climber who made several major innovations in climbing equipment) design that’s still available from Metolius. A Rabbit uses the same amount of material as a single-length sling, but instead of being sewn into a closed loop, each end has its own small loop to clip a carabiner. Thus, you can use a Rabbit as a normal single-length sling, by clipping it doubled, or extend it single-strand for twice as much extension. Just adding one of these to your standard rack can greatly increase your placement, anchor, and rapping possibilities.
Don’t Over- or Under-Extend

Below roofs, before and after significant traverses, placements deep inside a wide crack—all of these situations demand full-length slings. Cams placed in a splitter crack seldom even need a quickdraw, but delicate nut placements in that same situation are best fitted with a flexible draw to keep the rope from dislodging the nut. When learning, I used long runners on almost everything. Now, I use them sparingly. Look below and above your chosen placement to imagine the rope’s path after you clip your piece with a draw or a sling. Is the extension serving a purpose? If not, don’t extend. Adding four feet to your potential fall might mean the difference between a harmless slip and an injury. Sometimes you’ll place a “critical” sling—a single point that protects the second on a traverse or keeps the rope from a razor-sharp edge. In these cases, use two opposite and opposed biners or a locker on the rope, and double up the pro if possible.
Sling Configurations

Most of the time you can just clip your chosen sling to the piece of gear and the rope (fig. 6), but there are a few other options if you need to gain or lose a few more inches. If you’re short on biners, try girth-hitching a cam’s sling (fig. 5, but don’t do this with a wired nut; the cinching action of the girth-hitch can cut the sling in a fall). By doubling the runner through the cam’s sling (fig. 3, this works for wires, too) you’ll shorten the extension. Pick just the extension you need and no more. For long routes, speed of placement and re-racking is important. To move fast, add a few extra biners to the rack and nix all girth-hitching. Likewise, when quickdrawing a cam, leave the cam’s biner on the gear. It wastes a biner, but saves time when the gear is re-racked. Small savings add up over the course of a dozen pitches. A standby for rigging full-length slings is the “alpine quickdraw.” If you end up with a wrap around one of the biners, take the time to fix it. The wrap can work its way onto the gate, increasing the chances of cross-loading or unclipping. You can improvise a draw by clipping biners to both ends of a wired nut or corded pro, such as hexes.
Carrying
How many times have you needed a sling, only to find it inaccessibly draped over your wedged shoulder or hopelessly tangled with six other slings and biners? Rack smart to avoid such bondage. The alpine draw setup works well for a few of your full-length slings, but carrying them all that way consumes valuable harness space. The simplest option is over one shoulder—in my opinion, best done without biners, which promote tangles. Another alternative is to carry one “runner runner” over your shoulder, then double the rest of your single-length runners over that runner so they hang on your side, clipping both ends of each hanging runner with a carabiner. To deploy one-handed, simply unclip from one strand and pull. (Check out Learn This: The Runner-Runner a quick demo.) When swapping leads with a partner, I’ll often rack all the quickdraws on a dedicated shoulder sling to speed up changeovers. Since I seldom use my double-length slings except at belays, I carry them tripled, knotted, and clipped to a biner on a rear harness loop.
The post Why, How, and When to Extend Your Draws appeared first on Climbing.
]]>
These gear tips can help you avoid being stranded on the wall... or taking terrible risks to get down... or simply allow you to continue enjoying a climbing day.
The post So You Dropped Your Belay Device Halfway Up a 900-Foot Route… Now What? appeared first on Climbing.
]]>Dropped, forgotten, destroyed, or mysteriously vanished gear can ruin a climbing day or even be life-threatening. But with a little know-how, you can recover from most bone-headed mistakes and either keep climbing or descend safely. As an added bonus, you’ll impress your friends with your level head and savviness.
When you’ve ruined one of your ropes
If you trash your trail rope during a multipitch climb, you can still make double-rope-length rappels to get off. Feed the undamaged lead line through the anchor point, and attach it to the damaged line with a bulky knot that can’t pull through the rap rings. (This method is sometimes called the Reepschnur rappel and must be backed up.) Don’t use it with an anchor that has webbing or
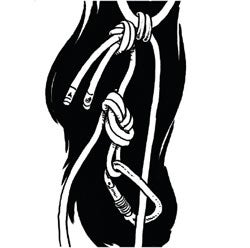
carabiners at the rap point; the smaller the rap rings, the better. Next, rig a back-up by tying an overhand or figure-eight on a bight on the damaged line, near the knot, and clipping the loop to the lead line [see illustration]. With the knot jammed against the rap point, you can rappel single-strand on the undamaged lead line, then pull the damaged trail line to retrieve your good cord. This method can also be used to temporarily anchor one strand of a double-rope rappel so you can rap with a Grigri or other single-rope belay device. (see figure 1.)
For more details, see “Two-rope rappels with one chopped cord”
When you’ve run out of quickdraws
If you run out of quickdraws, you may be able to substitute a chock. The cable loop on many wired nuts can be pulled away from the nut, exposing the end of the loop; clip a carabiner into each end of the wire for an instant quickdraw. (If the cable is soldered or glued at the nut, this method won’t work.) For a back-up long runner, carry a gear sling rated to full strength.
When you’ve dropped your belay device

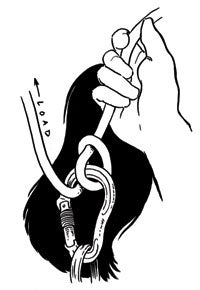
If you drop your belay or rappel device, use a Munter hitch. You can belay or rappel with this simple knot, using only the rope and a locking carabiner. Ideally you’d use a large, pear-shaped carabiner, which allows more room for the knot to move and “flip” freely so it can engage or release braking power, but if you don’t have one any locker will work. You can even use two non-lockers with the gates opposed and reversed. Tying the Munter is simple—see figure 1—but make sure the knot you tie looks exactly like figure 2. Check that you’ve done it correctly by pulling the rope back and forth —the knot should “flip” as you change direction.
To see other good uses for the Munter hitch, read “Munter Magic”
When you roll up to the crag sans harness
If you show up at the crag without your harness, all is not lost. For single-pitch climbing, you can share your partner’s harness; the climber wears the harness while you belay directly off an anchor at the base: a sling around
a tree or boulder or a gear anchor (see figure 4 below). Make sure the anchor is bombproof and good for multi-directional pulls, especially upward. Note: this sort of belay will be fairly static, which may result in somewhat harder catches, so it’s not the best for taking lots of falls.
When you forget that ice axe
When most of the snow is gone in your local hills, it’s tempting to leave the ice axe behind; unfortunately, any snow you find may be rock-hard. But you can cross short snowfields by using a rock to cut sharp-edged foot-holds and hand-holds into the snow. You can supplement this by using a nut tool as an ice dagger, but it’s more important to cut good steps and stand in balance, since catching a slip on a nut tool is (a) quite challenging and (b) quite painful on the hands. Both nut tools and hard snow (which is very abrasive) are touch on the hands, so it’s best to don a pair of light gloves for protection.
Do you really need rock shoes and chalk?
So, you’ve emptied your pack, but shoes and/or chalkbag are nowhere to be found. Take a deep breath, open your mind, and step back into the 1960s. Layton Kor and Royal Robbins climbed 5.9 and 5.10 in footwear far inferior to your average climber’s approach shoes, and they never bothered with chalk. Get out there and make it happen… But steer clear of hard crimping or limit moves: slipping off holds is a great way to injure a tendon.
The post So You Dropped Your Belay Device Halfway Up a 900-Foot Route… Now What? appeared first on Climbing.
]]>
Here are a few reasons to haul, tips on how to do it, and some cautions gleaned from years of experience.
The post Haul Your Pack to Climb Faster and Harder appeared first on Climbing.
]]>Simple truth: Attempting to go “light and fast” often means heavy and lame. To avoid the stigma of hauling a bag, many climbers feel the need to have everything clipped right on their harnesses. Water bottles, approach shoes, bullet packs—you name it—jangling on gear loops, wrapped around waists, getting in the way. If this sounds like you, strip down and haul! Here are a few reasons to haul, tips on how to do it, and some cautions gleaned from years of experience.
Why Haul?
On long free climbs, you often can’t retreat with one rope, so it’s customary to bring two. Unless you’re climbing with a double-rope system—which most American climbers don’t—you usually drag up a tag line. It’s more efficient and less strenuous to tie all your gear to the end of that line, instead of lugging it on your person.
Not having to carry a pack on your back also means it’s easy to throw in a few cushy extras such as a warm hat and gloves, space blanket, and some extra calories. You can be better prepared for bad weather, descents, or forced bivies. Plus, hauling allows you to climb harder. Carrying the big cams, approach shoes, water, and storm gear in a small haul pack frees the leader—and follower—to send as much as a number grade harder. If the climb is longer than 10 pitches, and you’re trying to blitz the route in a day, hauling might be too slow (more on that below). But if the route is steep, with hard free climbing, hauling could be a huge benefit. You may be a little slower car-to-car, but you’ll have much more fun.
How to Haul

Light-haul technique is simple. The leader carries the tag line as she normally would, clipped to the dedicated haul loop on the back of her harness. After she sets up the next belay, she’ll clip the haul line somewhere out of the way, and then pull up the free line and stack that into a sling that will eventually hold the entire haul line. At this point, she will tie off the rope again with a figure eight on a bight on the anchor, and prepare to haul up the bag. She will wait until she’s hauled to stack the rest of the rope into the tag-line sling. (If you’re lucky enough to have a nice ledge, you can skip stacking the rope in a sling and flake the haul line onto the ledge, separate from your lead line.)
At this point, yell, “Ready to haul!” to your second. If voice communication is difficult, agree on some sort of rope signal; I use three sharp tugs on the line to indicate I’m ready to pull up the bag. Be ready to hold the bag’s weight, but don’t start pulling immediately, since your second will need a few seconds to unclip the bag from the anchor.
The second can now free the bag from its clip-in point on the anchor. Unclip it and yell a voice command such as “Haul away!” and then gently ease the bag’s weight onto the line, or let the leader lift it out of your hands. I like to tie the tag line to the pack with a clove hitch, about 15 feet from the end of the line, so I have a “tail” section of line to gently extend the bag out on traversing pitches instead of letting it swing. If the pitch traverses even more, you can lengthen the tail, and on pitches that are a full rope length, you can shorten it.
The key to hauling a bag on free climbs comes down to one thing: energy conservation. Don’t be afraid to take a little extra time to rig an efficient system that saves your arms. With a lighter load—if you’re confident—you can simply haul up the rope and bag hand-over-hand. With a heavier bag, redirect the rope and the bag through a carabiner, as high as possible at the belay, and use a progress-capture device (PCD).
I like the Petzl Tibloc in “locking pulley” mode, or the slightly heavier (but more efficient) Petzl Nano Traxion. With this setup (fig. 1, above), you pull up on the strand of rope leading directly to the bag, pull down on the strand on the other side of your redirect carabiner, and let the teeth of the PCD grab the rope and hold it between pulls. Rest as often as you need to, but if the bag feels at all heavy, take the time to rig a foot-sling assist (fig. 2), using another spring-loaded PCD. Arms, not legs, give out first on long climbs, so don’t waste your guns on the hauling. Use the larger leg muscles to push the PCD down as it pulls the rope through the Tibloc, then pull slack through the PCD, which will move back up the rope.
Once you have your hauling system in place, bring up the bag and clip it in at the belay, somewhere out of the way but accessible. I usually let the hauled rope hang free until I’m done, and then restack the entire line so the leader’s end is on top. Now you’re ready to belay your second.
If all goes well, the entire hauling process should take about 10 minutes. That’s an extra hour for every six pitches, but you would hopefully gain most of it back by faster, lighter climbing.
Tips for Hauling

- Never use a skinny dynamic double rope as a tag line. Its stretchiness is terrible for pulling on rappel and very dangerous over edges if it has to be ascended. The best line for light hauling is a 65-meter 6mm-8mm static tag line.
- The tie-in knot is a high-abrasion point; on rough rock, you can quickly trash a haul line after only a few pitches, so I like to protect the rope at the knot with the cut-off top of a plastic soda bottle (fig. 3). Slide it up the cord before tying your knot.
- Use a bigger pack. Super-compact “bullet” packs are great little hauling missiles, but they’re often too small for a whole day on the heights. A smaller pack is easier to haul pound-for-pound than a larger one, but only marginally, and a slightly bigger bag will allow you to reach the contents a lot more easily. Pick a bag specifically designed for hauling, or it will get shredded after only one or two outings.
- Haul clean. Take a tip from multi-day big-wall climbers and make sure your haul pack hangs perfectly trim and plumb. Waistbelts and shoulder straps will snag, so remove or tuck them away. Never tie anything to the side of a haul pack—hang below, if at all. When you cinch down the load, the top of the pack should be as tapered as possible so it moves easily past roofs and large features.
- A hauled bag can cause rockfall, so be cautious when hauling from above and at the belay below. In general, the leader will haul the bag before he puts the second on belay (so the second can free a stuck bag if necessary), but let the follower climb clear of the danger zone before attempting a rockfall-prone haul. Also, be aware of parties climbing below!
- On easier, lower-angled rock, such as fourth-class summit pitches or ridge traverses, stop hauling and let the second carry the bag. You may also need to do this on sharply traversing pitches. Make sure your bag can be switched to carry mode without unpacking it, and if the sack has removable straps, don’t bury them at the bottom of the bag.
- Carry a second, lightweight pack stuffed in the bottom of the hauler, so the two climbers can more easily distribute the load for the descent and/or approach.
- Don’t run pitches too long. More frequent belays help alleviate hauling snafus, and each hauling effort will be less onerous. Shorter pitches, with their lessened rope drag, also contribute to the main advantage of haul-style free climbing: a featherweight feel on difficult rock.
- In an effort to further conserve energy (and thus move faster) experienced alpine-rock climbers should consider employing the “fix and follow” system to toprope solo each pitch while the leader hauls. Josh Wharton explains the pros and cons of that tactic here.
Also Read:
- Review: The “G7 HAUL PACK” Is Our New Favorite For the Alpine
- How Josh Wharton Climbs Multi-pitches Faster and With Less Energy
- 8 Father’s Day Splurges for the Dads in Your Life
The post Haul Your Pack to Climb Faster and Harder appeared first on Climbing.
]]>
Canada’s Vampire Spires are an impossibly rugged range in a seldom-visited wilderness. Follow contributor Jeff Achey on a rollicking amphibious assault: 100 miles by raft down the rowdy Nahanni River, followed by a first ascent to an untouched summit.
The post Vampire Diary: A trip to an untouched Canadian summit appeared first on Climbing.
]]>This feature was originally published in Climbing in 2012. It’s been republished here for free as fuel for dreams, while the North American winter drags on.—Ed.
Soaking wet but still upright, we were spit out of a smooth, fast rapid into a wave train trucking headlong into yet another blind bend. I spun us into an upstream ferry and called a hard “Forward!”, hoping to buy another second or two to pick a line through the next drop, but the fast-approaching rapid was so steep that all I could see were occasional splashes cresting the horizon line. I chose a random notch between boulders and spun us downstream.
We shot through the rocks below, busted through a wave at the bottom of a trough, and when I wiped the spray from my eyes, I saw that we were bearing down fast on a big boat-flipper of a wave coming off the right wall. The Little Nahanni seemed determined to be the most exciting part of our trip.

Pat Goodman, James Q Martin, and I were plunging headlong down this remote northern river not because we were expert boaters—we were not—but because we were climbers, and the river was snaking to the base of the Vampire Peaks, a group of granite spires in the vast, rugged wilderness along Canada’s Northwest Territories/Yukon border. This loaded-down 10-foot raft was taking us climbing.
I had vaguely recalled reading about “the Vamps” years ago in an issue of this very magazine. They were somewhere near the famed Lotus Flower Tower, right? Details were fuzzy, but if I recalled correctly, the climbing scenario there was somewhat less than ideal, involving mosquito clouds, grizzly bears, and ascending long, moss-filled cracks in the rain. Only about a dozen climbing parties had ever visited. That’s about all I could conjure up when Pat invited me on an expedition to claim a first ascent on the area’s most prominent tower.
For Goodman, the Vampires were practically home (this would be his sixth trip), and the difficulties of climbing there were part of the area’s charm. He sent me enticing photos of our main objective—all taken in sunny weather—noting that it was probably the greatest free-climbing prize in the area. I’d met Pat about five years back in the New River Gorge, West Virginia, where he now resides. He was a North Carolina climber at the time, and before that, hailed from Farmington, New Mexico. This background plus his brawling Irish temperament had made him a strong and scrappy climber drawn to a variety of masochistic disciplines: soft-rock hoodoo soloing, offwidth roofs, 5.13 X headpointing, and gnarly alpine big walls. He was the expedition leader, and had secured an American Alpine Club grant that would pay for much of the trip. It didn’t take much to convince me to join the team.
The Vampires are part of a large granite intrusion in the middle of the Mackenzie Mountains, a vast, mostly sedimentary- rock range that forms the divide between the west flowing Yukon and east- and north-flowing Mackenzie, two of the North’s largest rivers. The Cirque of the Unclimbables, a much better-known area that includes Lotus Flower Tower and Proboscis, is nearby, about 15 air miles to the southeast.
The expedition’s main objective was to establish a free route on the 2,500-foot northeast prow of the Phoenix, probably the most striking climbing feature in all the sub-valleys that make up the Vamps. Goodman had already made the first free ascents of both Vampire Spire and the Fortress; he considered these and the Phoenix to be the “top three” in the area, and the Phoenix was the biggest. The only previous party to top out the buttress had not attempted the icy and steep scramble up the final ridge, so the true summit of the peak had never been reached. It was hard to imagine a more enticing target.
The river component actually makes sense. Approaching the Cirque or the Vampires requires air support from a floatplane, a helicopter, or both. Planes carry more and airtime is less expensive, but they are limited in where they can land: You need a lake or a wide, straight stretch of slow-moving river. Choppers can pick you up and drop you off almost anywhere, but they are more expensive. Our solution? Raft the river to get that much closer to the climbing, and save on costs. But we would get an airlift from the water to our high base camp, sparing us an epic load-ferrying effort up the steep, wild Vampires valley.
Nahanni National Park—where the Vampires lay—is much better known for its rivers than its climbing anyway. Lower down, closer to where it empties into the huge Laird River just above Fort Simpson on the Mackenzie, the South Nahanni surges through several limestone gorges, eventually plunging 300 vertical feet over the stunning, Niagara-like Virginia Falls, one of the most impressive waterfalls in North America. The whole Nahanni valley was an area of some mystique during Gold Rush times. Several grisly, unsolved murders befell some early prospectors, and local place names bear witness: The Broken Skull River, Deadmen Valley, Hell’s Gate, Headless Creek, the Funeral Range, Vampire Peaks. The Nahanni was referred to as “The Valley of No Return.”
The Vampires and Cirque of the Unclimbables were high up in the river basin, so we’d be stopping well above the main gorges and falls, in the rugged heart of the mountains. We started on the river’s southernmost tributary, the Little Nahanni, which we accessed by floatplane at its source, a remote place called Flat Lakes.

Getting to Flat Lakes, however, took some doing in itself. It’s possible to fly to Whitehorse, the only place in the Yukon with an international airport, but like the majority of climbers who visit the area, Goodman and I made a marathon drive to a point where we could be picked up by bush plane. We all-nighted from Colorado across Wyoming and Montana, then continued up through Alberta. Past the rolling fields of Edmonton we crossed into British Columbia, soon reaching Dawson Creek, the official start of the Alaska Highway, or the Al-Can, as the locals call it. Beyond there, the country became distinctly wilder. Towns disappeared, the highway twisted through spectacular river canyons and over high passes, and the few-and-far-between gas stops came to look more like logging camps. After 50 driving hours we reached the last settlement we’d see on our journey, Watson Lake.
Watson Lake is a rough-around-the-edges way station for tungsten miners, loggers, and Al-Can tourists. Its best known attraction is the “Sign Post Forest,” a small park just off main street featuring thousands of street signs from all over the world. Go figure. Just behind the Forest we found the community center, with its one-room Greyhound station, where we picked up “Q”—photographer James Q Martin—thus assembling the complete river team (our fourth climber, Jeremy Collins, would meet us in the mountains).
From Watson Lake, we had another four-hour drive, to Finlayson Lake where Warren LaFave would pick us up by plane. This last stretch of driving followed the Robert Campbell “Highway,” a gravel spur off the Al-Can that had us bottoming out violently on a regular basis, but paid us back with caribou, moose, bear, and wolf sightings.
Finlayson Lake is the main fuel-depot and passenger pick-up point for Warren La Fave’s Kluane Airways. Its rustic quarters hardly prepared us for the poshness on the other end of the flight, the Inconnu Lodge, a high-end fishing resort run by Warren and his wife Anita. Inconnu is the jumping-off place for most climbing trips into the Vampires or the Cirque. Late the next morning, Warren picked us up in his vintage Havilland Beaver and flew us in. The Inconnu is a self-sufficient timber-framed lodge, and the only habitation on McEvoy Lake, a seven-mile long fisher’s dream packed with grayling and 50-pound lake trout. Anglers pay $1,000 a night, but Warren seems to like climbers and never begrudges a few free nights in the guide cabins pre- and post-climb as part of the deal.
From the Inconnu we flew about 50 miles over tundra-covered peaks and vast expanses of scraggly-treed flats to a velvety landing on Flat Lake to wade our loads ashore. When the Beaver disappeared we suddenly found ourselves all alone, in total silence. We blinked at each other, then got to work inflating and rigging the raft to began our 100-mile paddle to the Vampires.
Our raft bore down broadside on this ominous lateral wave, and there was nothing to do but paddle like hell. The boat was heavy with gear and slow to change direction— good for punching through waves but in this case, our possible undoing. As impact seemed imminent, I could imagine two possible scenarios: We’d be flipped immediately by the curling wave and sent upside down into the rapid below, or else pulled into the seething eddy on the upstream side of the wave and thrashed against sharp rocks until the raft ripped. My teammates, however, dug in with previously unseen vigor, and we just barely got enough momentum to bump the wave and spin off.
When we finally reached a stretch of relative calm, I reflected on how different climbing is from boating. When you reach a crux spot on the rock, you can stop the action, step back to a stance, hang on gear if you have to, and take your time to make a decision. If you pause in a rapid, the action keeps going. Hesitate, and the river decides for you—and there’s no such thing as rapping off.
It’s also true that in climbing, you never get anywhere except by your own exertions, while on the river, bar disaster, the current will bring you where you want to go. You can sit back and float. Despite a few adrenaline high-water marks along the way, most of the Nahanni was significantly more mellow.

Which is not to say boring—our four days on the Nahanni alone would have been worth the journey. The river had started out small, with bony rock gardens and places where we had to wade the gravel bars and drag our raft. Small tributaries flowed in from both sides and the river quickly gained power, with waves that splashed over our dry bags. There was not a sign of human presence anywhere: no footprints or fire rings on the gravel bars, no trails, no camps. There were a few cabins marked on the map, but we didn’t see them. We drank the clear water directly from the river. The nights were starry and short.
On the next-to-last river day, the Little Nahanni joined the main (“South”) Nahanni, and the water changed character, becoming much bigger and lazier, cloudy blue-green instead of clear, with widely braided channels and only the occasional run of straightforward standing waves. The river was placid, and we paddled hard to cover the miles.
As we got closer to the Vampires, a squall moved through with rain and thunder, the first weather we’d seen since arriving, and the mountains above took on an ominous look. Goodman watched the shoreline on river-right, consulting the map, waiting for a flash of recognition from his last time here. It was big country, and when viewed from the river, the broad valleys all looked quite similar. I was glad he was in charge of figuring out where we were.
Suddenly, we drifted into an alignment with a side valley that triggered a six-year-old memory, and Goodman announced that we had arrived at our pickup point. At just that moment we heard the faint twhack-thwack-thwack of the chopper—descending from Phoenix basecamp after dropping off our final team member, Jeremy Collins. We beached on a gravel bar and scrambled to get ready, derigging and deflating the raft and quickly separating gear. The helicopter landed on the gravel bar, we loaded up, and, just like that, we were flying into the face of a gray and gusty rainstorm, into the Vampires.

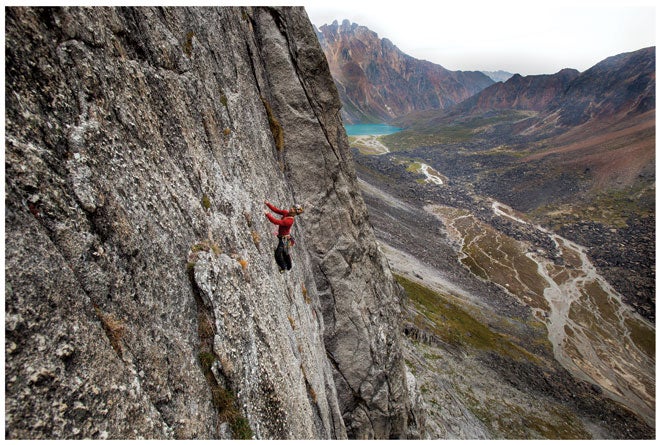
We came in low, under the clouds, up a steep, rugged valley, and when we suddenly crested a rise we got our first view into the upper cirque. There was Vampires Lake, site of an incident where a grizzly had once trashed a team’s camp while they were on the wall, rendering them without food for over a week. And there, looming beyond the lake, was a massive rock peak that I recognized immediately—the Phoenix— looking significantly bigger than in the pictures Goodman had shown me.
Rain pelted the helicopter’s windshield, and beyond the buttress, partly obscured by mist, was a hanging glacier with a monstrous hole like a gaping mouth. I’d never seen anything like it, in person or in pictures, and I thought about the Nahanni region’s spooky history, wondering if perhaps there wasn’t a legitimate supernatural force at work here that had generated the plethora of sinister occurrences and myths.
We were above 60 degrees north latitude, at an altitude just over 5,000 feet now, and on all sides lay cirques and sub-cirques filled with small glaciers and tall granite walls, many untouched. The 2,500-foot Phoenix prow was the most impressive. It had one completed mixed free and aid line, Freebird, done in 1998, which went to the top of the peak’s “big-wall” section, and another route, After School Special, done a few years later, whose complete ascent had been thwarted by ice just a few pitches from the top. Two other visiting parties had also been stopped short.
Few of the prow’s key features matched the hand-scrawled topo we had, but it was pretty obvious that the discontinuous cracks in the vicinity of After School Special promised the most feasible start for a free climb. Every possible route up the lower wall, however, was crossed by long, black water streaks and involved significant blank sections that looked improbable even through binoculars. We had only a handful of pins and bolts for protecting any sketchy face climbing.

Goodman seemed unconcerned with the terrain; his doubts revolved solely around the weather. We’d already had five near-perfect days in a row, and he surely felt like we’d used up our share. We all felt an urgency to get started, while at the same time an uncertainty about where the route would go.
The sound of our high camp was a river sound, a soft roar coming from a glacial cascade a half-mile above, and when I closed my eyes as I lay in the tent on that first night, I saw water: sparkling water tumbling over dark rocks, glassy tongues ending in V-waves that crashed over on themselves, turquoise eddies running upstream against undercut banks. Riverside images floated past at river speed: a grizzly among the willows standing up to sniff the air, a grayling finning in the shallows, an osprey wheeling above the water, moose tracks on the sand bars. Swirling water.
But now it was time to rock, and the next morning, we went up on the wall for a recon. We scampered up two easy pitches on low-angled slabs to the base of the main prow, where a series of overhanging cracks offered several options. The first steep pitch fell into place as I led up. Many sections of crack were filled with grass, but the rock was generously featured with knobs, ideal for free climbing. After 150 feet, I pulled a final overhang and arrived at a weathered rappel anchor, our first concrete evidence of After School Special.
Despite the steepness, the pitch had gone onsight at mid 5.10, and the black water streaks had been dry—an auspicious start, but the real business was yet to come. Collins headed up into thinner terrain, jamming in a couple of small cams, then fingered the opening moves of a steep and committing-looking seam. Feeling the flash pump and seeing nothing to go for, he hung on his top piece—which immediately ripped, along with the one below it, sending him for an alarmingly long fall that left him wide-eyed and level with me. Hanging from his sole piece of pro remaining in the rock, he looked over and chortled. I smiled back, saying nothing, but I couldn’t help thinking to myself, “Dude, we are a long way from anywhere.”
Knowing I’d done my lead for the day, and seeing that this might take a while, I handed off the belay to Goodman and began descending to camp. When Collins headed back up he chose an easier line, up an angling dihedral. Then he busted across a line of edges that drifted back left, pioneering the first strategic traverse, across one of the route’s biggest blank sections. The effort took several hours, which used up most of the daylight, and at 8 p.m. Collins and Goodman rapped from the high point, leaving four ropes fixed.
And so it went, for four days, Collins and me teaming up, then Goodman and Q, ferreting out pitches that gradually found a way up and left across the first thousand feet of the wall, occasionally finding and sometimes using the belay/rappel anchors of After School Special. Usually, two of us would work on the route while the other two hiked, bouldered, or rested in camp. The leader would almost always need a few points of aid to clean grass from the cracks, which would then go free the next day at some kind of 5.10. We placed one bolt and a couple of knifeblades, but otherwise found adequate pro from cams and nuts. The cracks ran from fingers to offwidth, connected by sections of face climbing, plus the occasional scary flake or moss-hummock mantel. It was stellar alpine rock climbing, and we became increasingly psyched about our line.
Any ethical concerns I had about our siege style were outweighed by the obvious benefit: precious time to wander and explore the pristine Vampires wilderness. On one of my off-wall days I took a long hike up onto the glaciers above camp. There was no sign of human passage. On the way up I had a face-off with a smallish caribou, who snorted and advanced with head lowered until I made a good threat display with my trekking poles. Higher, I found canid tracks in the snow leading up and over the col that led into the next valley: a lone wolf.
I eventually summitted a peak that was one of the highest in our cirque, earning a stunning 360-degree view. To the south were gigantic ice fields and the backsides of Cirque of the Unclimbables. Somewhere in that same general direction was the highpoint of Northwest Territories, a rugged granite peak known to climbers as “Nirvana” but officially unnamed. It was just a few hundred feet higher than where I stood. To the north, I had a sweeping view of the Phoenix and the other arm of our valley that contained Vampire Spire and the Fortress. To the northeast were the deep canyons of the Nahanni and the Broken Skull rivers, with countless peaks on the horizon beyond. So much country. So much water and rock. So many possibilities.
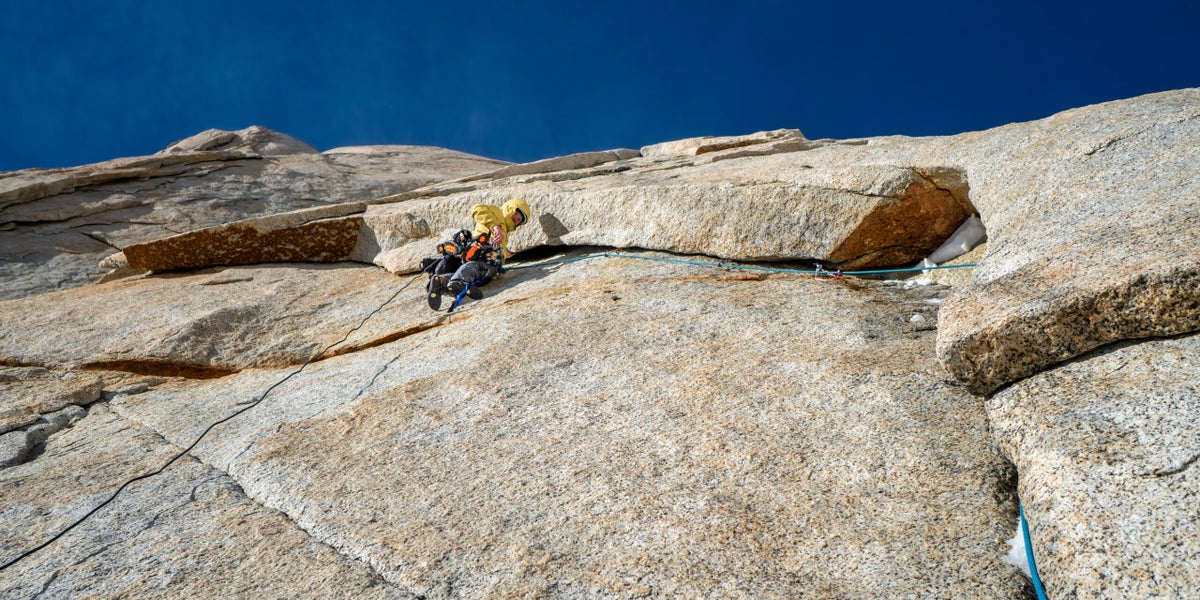
Finally we had fixed all our ropes and it was time to make a decision, so back in camp, talk turned to tactics. All of us would have preferred a light-and-fast ascent, but with ropes already strung, four climbers, and a single lead rack, a “disaster-style” assault made little sense. When no one proposed a specific plan, and a chilly evening drizzle put a damper on the next day’s free climbing prospects, I started loading up a haulbag to add to the one already stashed at the base of the wall, and announced that I would spend the next day hauling two modest bags to the top of the lines.

The weather cleared, the hauling went smoothly, and I returned to camp with daylight to spare. The following morning we committed to a summit push. It took us a good part of the day to pack the remaining essentials, get out of camp, and establish the four of us at the top of the fixed lines, but by late afternoon, Goodman finally began racking up for a free attempt on pitch eight. Everything had gone free at 5.10 to this point, and the weather was holding.
Thirty feet up lay a highly questionable crack switch, the last blank spot on the lower wall. The After School Special team had aided through here by penduluming from a bolt, and the rock between cracks was steep and smooth. True to the route, however, a perfectly positioned cluster of knobs appeared, and Goodman lurched across the blankness at 5.10+. He then fired up a steep hand crack, which widened to fist and then offwidth, but never slowed him down.
The pitch ended at the base of a striking, 150-foot dihedral that our topo called the Dixie Crystal Corner, a “four star” pitch we’d been admiring since we first glassed the wall. Beautiful as it was from afar, up close the Dixie was a beast—the first 100 feet of crack tapered gradually from seven inches to five, one of the most strenuous possible sizes to contend with. The left wall was smooth and dead vertical and the right only a degree or two less. It looked like it would be a fight, and it was my lead. Life was suddenly very simple. My job was to lead this pitch, quickly, free, and onsight. Nothing else mattered.
I swung the rack onto my left side, rigged our two biggest cams on full-length runners clipped to the lead rope, shoved one into the crack, and began chugging. Bingo! Protruding crystals on the right wall allowed me to stand with one foot out of the crack, shaving full number grades off the difficulty. It was strenuous offwidth climbing, and went on forever, but never got really hard.
The crack finally thinned to hands, leading into a series of small ledges. By now it was almost dusk, and the most pressing task was to find a bivi spot. Forty feet higher I could see what appeared to be a ledge, but I was out of rope. We had a set of small two-way radios, and I called down for Collins to follow the pitch. He did, then put me back on belay, and I scrambled up onto the grassy, sloping terraces that would be our camp for the night.
Stretching my lead beyond a rope length created a small hassle for hauling, so while the team sorted it out, I worked on our night’s quarters. The grassy shelf sloped badly, but by peeling back the grass, leveling the dirt and gravel beneath, and then replacing the turf on the flattened terrace, I fashioned what I thought was a pretty fair sitting bivi.
A gentle rain settled in as the team arrived, and we huddled under our hardware-store tarp and cooked up a warming stew. A few remarks circulated about my choice of bivi ledge, but everyone made the best of it—except Collins, who dealt the ultimate insult by rapping down 50 feet to a lower ledge, where he found an even more miserable perch to pass the brief but rainy Northwest Territories night.
The next morning dawned clear, and we went for the top. The climbing was the stuff of dreams, with steep and continuous cracks, challenging but never desperate. Everyone onsighted his pitches. Very near the top, an intimidating squeeze chimney cast some serious doubt on our success, but Collins dispatched it with aplomb. As the pitches went by, one by one, we became ever more hopeful and elated. This thing was going down, today!

We hit the summit ridge, and the vista opened up into a world of swirling clouds, with glimpses of ice-clad peaks. Only the Freebird party had reached this point before us. They had called it good here, and we might have too, but finding dry, late-season conditions, we were able to continue. Climbing alone, occasionally waiting for each other, we scrambled unroped and in approach shoes, up the last 2,000 feet of knife edge. Pat, in the lead, waited before the final rise, and we scrambled together onto to the untouched, tabletop summit slab of the Phoenix.
In 35 years of rock climbing I’ve been privileged to participate in many fine first ascents, from New Hampshire and Maine to Canyonlands and the Black Canyon, but our route on the Phoenix was one of the very best— sort of the Naked Edge of the Northwest Territories, if you will. More classics await future parties on the flanks of the Phoenix itself, and on nearby formations—but if the Vamps ever get more popular, this one will surely get repeated, due to its Half Dome stature, superb and textured rock, elegance of line. Not to mention climbing that is so much more reasonable in difficulty than it had any right to be.
Yet at least for Pat, Q, and me, the route will always be entwined with the river. I will think back to this Vampires adventure as a time when we moved through the unknown as good adventurers should: solid on the water, and fluid on the rock.
Also read:
The post Vampire Diary: A trip to an untouched Canadian summit appeared first on Climbing.
]]>
Back in 1979, tower trips could be serious business. Spring-loaded cams had yet to debut. Falls were rare, but potential air was huge.
The post The First Ascent of Lightning Bolt Cracks… Before Cams appeared first on Climbing.
]]>This article first appeared in 2020. We’re releasing it here for free to honor first ascensionist Ed Webster, who passed away in late November.
Out west beyond the Indian Creek, Utah, sits a son-of-a-gun of a desert tower: North Six Shooter Peak. From most angles it looks like its namesake—a bit on the stubby side, more the Sheriff’s Model Colt than Army Issue—but sight the tower directly from the northeast and a more perfect sandstone needle you will never see.

In April 1979, Ed Webster and Pete Williams finally got a close look at the daunting 200-foot “Lightning Cracks” (aka Lightning Bolt Cracks) that Jimmie Dunn had been telling them about. Dunn, with fellow desert-climbing pioneers Billy Westbay and Stewart Green, had climbed the formation’s original route in 1971, and spotted the zigzagging fissures on the sheer southeast face. “What I saw didn’t ease my anxiety much,” Williams says.

Back then, tower trips could be serious business. Spring-loaded cams had yet to debut, making the climbing difficult to protect. Hexes were available, but the Wingate-sandstone cracks were often so parallel that the leader simply had to punch it between pods. Two inches too high and a Hex rattled; two inches too low and it wouldn’t fit. Falls were rare, but potential air was huge.
The 15-foot roof at two-thirds height looked so daunting that Williams insisted Webster take that lead. This put Williams on the first pitch, facing a near-parallel crack splitting an unflawed wall. Bouldering up a few moves, he imagined falling off and yanking Webster from his stance, the two of them taking “a horrible, flesh-mangling slide” down the 500-foot talus cone below. Williams slotted a perfect No. 6 Hex and a wide finger piece, then gunned it 15 feet, cranking one jam each of every bad size between fingers and hands—unknowingly completing the route’s 5.11a crux. Steeper, wider cracks lay above, the bane of smaller-handed climbers who have climbed the route since, but Williams cruised these, too, and stretched the pitch out 120 feet to end just below the huge roof.

The stone below had been mostly blank, and Webster expected more of the same on his lead. Instead, perfect foot ledges appeared. Webster high-stepped and jammed effortlessly out the left side of the ceiling, yelling down from the lip, “This is the best route I’ve ever done!”
The view from up top—earned after a final stretch of 5.9—wasn’t bad either. To the southeast lay the sister pinnacle of South Six Shooter, their only companion in the sky. To the northeast rested the snowy, 12,000-foot cones of the La Sals. To the west lay the Dali-esque maze of the Needles District in Canyonlands National Park, and 50 miles farther, on the horizon, spiked the hazy summits of the Henrys. The two climbers took in the scene as a just reward for firing the FA of one of the planet’s most classic tower routes.

The Beta
Location
North Six Shooter Peak, Indian Creek, Utah
Grade
5.11a
Length
Two to four pitches
First Ascent
Ed Webster and Pete Williams; April 1979
The post The First Ascent of Lightning Bolt Cracks… Before Cams appeared first on Climbing.
]]>
Knots were also used for record keeping in ancient China, and the Chinese Book of Changes, almost 2,500 years old, associates knots with contract and agreement.
The post 10 Interesting Facts I Doubt You Know About Knots appeared first on Climbing.
]]>Get hands-on learning straight from Arno Ilgner in Climbing’s online video-course series Overcome Your Fear of Falling. Sign up now, learn from home, and climb your level best.
Knots: they attach us to ropes, connect slings to trees, substitute for dropped gear, secure tents, create belay anchors. Like the Force, knots surround us, protect us, and bind our galaxy together. Even a sport climber whose shoes close with Velcro knows a few knots.
But here are a few things you might not know about them.
*
The word “knot” is related to knob, knoll, and knuckle, but not to knowledge. It is knoten in German, knot in Dutch, knut in Swedish, nudo in Spanish, and noeud in French.
*
The Inca’s only “written” language was a system of knots tied into necklace-like “documents” called quipus, or “talking knots.” Some scholars think quipus recorded only numbers, but others believe that they also told stories and encoded historical events. A select class of Incas apparently interpreted the knots, and the code has never been definitively deciphered. Knots were also used for record keeping in ancient China, and the Chinese Book of Changes, almost 2,500 years old, associates knots with contract and agreement.
Read This: How to Tie A One-Handed Munter and Clove Hitches
*
The “bitter end” of a rope refers to its working end, intended to be tied off to a bitt, a cleat-like fastening point found on docks. If a longshoreman bobbled a thrown line or missed his tie-in move as a ship came in to dock, he might be left “hanging on to the bitter end” as the untethered ship drifted perilously past its mark.
*
The “feel” of a rope is called its hand. A hank is a looped bundle of rope, e.g., a lead line done up in a mountaineer’s coil. A bend is a knot that ties the ends of two ropes together. A hitch attaches a rope to a fixed object, such as a tree or carabiner. A short section of slack rope that does not cross itself is called a bight. If it crosses itself, it’s a loop. Twist a loop and you form an elbow.
Read: The Complete Guide To Climbing Knots
*
A “climbing rope” is a misnomer. “Rope” properly refers to the raw material—a spool of accessory cord, for example. Once cut to length and given a designated purpose, a rope should be called a line.

*
The square knot—the first knot many people learn besides tying their shoes—may be the single greatest hazard in rope-related activities, due to its default use in sketchy rigging scenarios by reckless amateurs. To see some of the square knot’s antics, tie a firm square knot, then pull on one tail until the knot flips (or capsizes in knotting language). One strand will turn into a lark’s head knot, or girth hitch, feebly grasping the perfectly straightened second strand. Off belay!
*
Anytime you tie a knot in a rope, you weaken it; in drop tests and pull tests, a rope typically breaks at the knot. The strongest tie-in knot you can use is the figure-eight follow-through, which, when pull-tested, breaks at 75 to 80 percent of the rope’s full strength. The bowline is a slightly weaker knot, at 70 to 75 percent, followed by the double fisherman’s at 65 to 70 percent. The clove hitch is the weakest of the common climbing knots, at 60 to 65 percent. Note, however, that modern climbing ropes have a tensile strength of upwards of 6,000 pounds, so even a clove hitch would fail at something like 3,600 pounds. The elasticity of climbing ropes makes that amount of force virtually impossible to generate in real life scenarios.
*
Although the bowline has been in use for thousands of years, the name first appeared in written English in 1627, when one John Smith called it the Boling Knot. French alpinist Gaston Rebuffat favored the bowline for his tie-in, as did El Cap pioneer Warren Harding. If you make a pre-dawn hike miles into the backcountry only to find you’ve forgotten your harness, you’ll be wrapping the rope around your waist to tie the bowline on a coil, or Space Cadet’s Hitch.
*
To help loosen a stubborn knot, roll it with your palm against a rock. For really stuck knots, such as those found in manky tied slings, soak the knot in water. Conversely, to create a more secure knot, soak it before tying, cinch it tight (bounce test–style), and let it dry.
*
Gorillas and weaver birds are both known to tie knots. Neither is known to wear a climbing harness.
The post 10 Interesting Facts I Doubt You Know About Knots appeared first on Climbing.
]]>
You see untold climbing photos nearly every day and most of them suck. The bad news is they're your pics. It doesn't have to be this way. Follow the advice from these five expert climbing photographers and start taking world-class pics you'll be proud to share.
The post The Complete Guide to Taking Sick Climbing Photos appeared first on Climbing.
]]>Get hands-on practical advice from Academy Award winning and National Geographic photographer Jimmy Chin. In this online-course Jimmy Chin shares advice for setting up a climbing shoot, how to prep, gear he carries and takes you behind the scenes in the making of Free Solo. Enroll in Climbing Photography With Jimmy Chin today!
You’re inundated every day with climbing photos on social media and blogs and websites, but fact is most of those shots suck. The bad news: those are your photos. With today’s nearly foolproof camera phones, many of which rival the technical abilities of DSLRs, it is possible to take pro-level shots, you just need a bit of help getting there. What follows are a series easy-to-digest self-help articles by pros and advanced amateurs who have had a hand in setting the bar for climbing photography. Read, absorb the wisdom, and up your photo game.
The post The Complete Guide to Taking Sick Climbing Photos appeared first on Climbing.
]]>
Follow these simple guidelines for better climbing photography. Includes advice for getting the most out of light, how to visualize, use a zoom, and even posing down and how to learn from others' photos.
The post How to Stop Taking Butt Shots appeared first on Climbing.
]]>Get hands-on practical advice from Academy Award winning and National Geographic photographer Jimmy Chin. In this online-course Jimmy Chin shares advice for setting up a climbing shoot, how to prep, gear he carries and takes you behind the scenes in the making of Free Solo. Enroll in Climbing Photography With Jimmy Chin today!
Nothing kills the climbing-buzz quicker than a climbing photograph that’s drab, cluttered, boring, predictable, or obviously posed. You’re not a pro climbing photographer, and probably don’t want to be, and you’d rather spend your cash on a new rope or gas than on expensive camera gear. Still, we know you hate it when you return from a killer roadtrip and your only good photo was of your buddy rope-swinging over the pallet fire. Fear not! You can keep the buzz alive by following a few simple guidelines.
Light
Most photographers will tell you “it’s all about the light.” Sage advice, but almost useless for the casual climbing photographer. Most of us will get up at the crack of dawn for alpine approaches, but not for a photo shoot. You’re more likely to be at the crag for the nice evening light, but by then most of the action is over, and your friends are warming down or already back at camp with a cold one. Chances are, the action you want to capture will happen in the heat of the day. So what do you do?
Use the striking light of early morning and late afternoon for landscape-type shots – scenic views of the peaks or crags, and more distant climbing shots that show a lot of terrain. Direct midday sunlight will give you washed-out colors and harsh shadows that wreak havoc on people’s faces. To capture midday action, you’ll have better luck shooting in the shade. Light filtered through trees or reflected off colorful rock is much more pleasing than midday glare, and you’ll get great shadow detail, too.
Have a concept
Your eye and brain see a scene in a selective, focused way, but a camera does not. You need to tell your camera what to do, what to focus on. Instead of just snapping a shot, hoping to take in what your eye sees, take a moment to identify what you’re really shooting. Is it the dramatic valley and peaks behind the climber? Or is it the climb itself you’re trying to capture? Is it a certain wild move, or is it the whole scene including belayer and belay dogs sprawled out in the dirt below? Once you decide what you’re going for, you’ll begin to recognize it when you see it in your viewfinder.
Once you’ve identified your concept, choose a main subject. Generally, this is the climber, but it may be a climber/belayer pair, or just the climber’s face, or even just a hand or foot. Decide how the rest of the scene supports or detracts from your concept, and eliminate everything else that merely clutters.
Zooming in
Even if you can’t change the lenses in your camera, you can zoom in and out, and this does more than make your subject larger or smaller in the frame. Zooming in makes the background peaks look proportionately larger and steeper. Zooming out, when shooting down on a climber from above, makes the climb look taller and more exposed. Back up and zoom in a little if you want a more flattering portrait; get in close and shoot wide-angle for a grotesque, demented effect.
Smile!
Or grimace, stick your tongue out, clench your teeth, furrow your brow, look askance, frown, huff and puff, ponder. The single most important thing you can do to improve your climbing images is to include the climber’s face. Expressions bring it all to life. You may be infatuated with a certain tiny chalked hold, but if your shot also features the top of your buddy’s head, it will fail.
By the way, pay attention to the faces of other people in the photo, too. Nothing sucks the energy out of a gripping action photo like a spotter bending down to adjust pads or a belayer talking to a bystander.
Posing down
If you decide to really do it up and set up a climbing shot, keep these tips in mind.
- If you’re shooting from a rope, set it off a bit to one side. Consider where the light is coming from, so you won’t be shooting into it or casting your shadow on the climber.
- Pick one or maybe two moves or sections that will give the most dramatic representation of the climb, and focus on shooting those. Rolling through dozens of frames as the climber works up the entire climb will earn you a lot of editing and few keeper images.
- If you are going to “pose” your climber, one of the best ways to do it is to have her repeat that special move over and over. This way, the climber usually becomes more and more “expressive” (i.e., exhausted) as they pose. Much more effective than the “reach up with your right hand” technique of posing.
Be a copycat
Imitation is the highest form of flattery, so copy your favorite climbing photographers. OK, so your favorite shots are taken from exotic vantage points you’ll never get to, but copy the ones you can, such as sport-crag or bouldering shots. What is the concept of the photo? What time of day was it taken? Where was the shooter relative to the in-coming sunlight? Was a flash used? Was the shooter above or below the climber? Wide-angle shot or telephoto? What really makes this photo work? Just analyzing how a photographer got their image can be quite educational.
The post How to Stop Taking Butt Shots appeared first on Climbing.
]]>
Sick of being the weakling and the buffoon? Forget excuses. “Discrete tension,” aka DT, can earn you credit for routes significantly harder than you actually redpoint.
The post Too Pumped to Send? Cheat With “Discrete Tension” Hack. appeared first on Climbing.
]]>Climbing, on good days, is about personal achievement. But it’s also about camaraderie, your rapport with friends. If you’re a habitual underachiever, as I am, you may be missing out on the gratifying esprit de corps of climbing. Tired of the campfire jokes cast in your direction when your pals send Welcome to the Big Girls’ Club and you don’t? Sick of being the weakling and the buffoon? Forget excuses. “Discrete tension,” aka DT, can earn you credit for routes significantly harder than you actually redpoint.
Broadly speaking, DT is any technique that allows you to rest on the rope without your partner knowing it. At its simplest, DT requires only that you find a protection point situated above your tie-in knot—something readily available at most clipping stances. With the bolt clipped, firmly press a hip or thigh against the rope, pinning it against the rock. Then, simply sag onto the rope. Voila!—a near no-hands rest. Repeat as necessary.
On smooth or very overhanging terrain, you’ll only be able to support 50 to 70 percent of your body weight before the rope begins to slip. Use textured areas of rock and/or special rubber-reinforced pants to increase friction. You can also supplement the thigh-pin maneuver with elbow pressure at the clip-in point (figure 1). A supple rope helps here.
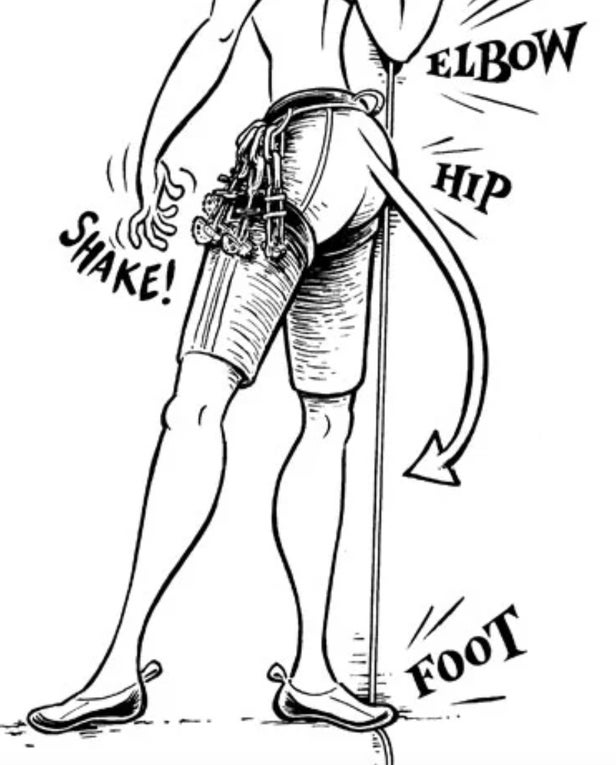
For the advanced practitioner, heel hooks and kneebars also provide prime DT opportunities (figure 2).To avoid detection during DT, maintain an erect body position and make sure to act like you’re fighting the pump while you rest. I find that yelling “This feckin’ booga-looga is going down!” or “I am the man, I am the man!” is an effective decoy. DT works especially well on trad routes; on crack climbs, place a chest-height cam, pin the rope inside the crack with a foot jam (be careful not to pull yourself off!), and sag. Re-rack, chalk up, or sermonize about the spiritual virtues of trad climbing to disguise your turpitude.

It’s possible, though trickier, to use DT when climbing above protection. Here’s where the true con artist outstrips mere swindlers and charlatans. You’ll need a good-sized, well-shaped handhold—say a chickenhead or flake. Drape your rope over the top of the hold at about head height, then pin it in place with your hand. Sag as in overhead-pro DT, maintaining firm pressure on your hand (figure 3). Finding the right hold is key; shape is as important as size. (Hint: Any hold you can wrap is ideal.) Discrete tension isn’t for all situations. On thin and runout routes, it’s almost impossible to use DT techniques. (The “Friends don’t let friends climb slabs” slogan was actually coined by one DT guru.) Also, avoid DT when cameras are present — I know one climber who was publicly spanked by his girlfriend after an incriminating DT photo circulated on the Internet. And remember, DT is not free climbing. Use it in moderation to hoodwink your nay-saying friends, never to win sponsorship or falsely claim first ascents.

The post Too Pumped to Send? Cheat With “Discrete Tension” Hack. appeared first on Climbing.
]]>
Dropped, forgotten, or mysteriously vanished gear can ruin a climbing day. Worst case, it can be life-threatening. But with a little know-how, you can recover from bone-headed mistakes and keep climbing—and also impress friends with your savvy.
The post Dropped Your Belay Device? Forget Your Harness? Here’s How to Make Do. appeared first on Climbing.
]]>Tag Line
If you trash your tag line during a multi-pitch climb, you can still make double-rope-length rappels to get off. Feed the undamaged lead line through the anchor point, and attach it to the damaged line with a bulky knot that can’t pull through the rap rings. (This method is sometimes called the Reepschnur.) Don’t use it with an anchor that has webbing or carabiners at the rap point; the smaller the rap rings, the better. Next, rig a back-up by tying an overhand or figure-eight on a bight on the damaged line, near the knot, and clipping the loop to the lead line. With the knot jammed against the rap point, you can rappel single-strand on the undamaged lead line, then pull the damaged trail line to retrieve your good cord. This method can also be used to temporarily anchor one strand of a double-rope rappel so you can rap with a Grigri or other single-rope belay device.
Quickdraws
If you run out of quickdraws, you may be able to substitute a nut. The cable loop on many wired nuts can be pulled away from the nut, exposing the end of the loop; clip a carabiner into each end of the wire for an instant quickdraw. (If the cable is soldered or glued at the nut, this method won’t work.) For a back-up long runner, carry a gear sling rated to full strength.
Belay Device
If you drop your belay or rappel device, use the Munter hitch. You can belay or rappel with this simple hitch, using only the rope and a locking carabiner. A large, pear-shaped carabiner allows more room for the knot to move and “flip” freely so it can engage or release braking power, but any locker will work. You can even use two non-lockers with the gates opposed and reversed. Tying the Munter is simple. Check that you’ve done it correctly by pulling the rope back and forth —the knot should “flip” as you change direction.
Harness

If you show up at the crag without your harness, all is not lost. For single-pitch climbing, you can share your partner’s harness. The climber wears the harness while you belay directly off an anchor at the base: a sling around a tree or boulder or a gear anchor (see illustration below). Make sure the anchor is bombproof and good for multi-directional pulls, especially upward. The belay will be fairly static, so it’s not the best for taking lots of falls.
Ice Axe
When most of the snow is gone in your local hills, it’s tempting to leave the ice axe behind. Unfortunately, any snow you find may be rock-hard. Cross short snowfields by cutting sharp-edged foot- and hand-holds with a rock. You can use a nut tool as an ice dagger, but it’s more important to cut good steps and stand in balance. Hard snow is very abrasive, so always don a pair of light gloves for protection.
Shoes or Chalk Bag
So, you’ve emptied your pack, but shoes and chalk bag are nowhere to be found. Take a deep breath, open your mind, and step back into the 1960s. Layton Kor and Royal Robbins climbed 5.9 and 5.10 in footwear similar to your approach shoes, and never bothered with chalk. On belay!
“My Imaginary Relationship With Layton Kor Got a Little Weird.”
The post Dropped Your Belay Device? Forget Your Harness? Here’s How to Make Do. appeared first on Climbing.
]]>
There's something magical about doing big routes in faraway places. But on these walls it's important to have your systems and tactics totally ironed out.
The post 9 Ways to Make Multipitch Climbs Safer, Faster, and More Fun appeared first on Climbing.
]]>Adventure climbing: an eight-pitch jaunt up Cannon Cliff, New Hampshire; an all-day route in Colorado’s Black Canyon; a 1,000-foot line in the canyons of Red Rock, Nevada. On long, multipitch outings like these, you want to be nimble, time-efficient, and physically and mentally ready for challenges and surprises. “Adventure” implies danger and unknown risks, and if you get caught in a storm, benighted, off-route, or otherwise thrashed, that’s part of the game. Nevertheless, there are ways to dial down your epic potential.
1. Tell someone your plan
Cell phones work in surprising locations, but batteries die. Let a relative or reliable friend know exactly what route you’re doing, and when you expect to be out. Suggest a plan of action if you’re late (and define “late”); specify who should be called if a search becomes necessary. Skilled climbing friends will have the best guess about what may have happened, and they will know whether to call in outside help. Investing in an inReach or Sat phone is a great idea, particularly if you’re heading to an especially remote wall or plan on doing big climbs frequently.
2. Scout
Don’t assume a topo will keep you from getting off route. Before starting up a big climb, stand back and trace the exact line up the rock. Identify major features—both on and off route—that you can track as you climb. Check out the descent, hiking to an adequate viewpoint if necessary. If you are bivouacking near the route, bring a small pair of binoculars to scope the line the night before. Plan your approach logistics to allow for daylight scouting.
3. Wear comfortable shoes
After a few hours on the rock, feet swell. Your tight, high-performance crag shoes become a liability if you can’t bear to weight your feet. On long routes, climb in looser, less aggressive shoes. Velcro closures allow you to quickly pop out your heels while belaying and give sore feet a break. (Want to read more about shoes? Check out “A Beginner’s Guide to Climbing Shoes”
4. Don’t over-rack
Pay attention to the rack suggestions in your topo but try not to bring more than you think you might need. Too much gear weighs you down, makes it hard to find the piece you want, and inhibits your movements in dihedrals and wide cracks. Go especially light on big cams—your least efficient pro—unless the route requires them. Don’t, however, skimp on free carabiners, full-length slings, or wired nuts. Carabiners free up your systems, nuts are light and serve as inexpensive bail anchors, and the slings do both. I’ve occasionally retreated because I lacked the right gear and couldn’t work around it, but almost always, a light rack makes me a faster, stronger, safer climber.
5. Place gear that’s easy to remove and re-rack
Don’t over-cam or bury your units. Place cams instead of nuts if you’re sure you have enough, because cleaning cams is faster. When you add a quickdraw to a unit, leave the cam’s dedicated carabiner in place to speed re-racking. If the second cleans gear onto a sling instead of harness loops, you can hang that sling at the belay and quickly strip the gear for re-racking.
6. Pack smart
Climbing with two smaller packs may be more efficient than one big one crushing the follower. On steep and difficult pitches, hauling a bag often pays off. A super-light, waterproof/ breathable shell is your most efficient extra layer, functioning as a windbreaker, insulating layer, and storm gear. A headlamp and space blanket weigh next to nothing, and should always be carried. Water presents a dilemma: I prefer to fully hydrate before the climb, carry a liter or less on the route, and climb faster, but this can get you in trouble if you unexpectedly epic. Another issue is shoes for the descent. I’ll carry super-light running shoes or flip-flops, or descend in my climbing shoes, depending on the situation.
7. Focus
Speed comes from eliminating wasted time, not from rushing. Changeovers should be sequential, choreographed, three-minute affairs, with both climbers using both hands to accomplish complimentary tasks. When leading, do one thing at a time: climb, place pro, study the route. Muddled combinations of tasks kill efficiency.
8. Know when to belay
Many adventure routes do not have set belay spots or fixed anchors. After 40 meters or so, passing up a comfortable ledge with easy-to-place anchors will cost most teams time and energy; you can easily burn 15 minutes setting up a cramped belay at the end of the rope, and the uncomfortable stance will drain you. Distinct cruxes are best done as short pitches, allowing communication for both leading and following. Shorter pitches also allow a lighter rack.
9. It’s all about the team
Finding a motivated, like-minded partner is a gift, so appreciate it. Learn the other’s strengths and weaknesses. Racking gear—right or left? Will his height make a difference cleaning a piece? Experiment, discuss, and compromise, dialing in systems. Always pay your share of gas, and consider a no-fault agreement to split the cost of any gear lost by the team.
The post 9 Ways to Make Multipitch Climbs Safer, Faster, and More Fun appeared first on Climbing.
]]>
Racking them, placing them, threading them, stacking them, trusting them. Here's what you need to know about using nuts.
The post What You Need to Know About Nuts appeared first on Climbing.
]]>This article originally appeared in our print magazine in 2013.
When many people start trad climbing, cams become their new best friend. They’re easy to use and contract to fit a variety of crack sizes. But don’t underestimate the benefits of their counterpart: the nut.
Nuts are passive protection devices, meaning that their holding power comes from their wedge shapes, cleverly placed in natural slots and constrictions (as opposed to cams, which actively expand under load to grip the rock). With no moving parts (this is what makes them “passive”), nuts are inexpensive, lightweight, sturdy, and versatile since they can fit a variety of spots because they can be positioned in four different orientations. Indeed, thousands of nut-only first ascents were completed before cams were even invented. Here’s a rundown of how to use these amazing tools.
The post What You Need to Know About Nuts appeared first on Climbing.
]]>