
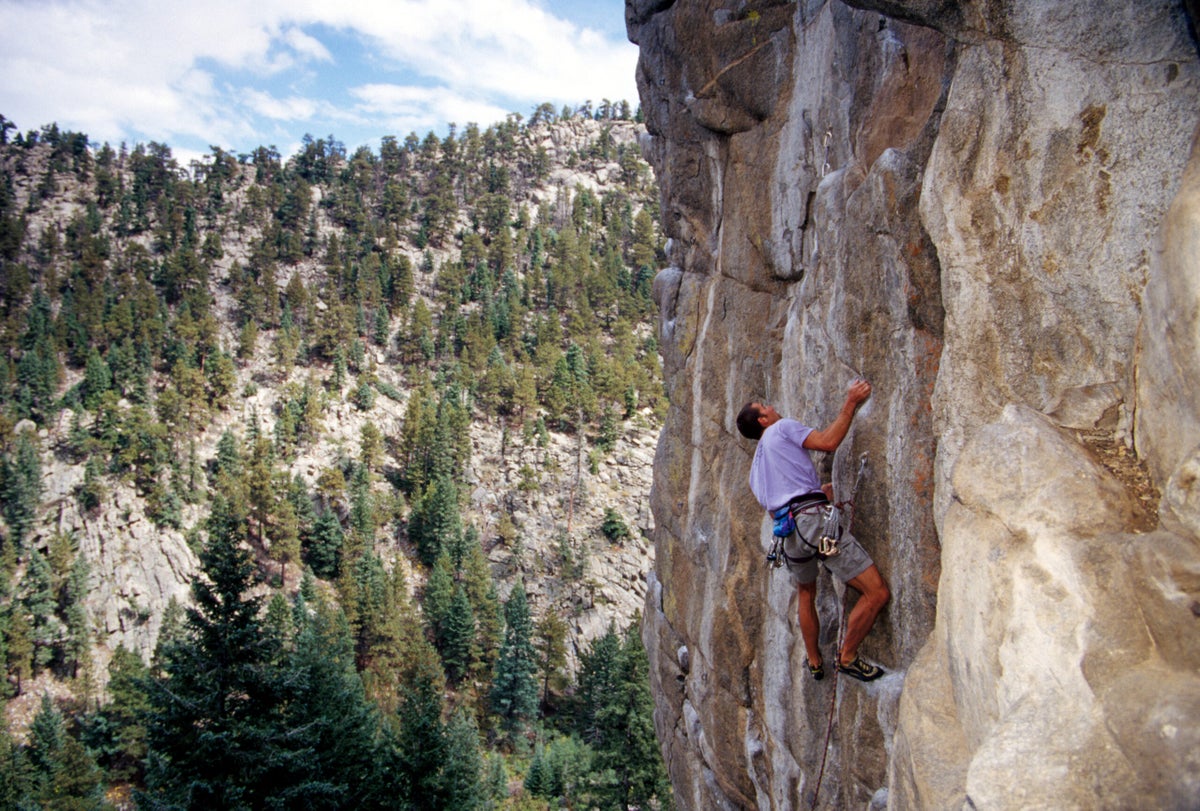
These are the risks of clipping draws with carabiner gates facing the wrong way.
The post Does It Really Matter Which Way Your Quickdraws Face? appeared first on Climbing.
]]>You may have heard the maxim “Face your quickdraws away from your direction of travel.” That is, if you clip a bolt and the sequence heads left, both your bolt-side and rope-side carabiner gates should face right. Perhaps you’ve heard this about draws clipped to pitons, too, as well as to traditional pro. But why should this be? Want more than the reasoning of, “This is just how it’s done”? Since we haven’t seen a rash of accidents from climbers facing their draws the wrong way, we decided to dig a bit deeper.
The right way to clip quickdraws to bolts
Which way should the quickdraw’s bolt-side carabiner face?
According to Mountaineering: The Freedom of the Hills (Ninth Edition), we clip quickdraws with the top carabiner gate facing away from the direction of travel so that this carabiner doesn’t rotate on the bolt hanger as you climb past—at which point, the rope applies tension to the draw, possibly reorienting the carabiner such that the gate contacts the hanger. “In the case of a sudden fall, the gate can then open and potentially unclip …” the authors write.
Jeff Jaramillo, Head of Gear Education and Outreach at WeighMyRack, has never seen this happen on lead—nor have I—but he did witness it once while someone was slingshot toproping a pitch. The climber was on the clipped-in side of the rope. As the belayer took in slack, the tension on the toprope caused a draw’s top gate to open against a hanger.
Another reason to clip the draw’s top carabiner facing away from the direction you’re going is to avoid “nose-clipping” (aka “nose-hooking”). Per the American Alpine Institute, nose-clipping can happen when “the nose of the carabiner gets stuck on the bolt with the gate holding it in place.” If you fall, you load the carabiner along its minor axis—its weakest orientation—potentially leading to catastrophic failure. Again, Jaramillo says this is rare, given that modern bolt hangers are made of thicker metal that reduces the chance of the carabiner’s nose sticking, compared to the skinny old hangers from the 1980s. But it can happen, especially with spinner bolts. On a route at the Red River Gorge, a friend of Jaramillo’s had clipped correctly, but the loose hanger rotated the carabiner into a nose-clipped scenario.
Which way should the quickdraw’s rope-side carabiner face?
We face the rope-side carabiner away from our direction of travel to avoid a back-clipping situation. As anyone who’s taken an (anxiety-inducing) gym lead test recalls, back-clipping occurs when, per Freedom of the Hills, “…the leader’s end of the rope is clipped so that it travels behind—rather than in front of—the carabiner.” With back-clipping, the rope can form a twisted byte that can then unclip itself in a fall. Instead, you want your side of the rope coming up and out of the carabiner away from the rock, which is promoted by orienting your rope-side clipper away from your direction of travel.
Do both carabiners in a quickdraw need to face the same way?
In an informative video (below) from former Black Diamond Director of Quality Kolin Powick he shows why you should rig your draws with both the bolt-side and rope-side carabiners facing the same way. Primarily, doing so helps avoid the inevitable, fumble-pumped confusion when you pull a draw off your harness and the gates are facing opposite directions: Opposed carabiners introduce the completely avoidable potentiality of accidentally nose-clipping or back-clipping.
What about draws clipped to pitons and traditional protection?
Pitons: The same rules apply—face the gates away from your direction of travel; also, beware any sort of funky interaction between the piton and the carabiner, such as a fat carabiner acting like a lever on the pin or a tiny clipper getting nose-clippedIf using a “trad draw” or “alpine draw”—a shoulder sling plus two carabiners—face the piton-side carabiner away from your direction of travel. Meanwhile, with old ring pitons, the carabiner will likely move around on the ring; do your best.
Traditional protection: Almost all cams come pre-slung, and nylon is pliable. The play that slings introduce into the system makes it unlikely you’ll experience either nose-clipping or back-clipping. However, if using a draw to clip directly into a cam’s cable loop or a nut’s wire, try to clip correctly given the added stiffness in the system.
One final thing to be aware of with either a quickdraw or alpine draw? Jaramillo cautions that the top (protection-side) carabiner can get pinned against the edge of a crack and open. “But this is easily avoidable,” he says. “Just extend the sling in a different way, move the piece, or place a second piece”
Drawing conclusions
In the end, carabiner-gate management comes down to situational awareness, both from the climber and the belayer. This holds especially true on traversing climbs. “There’s so much on the belayer to be watching out and be ready for the next thing that’s going to happen,” says Jaramillo.
So, if that top carabiner nose-clips or the bottom one self-unclips, what’s the plan?
The post Does It Really Matter Which Way Your Quickdraws Face? appeared first on Climbing.
]]>
Wood hangboards are the best: versatile, smooth, and they force you to use pure finger strength—which, after all, is the point.
The post Weak Fingers? Check Out Our Favorite Hangboards, Field-Tested. appeared first on Climbing.
]]>I was up in the Flatirons, Colorado, recently with my buddy Andy, belaying him on the legendary sport route Slave to the Rhythm (a nod to the Grace Jones album). We chatted between burns about the route’s history, including how the first ascensionist, Dan Michael, gave all the extruded cobbles funny names—e.g., “the Skinhead”—and nailed a piece of wood to a tree to warm up on. Back in 1987, this was visionary stuff: Previously, we had this bizarre idea that you should just show up to your project and give a burn while your muscles were still “fresh,” and so barely warmed up properly.
In that benighted era, training and logistics lagged well behind physical strength; at-home hangboards were sharp, tweaky, and rudimentary; and “portable hangboards” were, apparently, strips of wood nailed to trees.
We’ve come a long way into today’s world of doorjamb-mounters, sculpted resin hangboards, and wooden apparati. For my money, the wood hangboards are the best: versatile and smooth, they’re ideal both to warm up on and at the session’s end, when skin is thin. And they force you, by relying less on friction, to use pure finger strength—which, after all, is the point.
There are lots of wooden options. The four below are my favorites, both at the crag and in the gym/home during training cycles.
Beastmaker 1000 Series
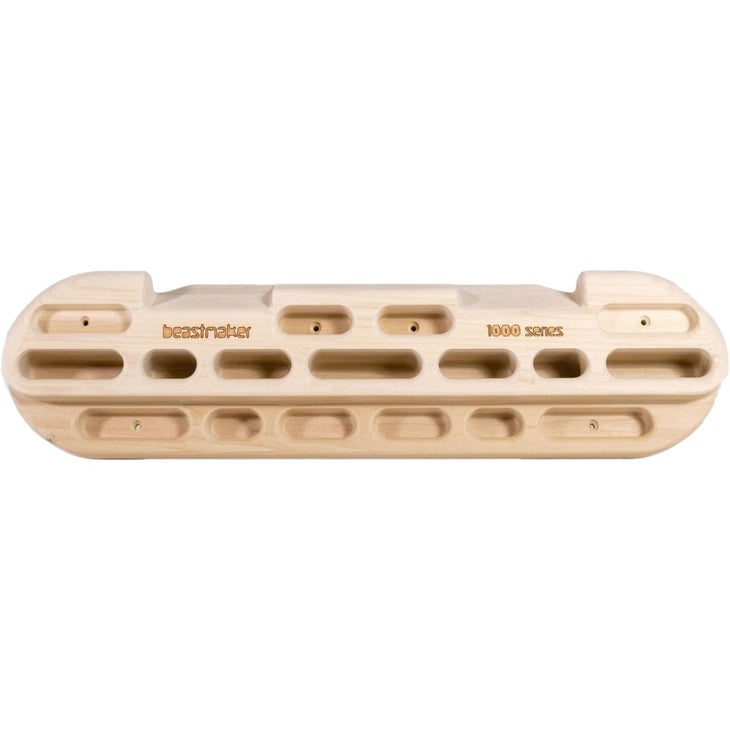
This is the kindler, gentler hangboard from the UK-based wooden holds and hangboard maker Beastmaker, with the 2000 having gained a cult following among training cognoscenti for its sloping monodoigts and one-arm deadhang/pull-up benchmark “middle edge.” The 1000 has no monos—which, frankly, with sausage-sized, tweak-prone middle fingers I don’t miss—but instead a series of slots/pockets from four fingers down to two, and from “very deep” (~40 mm) to “small” (10 mm), as well two handlebar jugs and two pairs of slopers. The 1000 Series brushes clean with little effort and has a grippy, tight-grained texture, making it a go-to for volume sessions including drills like repeaters.
Pros
- Rounded pocket shapes are kind on sore joints and trashed skin, as well as “open” enough to allow for full and half crimping
- Jugs are of a comfortable size and perfect width for pull-up and lower-out workouts
- Amazing texture
Cons
- The 20-degree slopers are plenty usable, but the 35-degree slopers may be too aggressive on dry-skin days (wet your hands with a spray bottle first)
- You can “cheat” by pressing your fingers against the sides of the relatively tight slots to increase holding power
Metolius Climbing Nano Rings
The aptly named Nano Rings are so small it’s ingenious how many grips—eight, from 40 mm down to 10 mm—Metolius has loaded into such a small package, one roughly the size of two protein bars. This has made them a go-to for crags with long approaches, where I’m paring down my pack to the minimum, such as on a local Flatirons project with a one-hour, 1,000-foot-vertical-gain approach. Usually I just “make the rounds,” starting with the jugs and working my way down the crimp ladder till I can recruit on the 10 mm slimpers. The wood is cool and soft on the skin, and the Rings are so thin (1.6”) that you can full-squeeze/pinch the crimps to warm up your drag.
Pros
- Extremely compact (5” x 3”), light (7.7 oz), and portable, but still has six edges in 5 mm increments from 25 mm to 10 mm, plus a 40 mm full-hand and 40 mm fingertip jug
- Smooth, friendly texture that holds chalk well
- Affordable
Cons
- Holds can only be used in one orientation—the “incut” one (though there are sloping 10 mm edges inside the cutouts)
- Website says “body weight only,” meaning no weighted pull-ups
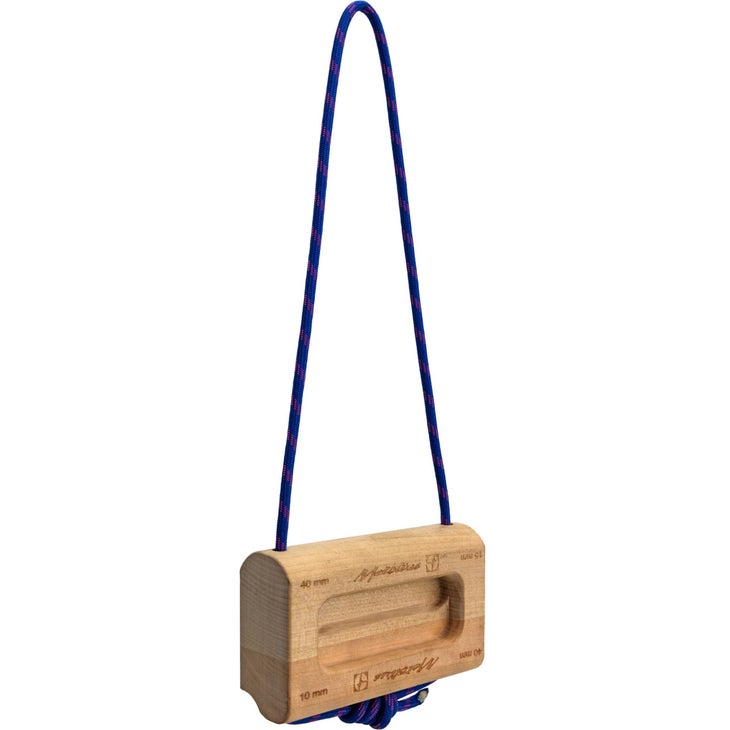
Tension Climbing The Block (aka Tension Blocks)
When Tension Blocks came out in 2019, they were so novel I didn’t understand them—did you hang them from a tree branch and do pull-ups/deadhangs for a cliffside warm-up? Clip a draw to the keeper loop and stand on it, to pull against the crimps and fire up your digits? Use them to lift weights off the floor to do “max hangs,” or perhaps lat pulls on a cable machine? Well, it turns out, all of the above, which is what makes these little (4”x6”) chunks of wood so cool. I’ve had mine for a few years, and one lives at the cliff for warming up or I use a pair for max hangs. There are crimps from 20 mm to 6 mm, pinch possibilities, a 25 mm bidoigt, and a 25 mm monodoigt—i.e., plenty of versatility.
Pros
- You can flip the keeper loop, varying the angle of attack to make the holds either “incut” or “sloping”
- Smooth texture and big, rounded radius on crimps makes for comfortable recruitment
- Portable and versatile
Cons
- Monodoigt could be deeper, to avoid risk of tweakage (or just make another bidoigt!)
- Wood is soft, so care must be taken with storage, transport, etc. to avoid dings and splinters
Tension Climbing Whetstone
 As with Beastmaker, Tension also sells multiple tiers of hangboards: the advanced/elite Grindstone and the friendlier Whetstone, which has two ergonomic jugs with bumps to displace weight, big (40 mm) bidoigts and edges, mid-sized crimps (25 and 30 mm), benchmark 20 mm edges (the gold standard for weighted/max hangs), and a 40 mm “one-arm” slot/edge right in the middle. My local training facility The Campus has a row of alternating Whetstones and Grindstones; the two boards complement each other well, giving you a range of holds from 40 mm down to 8 mm. Both boards are also near-frictionless, making you train with power and focus. Read our full review of the Whetstone here.
Pros
- The deep two-finger pockets and ergo-bump jugs are kind on the tendons, even when doing weighted lower-outs and pull-ups on the jugs
- Mid-sized edges are well-milled, with a broad radius that lets you push max hangs—failure is gradual, not sudden
- Lots of holds in a compact package—jack-of-all-trades space-saver
Cons
- One-arm progression is limited by the jump from the 40 mm central slot down to the 30 mm edges (i.e., there’s no 35 mm option)
- Minimal overhang between rows means you can “cheat” your thumb on the lower row while dangling from the upper edges
The post Weak Fingers? Check Out Our Favorite Hangboards, Field-Tested. appeared first on Climbing.
]]>
Featherbagged—aka “soft”—cragging and bouldering areas for your climbing pleasure
The post The World’s 7 Least Sandbagged Climbing Areas, Ranked appeared first on Climbing.
]]>Sandbagging hits us where it hurts the most—right in the ego. When your psyche gets hit hard by one of these notoriously sandbagged areas, there’s only one cure: Soft grades. Put the pieces back together again with some easy ticks for the rating.
“Featherbagging”—giving Charmin-soft grades to routes and boulders—is just as much a climbing tradition as sandbagging. Heck, sometimes gyms and destination areas even use it as a secret tool to get repeat “customers.” You climb your hardest there, and so come back for more, gleefully opening your wallet.
Gyms aside, the following seven areas are all known for featherbagging. As with all climbing venues, of course, much of this is subjective. There’s variance between climbs, and you’ll still find sneaky sandbags lurking in the shadows, waiting to draw blood.
So go forth and climb soft at the world’s least sandbagged areas, ranked from somewhat featherbagged to “Wow, I’m a better climber than I thought” featherbagged.
7. Boulder Canyon, Colorado

As far as backyard areas for Colorado’s Front Range go, Boulder Canyon is one of the most historic. Here you’ll find some of the country’s earliest 5.10s and 5.11s, dating back to the 1960s. But make no mistake—the original routes on the area’s granite, like Country Club Crack (5.11c) and Umph Slot (5.10c)—are not the softies you’re looking for. Rather, it’s the newer sport areas from the 1990s and Aughts, like Avalon, the Rivieria/Bihedral, and Cascade Crag, where the routes typically range from 5.9 to 5.11.
Furthermore, Boulder Canyon’s granite is rough and featured, with slabby to vert angles that make it easy to piece together beta as you go. Plus many climbs are gym bolted (see the routes of Sport Park), inspiring leader confidence.
6. Indian Creek, Utah
It’s not 100 percent accurate to say that the Wingate-sandstone cracks of Indian Creek are soft. In fact, they’re long, continuous, pumpy, and (often mercilessly) the same size from deck to anchors. But given how homogenous these cracks are, the splitters that fit your fingers perfectly for locks, or accommodate your hands for jams will feel “easy” at the given grade.
So, people with big hands will find Supercrack to be slammer hands and chill at 5.10, while the small-handed might find it to be a loose-fists 5.11. Or take the infamous 5.11+ rattly-fingers face splitter Johnny Cat, which protects with 0.5 Camalots. In all honestly, it felt like 5.9 to me with my Jimmy Dean sausage fingers, even as the neighboring 5.11+ tips crack Puma slapped me around and stole my lunch money.
5. Red River Gorge, Kentucky
This might be a controversial pick. Some people find the Red to be stout—and those people are called boulderers! However, if you are blessed with ample endurance, aerobic capacity, slow-twitch muscle, and good on-the-rock strategy, the Red’s Corbin sandstone is nirvana. The cruxes rarely exceed V4–V7, even on 5.13s and lower-end 5.14s. Most holds are super-friendly deep pockets, huecos, and incut, grippy crimps.
So if you can read the rock and hang on like a sloth, you will take routes down at the Red. On the flip side, the pitches are wildly overhanging and you need to be fit. Perfect examples of this treadmill style include the Chocolate Factory’s Oompa (5.10b), Naked (5.12a/b), and Silky Smooth (5.13c). These routes are all doable for their grades, with no real stopper moves. But they also all deliver a massive pump.
Watch Ada Cronin take down No Redemption (5.13b) in the Red with ease
4. Rocklands, South Africa
The brightly colored Cederberg sandstone of Rocklands is legendary for a reason: It’s fun, featured, solid, and steep. Untold boulder fields stretch as far as the eye can see. Another lure? The area’s user-friendly grades. Many make the pilgrimage to tick their first 8B (V13), given how many options there are to fit one’s unique strengths.
Coloradan Brian Stevens recently spent a season in Rocklands. He said that as a rule, the problems felt two V-grades easier than Hueco Tanks and one grade softer than Joe’s Valley. For example, the classic V4 jug roof of Girl on Our Mind felt on par with the similar roof climb Nobody Here Gets Out Alive (V2) at Hueco. Another factor is the sheer density and volume of problems. “Rocklands has so much, and you can pick and choose whatever you want,” Stevens says. “It’s like nature’s Kilter/Tension/MoonBoard, where you just swipe to the next problem if you don’t like the current one.”
3. Kalymnos/Telendos, Greece
Kalymnos and the neighboring island of Telendos offer perfect blue, white, grey, and tan limestone laced with tufas and stalactites. But there’s more—these routes come riddled with pockets, flakes, sidepulls, and crimps. And with hundreds of climbs from 5.7 to 5.14+, life is good here. Climb sublime rock in the morning, then take a dip in the blue-green Aegean Sea when it gets hot.
But the isles are also known for “holiday grades,” usually a letter or two soft, perhaps engineered to lure repeat visitors. Colorado climber Chris Weidner cites Punto Caramelo, an 8a+ (5.13c) in Kalymnos’s Grande Grotta. He sent it second try and said it felt more like 7c+ (5.13a). “The ‘soft’ feeling in Kalymnos came mainly from the size of the holds: they’re just bigger than you might expect at a crag in, say, France,” says Weidner. “Of course, the Grande Grotta is very steep—probably from 10 to 40 degrees overhanging—so the holds are necessarily larger.” (See also the “Red River Gorge.”) Weidner adds that the tufas make it easy to find kneebar rests mid-route.
2. Moe’s Valley, Utah
This St. George winter destination is a boulderers’ playground, with tight clusters of blocks and a high density of problems. You’ll also find mostly flat landings that are friendly for families and kids. It also has squishy grades, but because everyone’s having so much fun, no one seems to take issue. Says onetime Utah climber Ryan Pecknold, Moe’s has “pockets and edges galore, and most routes are straightforward and require minimal creativity and imagination, with juggy topouts that rarely require a sketchy high heel hook.” In other words, just pull down. (Utah’s Joe’s Valley, though stiffer than Moe’s, has been called soft for similar reasons: lowballs, heavily chalked/ticked holds, easy access, lots of problems to choose from, etc.)
Epitomizing the accommodating Moe’s style is Crippler (V6) in the Sentinel Area, a well-chalked lowball with good holds that might be many a climber’s first V6. At the Pink Lady Area, the photogenic IsRail, also V6, is another classic local example. Impressively, Timothy Kang did 10 double-digit problems from V10–V13 during his first day at Moe’s. This perhaps confirms that the area is soft—but also what a beast he is.
1. Ten Sleep Canyon, Wyoming
Ten Sleep is one of those areas where climbers get lots of firsts: “first 12a onsight,” “first 5.13b in a day,” “first 5.14a redpoint,” etc. This would certainly lead one to believe that it’s featherbagged. And overall, it probably is, especially when compared to the cranky grades at other Wyoming dolomite areas like Wild Iris. On the flip side, some of the older climbs, like Go Back to Colorado (5.12b), are stiff. Beware of wild cards!
In truth, what mostly makes Ten Sleep “soft” is the featured limestone. Tiny crimps and pockets abound, allowing for multiple beta solutions. This also makes it easy to wander off the bolt line, perhaps looping around a crux that the first ascensionist beelined straight up. Famous case in point: the Grasshopper Wall testpiece Blue Light Special (5.13b).
View this post on Instagram
Honorable Mention: Kilter Board
As with the MoonBoard listed as an honorable mention for one of the most “sandbagged areas,” this one’s a bit tongue-in-cheek. Still, of the “Big Three” boards common in the States—the MoonBoard, Tension Board, and Kilter Board—the Kilter Board perhaps has the softest grades. Or maybe there’s just more variance within each grade range. (Don’t worry, there are plenty of stiff rigs. See any problem set by Jimmy Webb or the crimpy offerings on the Fullride 7×10 home wall).
Friendly and ergonomic holds, rounded jugs, flat crimps, and pinches also make the Kilter Board less tweaky. This makes it more conducive to putting in multiple project burns. It also favors taller or more dynamic climbers, with big jumps to positive holds. UK climber Toby Roberts famously did 50 8As (V11s) in an hour on the Kilter Board. Five reps of 10 separate V11 problems is something I can’t imagine anyone pulling off on the fingery MoonBoard. But hey, prove me wrong!
The post The World’s 7 Least Sandbagged Climbing Areas, Ranked appeared first on Climbing.
]]>
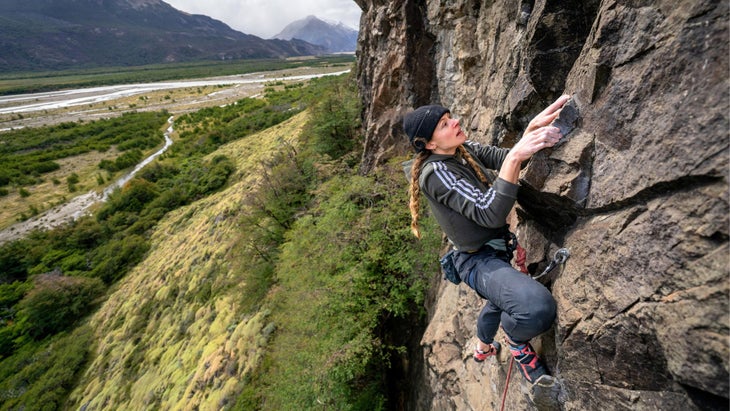
We’ve field-tested everything from beginner’s kicks to high-end weapons. Of the 48 models Sportiva makes, these are our favorites.
The post Psyched on La Sportiva? These Are the 6 Rock Shoes We Recommend. appeared first on Climbing.
]]>La Sportiva has long been a dominant force in the global and United States rock-shoe market, their boots prized for high-octane performance, precise fit, sleek, aesthetic, meticulous Italian craftsmanship, and durability—easily withstanding multiple resoles.
La Sportiva’s climbing shoes have been integral to some of the world’s most difficult ascents, from the Solutions that Beth Rodden wore on the trad climb Meltdown (5.14c) in Yosemite in 2008, to the TC Pros that Tommy Caldwell wore on the first free ascent of the Dawn Wall (VI 5.14d) on El Capitan in 2015, to the Miura + Solution combo Adam Ondra used on the first ascent of Silence (5.15d) in Norway in 2017, to the Mandala + Solution combo Keenan Takahashi sported on the FA of The Gold Standard (V15) at the Buttermilks, California, in 2024.
Sportiva also makes more moderate climber-friendly shoes known for their comfortable footbeds, flatter lasts, and all-day or -session comfort, with the Tarantulace a longtime staple at gyms and crags.
History of La Sportiva
Founded in 1928 in the Val di Fiemme, Italy, in the heart of the Dolomites, La Sportiva is one of climbing’s most venerated mountain and rock-climbing footwear brands. The business began with the bootmaker Narcisio Delladio, who handcrafted his leather boots and wooden clogs for local farmers, and then, during WWII, mountain boots for the Italian Army. Post-war, an in-demand Delladio expanded his business to create a workshop, the Calzoleria Sportiva (“Sportive Shoemaker”), with La Sportiva’s modern HQ now based in the mountain village of Ziano di Fiemme.
In 1982, La Sportiva entered the rock-shoe market with the Mariacher, the iconic purple-and-yellow hightop. Today, the company makes mountaineering, alpine, and ice-/mixed-climbing boots, ski-touring boots, approach shoes and trail runners, apparel and technical wear, and of course rock shoes, of which, as of 2025, they have 48 different models across the men’s, women’s, and kids’ categories.
La Sportiva has long been a major innovator in rock-climbing footwear. They sold the world’s first commercial climbing slipper, the Ballerina, in 1983, pointing to a future in which climbers sought steeper rock requiring softer, slip-lasted shoes; the first “high-tension” (i.e., slingshot-rand) rock shoe, the Kendo, in 1986; and the first “No Edge” shoe, the Mantra, in 1999, forgoing the crisp, 90-degree edge where the sole meets the rand for a softer, more sensitive sole that wraps up over the toe.
Buyer’s Guide to La Sportiva Climbing Shoes
Mountain climbers, trail runners, and backcountry skiers—all of whom are also often diehard rock climbers—will know La Sportiva for their alpine boots, approach shoes, trail-running shoes, and ski boots. But here we’ll cover a handful of their most iconic rock shoes, plus what makes each one special.
Mandala
The Mandala represents the pinnacle of the No Edge line, which also includes the Futura, Genius, and Mantra—it’s the stiffest, most powerful, most versatile of the four shoes, with big-toe bite for edging and micro-edging, yet still tons of “squish” and sensitivity for steep rock and smears. The deep heelcup is a beast for technical hooks, and was key for Keenan Takahashi, hooking a patina crimp, on the FA of The Gold Standard. I used them in 2024 for the first ascent of a radically overhanging 5.14b in Colorado’s Front Range that included every manner of foot placement, from hooks, to smears, to jams, to driving down hard into jibs. Read our full review here.
Buy Mandala for $229 on lasportivausa.com
Ondra Comp
The Ondra Comp is one of La Sportiva’s softer, more rubber-coated offerings, similar to their gym/bouldering shoe the Theory in look, feel, radical downturn, and sensitivity, but with a ribbed, hyper-large rand/scumming patch for coordination climbing. Adam Ondra also designed the shoes to “smedge”—smear-edge—with marked flex in the toebox to spread the soft Vibram XS Grip 2 sole out on tiny holds. These shoes are monsters indoors and for bouldering, but also agile on sport climbs for smearing, grabbing, and lateral/vertical footwork—i.e., drop-knees—as skillfully demonstrated by Anak Verhoeven on Rainshadow (5.14d) at Malham Cove, England. Read our full review here.
Buy Ondra Comp for $229 on lasportivausa.com
Skwama
The classic, single-hook-and-loop-closure slipper the Skwama bridges the gap between La Sportiva’s intermediate offerings and its highest-end shoes, with a milder downturn and broader fit (one of La Sportiva’s widest) ideal for longer-term wear and wider/higher-volume feet. Consider them a semi-stiff sport-climbing jack-of-all-trades. They’re tailormade for somewhere like the Red River Gorge, Kentucky, where you need smearing for slabs, jamming for cracks, precision edging for vertical lines like Zen… (5.12d), a bomber heel, a pointy toe for pockets and “innie” jibs like the iron-rock nipples nested inside the sandstone pockets, and grabbing for 45-plus-degree grottoes like the Madness Cave. The Skwamas also come in a vegan version with microfiber—versus leather—uppers. Read our review of the Skwama Vegan here.
Buy Skwama Vegan (men’s) for $239 on lasportivausa.com
Buy Skwama Vegan (women’s) for $239 on lasportivausa.com
Buy Skwama (men’s) for $239 on lasportivausa.com
Buy Skwama (women’s) for $239 on lasportivausa.com
Solution
It’s crazy to think that the Solutions came out back in 2007, but these complex, multi-paneled, multi-layered shoes were futuristic then, as now. Solutions do everything extremely well, from overhanging bouldering to thin cracks to sport, and are prized for their hyper-precision on granite and limestone jibs. They’ve been used on everything from nauseatingly thin, vertical 5.15 Ondra tech, to über-steep, bouldery routes like Stefano Ghisoli’s Arco, Italy, testpiece Excalibur (5.15c), to Jakob Schubert’s repeat of the varied V17 endurance problem Alphane in Switzerland. The bulbous, rubber-coated 3D heel locks in on technical hooks but has a specific feel that takes some getting used to. Solutions are stiff, long-in-the-toe, pointy shoes, so if they don’t fit you well, try the slightly wider-footbed Solution Comp, a softer shoe that excels on overhanging terrain.
Buy Solution (men’s) for $219 on lasportivausa.com
Buy Solution (women’s) for $219 on lasportivausa.com
Buy Solution Comp (men’s) for $219 on lasportivausa.com
Buy Solution Comp (women’s) for $219 on lasportivausa.com
Tarantulace
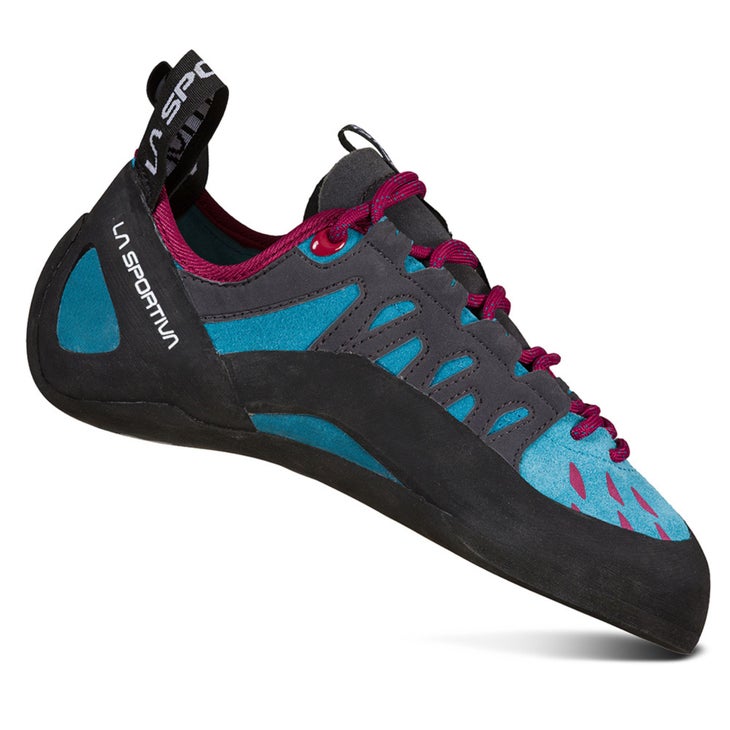
With a price point of only $99, the Tarantulace is both one of La Sportiva’s most affordable and one of its comfiest shoes. This unlined lace-up has a flat last, beefy 5mm FriXion RS sole, and supportive 1.8mm-thick LaspoFlex midsole perfect for newer climbers wanting an edging boost, or for more experienced climbers looking for longer-term wear, as with moderate multi-pitch climbs, autobelay sessions, crag laps, etc. If dealing with the laces during on-off feels cumbersome, there is also the double-hook-and-loop-closure version, the Tarantula. Neither of the Tarantula shoes are hyper-precise, capping their upper range at around 5.12, but their comfort and neutral last will see you comfortably up through the grades.
Buy Tarantulace (women’s) for $99 on lasportivausa.com
Buy Tarantulace (men’s) for $99 on lasportivausa.com
TC Pro
Perhaps the most niche, but one of the most powerful, shoes ever made is the TC Pro, designed by Tommy Caldwell for the endless cracks and insanely thin edging and crystal-standing of El Capitan granite. This semi-hightop is now in its second iteration, with some feedback also from Alex Honnold, who wore them on his mind-boggling ropeless ascent of Free Rider (VI 5.13a) in 2017. The TC Pros are stiff, precise, and supportive, with a chiseled, protruding toebox; they barely flex and offer minimal feedback—inspect your footholds visually. The shoes are engineered for comfort and support on long, technical traddy pitches, the new, flatter, more streamlined toe slots into thin cracks better than ever, and foam padding along the heel cuff and lacing/tongue zone offers ankle protection for wide cracks. If the TC Pro feels too stiff, check out the slightly softer Katana Lace (men’s and women’s versions), another thin-edging machine. Read our full review here.
Buy TC Pro for $239 on lasportivausa.com
The post Psyched on La Sportiva? These Are the 6 Rock Shoes We Recommend. appeared first on Climbing.
]]>
From Colorado to the Czech Republic, here are the climbing areas across the globe with the most sandbagged grades and, in some cases, R-rated vibes.
The post The World’s 13 Most-Sandbagged Climbing Areas, Ranked appeared first on Climbing.
]]>As long as there’s been climbing, there’s been sandbagging. No, we don’t literally hit one another over the head with bags of sand to then rob each other like bandits. But we climbers do delight in giving routes implausibly stiff ratings or downplaying their seriousness. Sandbagging may result from an area being “old school,” with many routes graded when 5.9 or 5.10 topped the scale. Or it may simply be because the first ascensionist wanted to see their enemies fail.
Whatever the reason, knowing that a certain area is sandbagged ahead of time can help you prepare. You might choose routes below your limit, set out with a bigger rack, or bring some extra crashpads for a safer landing zone. Some might choose to avoid these areas altogether. And for the sandbagged sport climbing areas below, you won’t want to forget your stick clip. For the traveling rock climber, here are the 13 most-sandbagged areas around the world, ranked from least to most “hard for the grade.” We’ve also included the type of climbing predominant in each area, plus a wild card entry at the end of the list.
13. Eldorado Canyon, Colorado (trad)
Eldorado near Boulder is a storied traditional area, with many routes first freed or established back when 5.10 was the top end of the grading spectrum—thus its slew of stiff 5.9+ routes (e.g., the slimy, sure-feels-like-5.10 dihedral of The Green Spur). Extra spice comes in the form of long runouts, slick sandstone, manky pins, thin pro, weird moves on diagonalling holds, and horizontal bands of shattered purple choss criss-crossing the walls.
12. Céüse, France (sport)
Céüse may arguably offer the world’s best sport climbing, but it’s also unforgiving. The hike is a steep hour uphill, the upper half of the butte is treeless and sunbaked, and weather moves in quickly. (In 2022, a 23-year-old woman was struck unconscious by lightning while sitting below the route Bibendum.) What’s more, the routes don’t have “holiday grades”—in fact, they’re quite stiff—and the climbing is engagé: The spaced-out bolts usually, and cruelly, arrive right after the thin-pocket cruxes.
11. Dolomites, Italy (trad)
After Colorado climber Chris Weidner put down the classic West Face of Cima Grande—a V+ (5.7/5.8) established in 1913—he said it felt more like mid-5.10. From the ground, the crux Dulfer Corner looked so intimidating to Weidner and his climbing partner that both were certain they were below the wrong route. Many factors are at play in Dolomites’ sandbagging, notably the area’s venerable history, the pumpy, overhanging rock, the museum-relic fixed pitons, the fast-moving weather, and the friable limestone. In fact, the rock is so ill-reputed that when Alex Huber free-soloed the 500-meter Hasse-Brandler Direttissima (5.12a) on Cima Grande in 2002, he wore a helmet.
10. The Needles, South Dakota (trad/sport)
The fact that the Needles favors a ground-up ethic with bolting at stances or hanging on hooks comes through loud and clear in the climbing. Epitomizing this style: the 5.10 and 5.11 R/X climbs on the slender spires of the Ten Pins, and the thin, sporty face of Vertigo (5.11+ PG-13) in the Outlets. But the grades here are also feisty, exacerbated by the fact that the myriad quartz, feldspar, mica, and other crystals studding the granite are prone to snapping. This is quite alarming when you’re runout 20 leg-quaking feet. (Note: The Needles in California are also sandbagged, but at least the stone is perfect and there’s better protection—usually.)
9. Yosemite National Park, California (trad, bouldering, sport, multipitch, big walls)
It feels odd to list the area—along with Tahquitz/Suicide—where the Yosemite Decimal System was literally created as “sandbagged.” But most would agree that the Valley is stiff, perhaps because so many benchmarks are found here, from early 5.10s like the offwidth Ahab, to relatively newer-school testpieces like Beth Rodden’s 5.14c crack Meltdown. The splitters stretch forever, and the slabs come glacier-polished and runout. Moreover, an unwritten bouldering code meant that, for years, no FA could be harder than V12—a spell only recently broken with FAs like Carlo Traversi’s V16 The Dark Side.
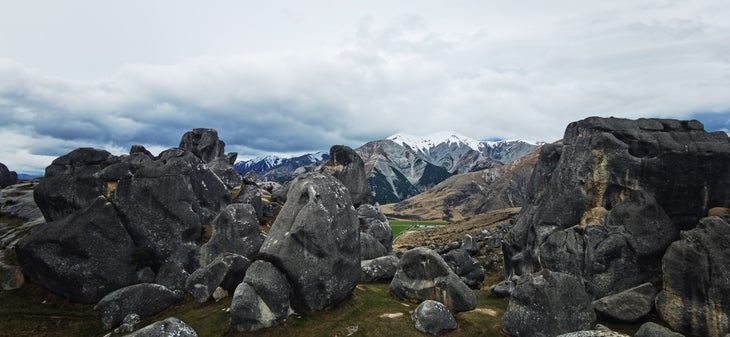
8. Castle Hill/Flock Hill, New Zealand (bouldering)
The wind- and water-weathered limestone blocks on New Zealand’s South Island are an adventure-boulderer’s paradise, with a raw feel and limited documentation (try castelhillbasin.co.nz). For ages, the problems went ungraded. Now, even with V-grades, the ratings are stout. Quick-to-polish rock, spaced-out pockets, body-position-dependent sloping dishes, and dire, rounded-mantel topouts make the sandbagging even more dire.
7. Rifle Mountain Park, Colorado (sport)
Notoriously, Rifle has river-polished limestone glossed by three decades of traffic (“Grab the white spots; step on the black spots”). This is the land of unrelenting steeps and blocky, roofy, hard-to-read rock with few downpulling holds. But Rifle also succumbs to trickery, especially kneebars and kneescums—beta the locals will “crag-splain” from the road. According to these suspect locals, that impossible-feeling 5.12b is actually just a casual stroll, with 14 secret no-hands rests you somehow missed on your first go.
6. Shawagunks, New York (trad)
Climbers have been putting up routes in the ‘Gunks for a looong time, since the 1930s/1940s, starting with the climbing icons Fritz Weissner and Hans Kraus picking the plums, like High Exposure. The Gunks’ near-century of history has thus led to grade compression and especially heinous “plus” grades (5.8+, 5.9+, 5.10+). And it’s heckin’ pumpy, even on the moderates. The gently overhanging to massively roofy quartzite’s horizontal bedding forces you to hang off your arms to pro up the horizontal cracks.
5. Horse Pens 40, Alabama (bouldering)
HP 40 is known both for its slopers and stout ratings, epitomized by the slope-rassle Bumboy (V3). Also beware stiff problems like the aesthetic Skywalker (V8) and the high, committing arête of Mortal Kombat (V4). Michael Rosato, a onetime local who made the brilliant HP 40 homage EGODEATH, says the sandbagging is threefold in origin:
- The grooved, weathered sandstone dictates precise, hyper-positional movement.
- Inspired by the Fontainebleau ethic, Adam Henry, a driving force behind HP 40 purportedly only suggested a grade for his first ascents once he and/or other fellow early developers had repeated the climbs numerous times to optimize the beta.
- The ratings heavily factor in elusive “optimal conditions” in the warm, rainy South.
And there you have it.
4. Joshua Tree National Park, California (sport, trad, and bouldering)
At least J-Tree’s sandbagging is equal opportunity. The sport routes are stout (half the crimps fell off Desert Shield, originally given 5.13a, yet one guidebook still called it “5.12d”). The trad climbing is stressful, committing, and baggy (see the holdless, RP-protected stemming on the 5.11b Coarse and Buggy). And the bouldering will crush your soul (try the tips-eating patina crimps on the “V5” JBMFP, or the slappy crimps/seams of the John Bachar “V7” Pumping Monzonite).
3. Rochers de Freyr, Belgium (sport)
This diverse and storied limestone crag—its first documented FA was in 1930—with 700-plus routes on the River Meuse is Belgium’s crown jewel. It’s also the early proving grounds for the country’s superstars like Nico Favresse and Séan Villanueva-O’Driscoll. But Freyr is also well known for runouts, mirror-slick moderates, cryptic beta, and cranky grades. Famously, the “6c” (5.11b) Beau Gorges offered a bounty of a bottle of Champagne for anyone who could onsight—a prize not even Favresse was able to claim.
2. Index Town Walls, Washington (trad and sport)
The running joke about “Index 11b” holds more than a few grains of truth. Back in the 1980s, when 5.12 was still the upper end of the grading scale, the locals at this granite backwater were convinced they couldn’t climb that grade, leading to insane compression at 5.11. For the full Index “5.11” flavor, try the Lower Town Wall’s technical tips/pin-scar crack Iron Horse (5.11d, or 5.12c+ everywhere else on Earth). And find out why exactly this traditionally “gatekept” area has become more popular in recent years.

1. Elbsandstein in Dresden / Adršpach in the Czech Republic (trad/rings/jammed knots)
The strict ethics on these sandstone towers split by the international border of the Elbe River is legend:
- No nuts or cams (climbers use jammed knots and sling chockstones)
- No chalk or rosin
- The only sanctioned fixed pro is massive, half-inch-plus-diameter rings that must be drilled ground-up
The result: sweaty hands, terrifying runouts, and huge fall potential on sternly graded routes. If all that isn’t enough, you can also fill your days (and trousers) on the Czech side with tower jumping, linking spires with terrifying salti mortali.
*Runner Up: The MoonBoard
While a bit tongue-in-cheek, the MoonBoard is an “international venue” in the sense that these boards have existed worldwide since the mid-Aughties. Of the many versions of the board’s modern, light-up, app-interface hold sets, 2019 is considered the stoutest, followed by 2016, 2017, and 2024. On the MoonBoard, the ratings routinely feel two to four grades harder than commercial or outdoor boulders. The board’s creator, Ben Moon, actually calls the pre-app/-lights 2010 set the fiercest, with its 40 tendon-punishing School Room Originals. The tweaky yellow holds are so small, they’re barely substantial enough to serve as paperweights.
The post The World’s 13 Most-Sandbagged Climbing Areas, Ranked appeared first on Climbing.
]]>
Don't let you posse throw off the vibe
The post Large Group at the Crag? Don’t Ruin it for the Rest of Us appeared first on Climbing.
]]>Picture this: An open road through the mountains, taking the curves on a warm summer morning. Your open window lets in ponderosa-scented air as the cries of hawks and ravens carry over the breeze. Suddenly, a gang of Harley riders appears in the rearview mirror. Their glass-packed mufflers shatter the stillness. The motorcycles surround you like a river splitting around a boulder, forcing you to slow down, clench the wheel, and hold your lane till they’ve zoom by in their leather-clad dozens.
That’s precisely how I feel when a large, loud, un-self-aware group of climbers shows up at the crag or boulders—and now, even, the gym. Before you accuse me of being a get-off-my-lawn Boomer, let me make the point again in its most nuanced form: I’m not talking about encountering tons of people at a known popular crag like Smith Rock midday on a nice spring weekend. That’s like complaining about the Tokyo metro at rush hour. I’m talking about big posses that form through friend-group networking, social media, climbing clubs, or whatever, and arrive at a normally quiet crag or gym where people were already climbing.
I once encountered a big pack of climbers at Staunton State Park, Colorado. Even though my friend and I were the only other people in the Tan Corridor, they threw their packs right down on ours and started shout-bantering away while chomping apples in our faces. Then there were the climbers at Highlander Crag in Clear Creek Canyon, Colorado, who came up the hill in a pack train one morning. They threw their gear down on ours, before starting the two routes on either side of us. That day, it didn’t even matter that my buddy and I were the only other ones there and the crag has 31 other climbs. They were so loud, we were unable to exchange basic belay commands.
And the latest incident: A crew showed up at my local bouldering/boarding gym, The Campus, en masse and ignored the climbers already there. Backs turned to us, they grabbed random holds on the boards that were clearly in use, pulling on in street shoes as they shouted inanities across the gym (“Hey, Tony, how’s that crimper?”).
I realize that the sport has changed. It’s not just misanthropes, societal dropouts, and introverts anymore (I check all three boxes as a Gen X latchkey kid). And I understand that gyms and social media have shifted the conversation, as have the mores of the new generations. But I also think that self-awareness, common sense, and common courtesy make us all good stewards of the shared resource. If you don’t take the time to first read the room wherever you’re climbing, you run the risk of becoming the problem.
So, keep it in mind the next time you head out. Do you want to be a sports car passing that slower sedan up ahead on a mountain road quickly, quietly, and safely? Or would you rather be a loud Harley Hog, heedlessly disturbing everyone else’s day? Check yourself and your crew before you get to the crag—these places stay sacred as long as we treat them that way.
The post Large Group at the Crag? Don’t Ruin it for the Rest of Us appeared first on Climbing.
]]>
An op-ed from a climber aspiring to master the heel hook as he lose power with age
The post The Best Way to Heel Hook? Probably Not How You Currently Do It. appeared first on Climbing.
]]>When I was 18, I fell off gunning for the first bolt on Smith Rock’s Churning in the Wake (5.13a) on a hot October morning. My heel stayed hooked in a hueco and I fell onto my head, earning a concussion—and a lifelong aversion to hooking. However, as I’ve gotten older and needed better technique to compensate for lessening power, I’ve tried to become more of a hooking scientist.
I’ve also come to realize that most of us suck at heel hooking. We just plunk our heel on like a walrus flopping onto a ledge and carry on, hoping the heel sticks, exercising minimal intentionality. We might call this “old-school hooking” or “passive hooking.”
Back in the day, our slipshod approach to hooking was informed by both the newness of steep rock and our clunky shoes, which had slidey, insensitive heel cups and, with tension rands still rudimentary, little dialogue between the front and back of the shoe.
Case in point: Masters of Stone (1991), wherein the late Dan Osman climbs Slayer (5.14) at Cave Rock, Nevada, wearing the original Boreal Ace. Narrates Osman, “You’ve got to keep the opposition going … To keep the flow going in these moves, you’ve got to be constantly looking for these toe hooks, heel hooks, backsteps. Body English is extremely vital.” But then, from 16:30-16:50, he slaps his heel on blindly and just keeps climbing. This is not a knock on Osman, who was a superb climber; it’s just an observation of how incipient the technique was back then.
Contrast this with Benn Wheeler, whom Josh Horsley of The Testpiece Podcast has called a master of hooking, with off-the-charts ankle mobility, climbing the Rocky Mountain National Park problem The Phoenix (V14). From 5:40 to 6:40 in this video, Wheeler sends the compression arête, relying on multiple left heel hooks. He’s precise and intentional and dynamic, looking at his heel, placing it just so on tiny crystals, rotating over and around it, and squeezing hard with his leg muscles to create opposition. His heel becomes another hand—or a tail.
We might call this “new-school hooking” or “active hooking”—and it’s what we should all be doing. Our rock shoes and the collective knowledge have gotten so good; there’s no excuse for lazy hooking.
So next time you place a hook, study it, refine it, and activate it. Find the exact dimple or crystal where your heel locks in, and then play with the optimum angle of articulation in your ankle based on that hold and its position relative to your body—wiggle your foot around; flex your toes toward you or point them away. Once the heel is situated, fire up your leg muscles from your calf to your quadriceps to your hamstring to create opposition, and then drag your heel back toward you.
Now you’re heel hooking; now you’re on fire!
The post The Best Way to Heel Hook? Probably Not How You Currently Do It. appeared first on Climbing.
]]>
The makers of the "Narwhal" claim it can be used to reduce sweat and increase friction. Matt Samet puts that to the test.
The post Does This Weird Hand-Cooling Device Actually Make You Climb Harder? appeared first on Climbing.
]]>One hot summer day in the early 1990s, my friend John and I watched, dumbfounded, as a pro climber misted himself off with a spray bottle at the Hell Cave in American Fork Canyon, Utah.
“What a loser,” I said, sotto voce. “As if that’s going to make a lick of difference.”
The pro climber explained to his subman, now enlisted to mist off his exposed back, that the water brought his core temperature down, in turn cooling off his fingers and toes so he could send harder. “Ooh, my core’s on fire—mist me off, bro!” John and I snickered from behind the trees like the snarky little creeps that we were.
Who is this guy who cares so damn much about climbing? I wondered. But then also: I wonder if it works.
Hot climbing, of course, is a misery: your hands sweat, nuking friction; sweat pours into your eyes, obscuring the holds; your shoe rubber feels squishier than a grilled-cheese sandwich on a hot dashboard; you get dehydrated, crampy, and grumpy; and there’s even a risk of heat-related illness like heat exhaustion or heat stroke, though we climbers generally do a good job of avoiding the scorching sun.
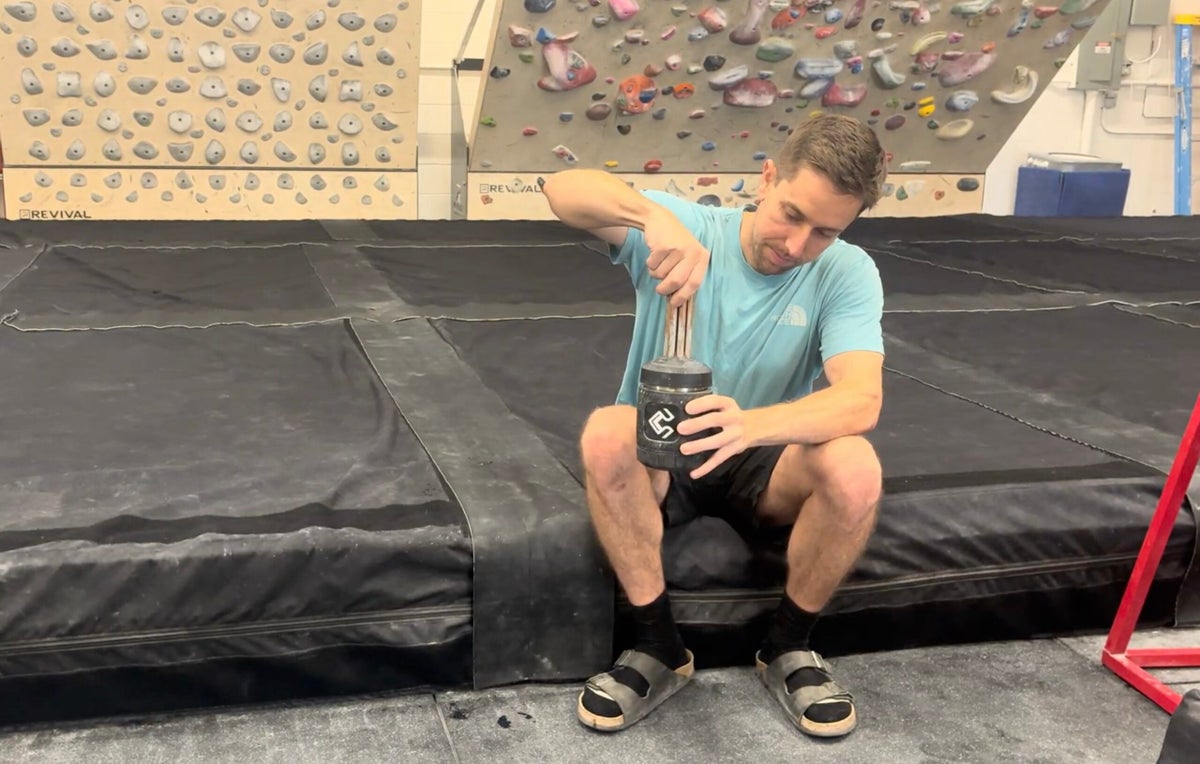
Which is to say, why not try to cool yourself off when the “sendex”—heat + humidity—is high, be it with fans, spray bottles, cold packs, dry ice in the chalkbag (yes, people do this!), or the clever, little gizmos called Narwhals you may have seen in bouldering videos or at your local gym?
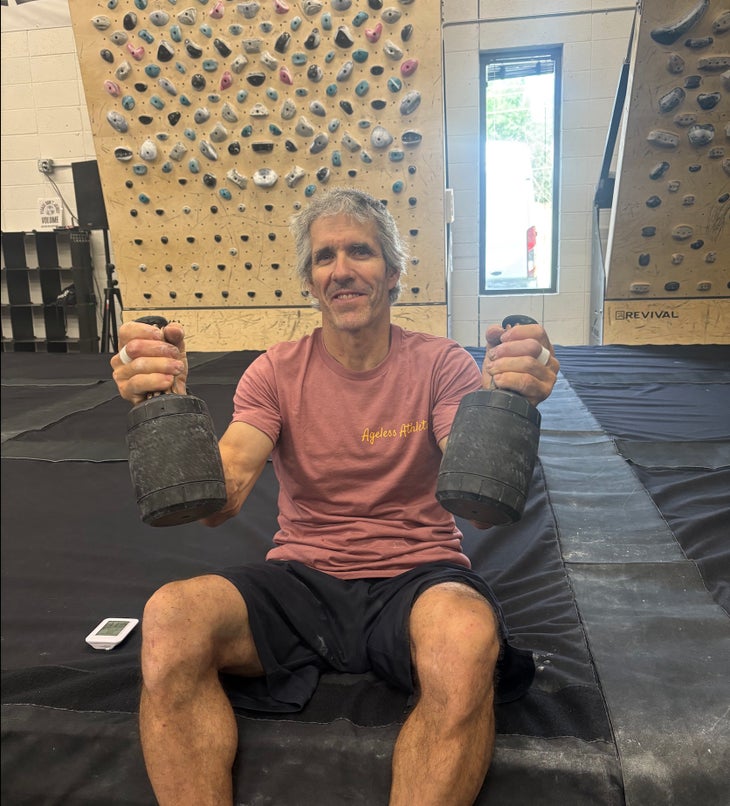
Made by the small company Apex Cool Labs in Boulder, Colorado, Narwhals showed up at my local training and boarding gym, The Campus, a month or so ago, but it was spring then so I paid them little heed. However, even climbing gyms have varying conditions, so I was happy to give the Narwhals a spin on a handful of hot, muggy late-June days (70-degree air temperature, 63-71 percent humidity), the kind where sweat flows the moment you do more than three moves in a row and your dermis flays off like onion skin.
The Narwhals are easy to use—you simply unscrew the lid, add water, grab the “Cool-Not-Cold” packs out of the freezer, drop them into the water, screw the lid shut, and let the Narwhals sit 10 minutes so the copper coils can chill. Then you hold the coils as you rest—perfect for between routes or board rips, and also a good way to prevent idle hands from doomscrolling.
Per Apex Cool Labs’ site, there is some science behind palm cooling. Our palms and soles contain glabrous (smooth) skin with arterio-venous anastomoses (AVAs): the prodigious blood flow in these “direct connections between small arteries and small veins” means that you get a 10X cooling effect over other skin regions, claims the website. So, if you’re overheating, one of the quickest ways to cool off is via your palms or feet.
Watch Matt Samet test the Narwhal:
The Narwhals were developed for endurance athletes (cycling, running, etc.) who routinely experience high body temperatures but also people who work in jobs with exposure to prolonged heat (firefighters, etc.). So it just happens to work to us climbers’ advantage—despite the fact that ours isn’t really an endurance sport—that you also grasp the Narwhals using our main point of contact with the rock. In other words, we get the double benefit of cooling our bodies and our palmar skin.
So, did the Narwhals work, or was it mumbo-jumbo? As I said, these were far-from-prime days when I used them, providing ideal conditions for testing. I began by holding them between burns on my warmup and mid-session climbs, doing one problem a minute in the V4-V7 range for 10 minutes on the Tension Board 2, with my heart rate up, breathing accelerated, and sweat lightly flowing. The Narwhals are deliberately cool—not cold—so you can clasp them for minutes on end without frozen skin: these aren’t painful cold packs. The cooling effect was subtle and pleasant, and I did notice feeling overall less hot and sweaty, which in turn made me less frantic on the board.
But best of all, with my chronically slick, hard, dry skin, the coils’ near imperceptible moisture made my palms and fingers “sticky,” and I was able to, with a chalk base on, often go straight to TB2 after holding them, skipping my usual ritual of spraying my hands with a spray bottle (yes, I know…), lightly drying them, and then chalking.
The real test would be sloper problems, where cool hands are king. First, I selected the TB2 Classic The Silver Mountain (V9 at 35°), which has a stab off a micro-crimp nugget to a full-hand sloper which must be controlled, bumped off to a soap-bar slimper, and then recycled for the finishing lunge. The Silver Mountain had eluded me, so I gave it a whirl despite the 70 percent humidity.
Lo and behold, I sent The Silver Mountain on my third go after nearly doing it the first two, when I came up a centimeter short on the last move. After I grasped the Narwhals for a few minutes before each burn, my skin felt pliant, gummy, cool, and grippy, and the sloper felt like a jug, whereas before I’d often dry-fire. Maybe I was just having a good day. Or maybe it was placebo—a few of us boarding joked that the real magic was the mere act of doing something between burns; I could just as easily have come down and hugged a teddy bear. Regardless, I saw positive results, and, as this first session wore on, the cooling action had a welcome painkilling and skin-preserving effect, letting me climb a good four hours, versus my usual two or three.
On another, even worse day on which I was a sweaty mess—having just come back from cragging in the Flatirons—I used the Narwhals to good effect again on my warmups and then pulled up another unvanquished baddie from my project list, Spinnin, a V9 at 40°. This problem starts on tiny crimps and underclings, but then revolves around deep locks to rounded slopers on its upper half, including the final match—another sloper test requiring cool, sticky skin. Moves that had eluded me went quickly, and I wrapped up the problem in a handful of tries. Late in the session, tired but curious to test more, I pulled up the classic V10 (@45°) Might of Manon—more sloper wrestling, with a powerful crux lunge. I gave it my best effort to date, nearly sending, and look forward to coming back with fresh skin, after cooling my scene off with the Narwhals.
So would I recommend the Narwhals for climbers? Yes, absolutely—they work. They are expensive at $399 a pair (though they seem basically indestructible, so will last you a lifetime), and if you were taking them to the boulders or the crag, they weigh three pounds, which is not nothing. But if you are serious about your skin, training, and results—gym and rock—you have no reason not to try. They felt perfect for limit bouldering, and would likewise be ideal for sweaty work like 4x4s, lead doubles, and so on, great for bringing your body temperature down during those welcome five-minute rests between sets.
Plus, sitting there holding Narwhals looks way less dorky than having your subman mist you off—and likely works a hell of a lot better, too.
Pros
- Successfully keep the hands and body cooler while training on hot, muggy days
- Copper coils feel soothing on the skin, reducing skin pain during long sessions
- For dry skin, coils impart palpable humidity, making palms and fingers “stickier”
Cons
- Pricey, but hopefully your local gym or an obsessive-boulderer friend has them
- Would be heavy to transport to the rock, with a filled weight of 3 pounds
The post Does This Weird Hand-Cooling Device Actually Make You Climb Harder? appeared first on Climbing.
]]>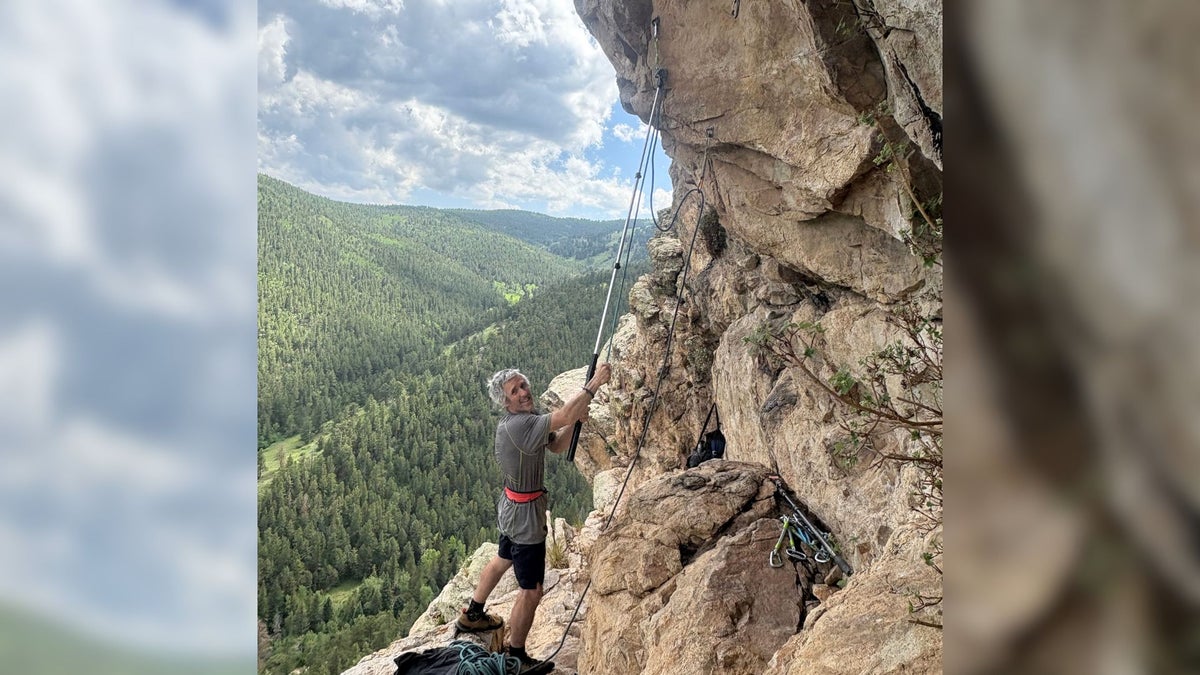
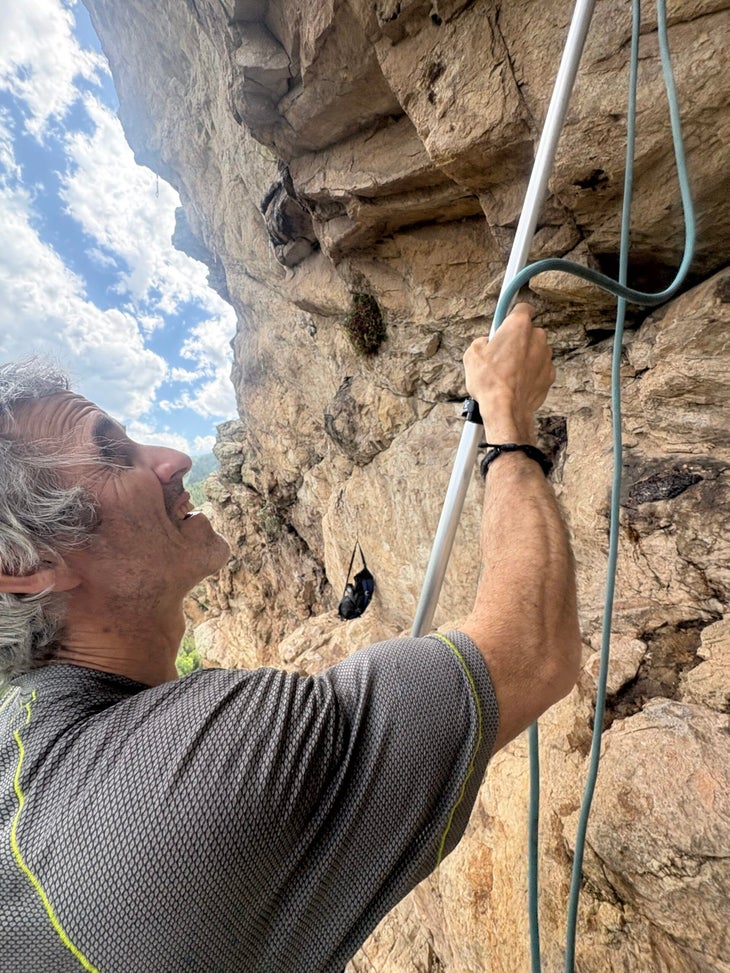
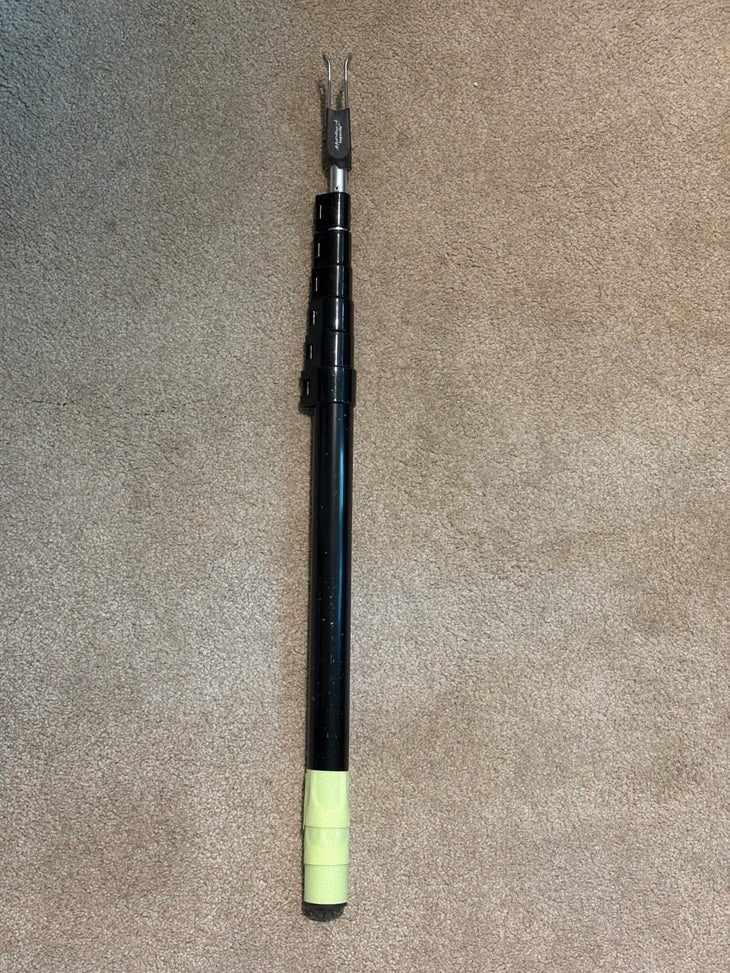
"I’ve used just about every commercial stick clip and, in the end, they all tend to succumb to the same Big Three issues—except for this one."
The post Most Stick Clips Have Fatal Flaws. This One Doesn’t. appeared first on Climbing.
]]>The 1984 film Repo Man is a cult classic for many reasons, among them its clever use of generic, anticapitalist packaging for grocery items, with some cans labelled, simply, “FOOD” or “DRINK.” So I thought of Repo Man when I received the Basic Stick Clip in the mail: the name feels almost deliberately threadbare, belying just what a great stick clip this is—perhaps the best on the market.
I’ve owned or used just about every commercial stick clip and, in the end, they all tend to succumb to the same Big Three failure/fatigue/wear/usage issues: 1) At full extension, the stick is wobbly and the thinner, final segments may even snap if using the stick to help pull the rope down, 2) The telescoping mechanism/s wear out, get sticky, or decouple, as the pole segments get wonky or the cam locks or cinching collars lose efficacy, and 3) The clipping head only works—or works best—with certain carabiners.
These are all minor nuisances, sure, and some fussiness with and wear-and-tear on climbing gear are to be expected. But with many clips costing upwards of $100, it would be nice if they stayed in good working condition for more than a season or two, so you don’t become that partner who’s nursed along the same battered stick clip for five years but won’t let your friends use it because it’s one wrongly applied vector away from catastrophic failure.
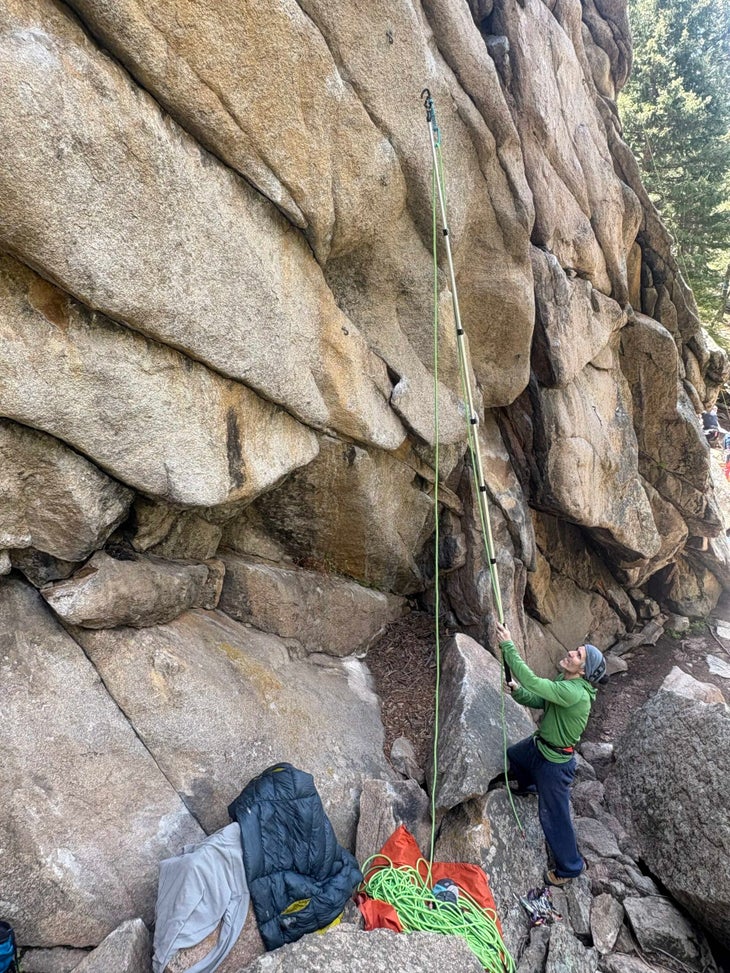
Based on my testing, the Basic Stick Clip, despite its Repo Man name, is a well-balanced, near-perfectly crafted clipper that solves the Big Three issues, and then some. It’s beefy—the bottom of the six telescoping segments is 1.35” in diameter, tapering down to the topmost at 0.7”, all made of burly metal stock that hasn’t been prone to dinging or deforming. The telescoping poles slide smoothly, with thick, snappy, bomber plastic cam locks to hold them in place at whatever length. And the Superclip is, as ever, an ingenious little head that accepts all carabiners (wire gate and solid gate alike) and is also easy to use for tagging the rope in and removing draws.
All this and the Basic Stick Clip extends to a big 12’, meaning you can clip those high Red River Gorge first bolts, or what we in Colorado like to call “bolt three.” And it collapses down to a manageable 32”, which strapped easily along the side of my Mystery Ranch Tower 47 crag pack.
I tested in various venues, from Staunton State Park, Colorado, to a few other high-country granite crags along the Front Range, all with the region’s typical bouldery, undercut, mandatory-pre-clip starts. I also handed the stick to my partners—some stick-clip ninjas, some stick-clip neophytes—without any preamble, to get their unbiased feedback.
On functionality, it was unanimous: the Basic Stick Clip is user-friendly, reliable, and intuitive for both quickdraw and rope placement. Of particular note was its rigidity, even at full extension, with near-zero wobble when stretching for high clips—again, thanks to the burly telescoping segments. In fact, the Basic Stick Clip was so strong when extended that I felt comfortable pulling down a semi-tensioned rope, something I’m hesitant to do with most other sticks, especially those with plastic poles.
The flip side is, predictably, weight—the Basic Stick Clip weighs 2 pounds, compared, say, to the Standard Trango Beta Stick Evo, which is 1.35 pounds at the same, 12’ length. But really, is one extra pound going to kill you on the approach or while clipping? (If so, up the squats and shoulder presses!) Plus, most of the weight felt concentrated in the base black pole, meaning it was easy enough to tilt the stick up and out for distant clips. To note is that one friend, Dean, said he’d like that pole to have a rubber or similar grip—the black coating is slick—but I solved this by adding grip tape, and I imagine duct or adhesive tape would work as well.
The Basic Stick Clip is a workhorse, with mad functionality and hardwearing components. While it’s not air travel friendly, it’s perfect for road trips and local cragging, a throwback to the robust painter’s poles of yore but with all the modern convenience and flair of the Superclip head.
Pros
- Superclip head is highly intuitive for draw/rope installation and removal
- Telescoping poles are heavy-duty, beefy, and reliable
- Cam locks are quick, snappy, and bomber
Cons
- At two pounds, stick is heavy-ish to carry
- Base pole can feel slick in hand, an issue you can solve with grip or duct tape
The post Most Stick Clips Have Fatal Flaws. This One Doesn’t. appeared first on Climbing.
]]>
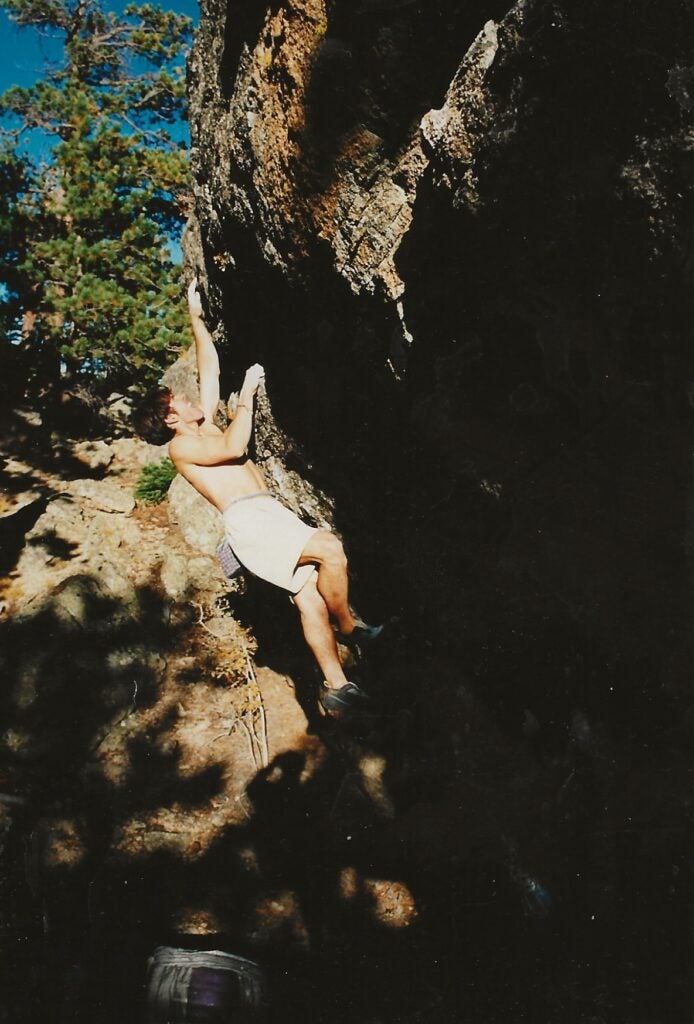
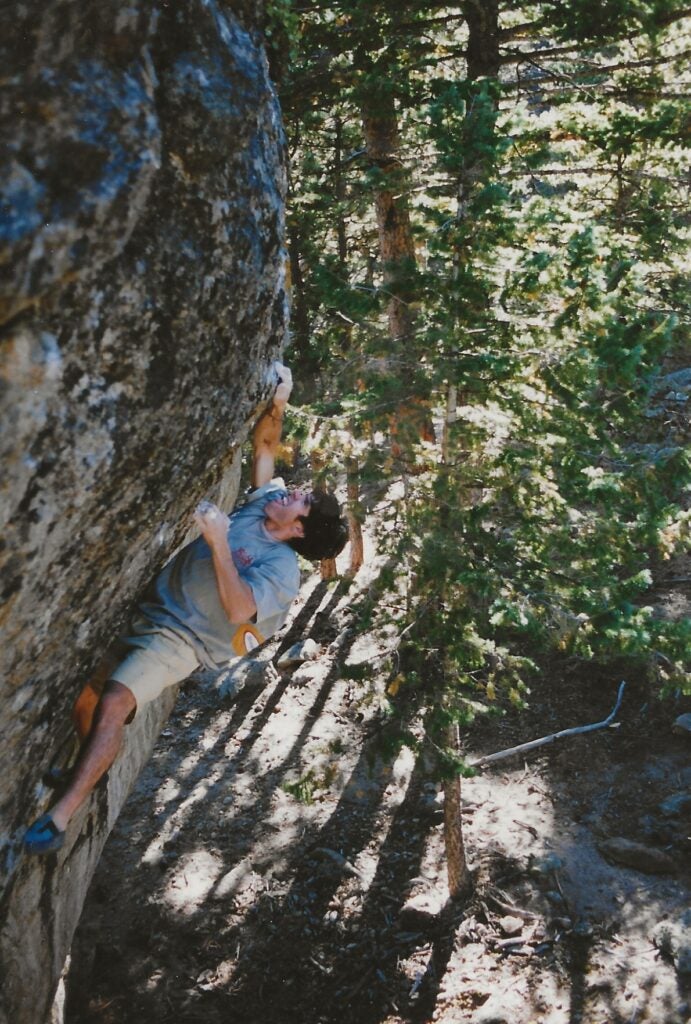
An analysis of a possibly historic problem leads to an exploration of the nebulous world of bouldering in the `90s.
The post I Climbed America’s First V11 (Except Maybe I Didn’t) appeared first on Climbing.
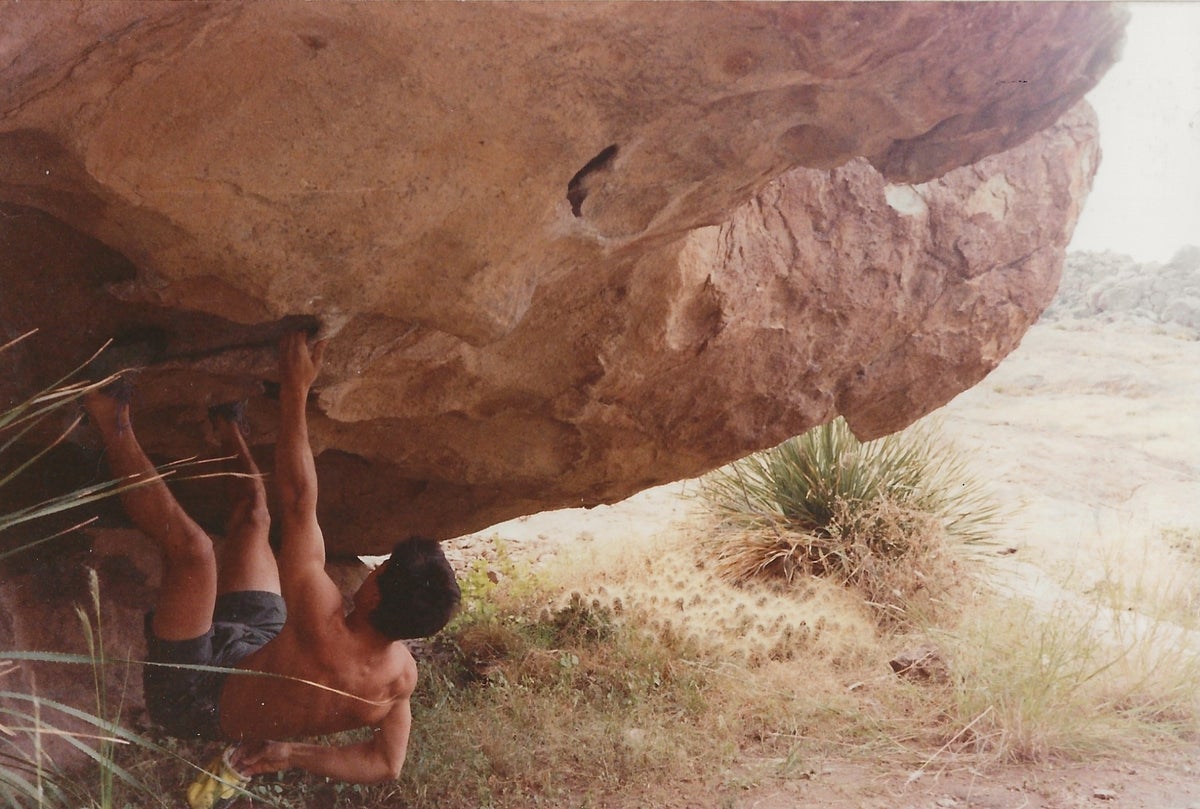
]]>Over three decades ago, I established the first V11 in the United States. I think. Maybe. Well, probably not….
I named the problem Gnar-Gnar. It added a sit start to a previously unnamed line on the Africa Boulder, on the Lower Mound of the granite, semi-urban—think spray paint and broken glass—U Mound Boulders above Albuquerque, New Mexico. Today, the problem appears as the Samet Problem (V8/9) on Mountain Project, but it was not originally described with the start I did, which traversed in from a juggy crack out right. ( I likely also did the more direct sit described on the Proj; IDK—it was 34 years ago.)
The traverse beta took time to unlock. It was the first time I ever used a reverse heel-toe hook, for example. But the redpoint crux came higher, popping out of a sloping dish to a sharp, brittle gaston.

The stand start was—on the B-Scale we used at the time (more on that later)—given B1+ and was rumored to be a first ascent by the late, great John Duran (or, at least, he was the first person I saw do it), a preternaturally gifted climber who routinely floated his way up U-Mound’s gerbil-tooth crystals and xenoliths. When I spied the low traverse, I figured I might as well try it, since no one else had bothered.
I completed the problem in spring 1991, on a gap year between graduating from Albuquerque’s Highland High and starting college at the University of Colorado Boulder. I was living at my father and stepmother’s home, moving furniture to make money. Sweating under the unsparing New Mexico sun, I’d lug couches and boxes of books up apartment stairs with a rotating cast of feckless fellow ABQ kids. We also worked alongside various hard-luck cases, including an old-timer who was perennially coughing up a lung—yet still chain-smoking—and a pathologically horny Harley biker who had fallen out of a tree drunk, and had the limp and steel plates in his leg to prove it.
Moving heavy things makes you hungry, but I tried to stay lean for Gnar-Gnar by asking the boss to order me lunchtime pizza “without the cheese.” As I nibbled on what was basically bread with tomato sauce while drinking Diet Coke, my coworkers guzzled Mountain Dew and scarfed pepperoni pizza, chewing like lions and staring at me like I was insane.
But my sacrifices paid off: I got Gnar-Gnar done after some days of effort, graded the low start B2 since it was harder than the B1+ stand, and didn’t think much of it. I viewed the problem as just some lowball training diversion at the local boulders.
In the mid-1990s, my friend Timy Fairfield told me that Eric Scully, a top young climber visiting from Arizona, had repeated or tried to repeat Gnar-Gnar and was calling it V11. This didn’t really make sense to me because there was no way I—far from the strongest climber—could ever climb that hard. Back then, V11 was (and for many, still is) considered a very difficult grade. V11 represented the realm of legends like Fred Nicole, Klem Loskot, and Chris Sharma, not a podunk kid from Albuquerque, New Mexico.
A Short History of Some V-Scale Firsts
According to Planet Mountain, the first V11 (8A) boulder problem in the world was C’était Demain, established by the French bouldering legend Jacky Godoffe in 1984 at Fontainebleau. This seems to be a universally agreed-upon fact.
It’s also agreed upon that the world’s—and by default, America’s—first V12 was A.H.R. (Another Holloway Route) aka Trice. Jim Holloway put up this semi-eliminate on a bulge at Cloudshadow Wall on Flagstaff Mountain in Boulder in 1975. According to John Sherman’s book on bouldering Stone Crusade, Holloway said he didn’t rate his problems; at most, he might assess them as easy, medium, or hard. A.H.R. remained unrepeated—and unrated—until Carlo Traversi ticked the second ascent in 2007, calling it V12.
As for America’s first V11, that is much harder to track down. According to Google’s AI, which in its current iteration seems about as truthful as my three-year-old when asked how many cookies she’s already eaten even as she comes up hand outstretched for another, “The first boulder problem in America to be graded V11 was ‘The Groove,’ which was first climbed by John Gill in 1978 in Pueblo, Colorado. It’s also worth noting that Gill also famously climbed the first V10, a problem also named ‘The Groove.’”
So, per AI, Gill—the godfather of American bouldering, so called because he singlemindedly pursued a subdiscipline that was considered mere training for real climbing when he was active in the 1950s through 1980s—somehow put up The Groove twice. And it’s both V10 and V11, which, I suppose, makes as much sense as the world’s first V12 going in before the world’s first V11, or asking for another cookie when you just scarfed down six and already have a tummy ache.
But I’m being facetious: According to Pat Ament’s excellent biography of Gill, Master of Rock, The Groove is in fact a real problem on the Dakota sandstone boulder of the Fatted Calf west of Pueblo, Colorado. The problem involves pulling on in a double gaston and launching to the boulder’s lip, using the standard, dynamic, V10 method; or endeavoring to do the sequence static at V11, perhaps explaining the problem’s weird double grade. So while The Groove could be said to be V11 if consciously choosing the harder variant, this would leave Gnar-Gnar as the country’s first standalone V11—on record anyway.
Watch the author send another V11: Army of Darkness in Lyons, CO
V Confusing
When Gill and Holloway did their seminal first ascents, the V-Scale had yet to be invented. That didn’t come along until 1991, with John Sherman et al.’s Hueco Tanks guidebook. So the problems’ V-Grades were applied retroactively, as happened with Gnar-Gnar. Gill created the B-Scale back in 1958, motivated in part by Yvon Chouinard, who bouldered with Gill in the Tetons. Seeing Gill send sequences up to modern-day V9, Chouinard suggested he create a separate grading system for bouldering, since Gill had clearly surpassed the Yosemite Decimal System’s high end of 5.9 at the time.
So Gill proposed a closed, three-tiered, somewhat esoteric scale. As he wrote on his website, “B1 would denote the highest level of difficulty in traditional roped-climbing, B2 would be a broad category of more difficult or ‘bouldering level’ problems, and B3 would be an objective category signifying climbs that were unrepeated, though attempted.” The grading system was also dynamic, evolving as problems saw repeats and as roped climbing pushed into more difficult grades.
To Gill, B3, as he told me in an interview, retained “an almost ethereal nature, a concept rather than a grade. A sort of holy grail one never quite reached, but was always out there to tantalize the spirits.” It was also a grade that Gill, ever humble, never applied to any of his own problems—while Holloway was himself notoriously grade averse. Thus neither climber would have graded America’s first V10 and V12 at B3.
Neither would I have given Gnar-Gnar, or any FA I’ve done, B3 because I’m just not that strong of a boulderer—anything I can climb, someone else can climb faster and better. Thus I was surprised to hear that a butt-dragger traverse into an unfriendly crystal problem I’d put up in 1991 and graded the vague B2 had been bestowed with the lofty grade of V11. But I’m still not entirely certain that Gnar Gnar does clock in at V11—though if the easier sit start described on Mountain Project is V8/9, then adding my more challenging sit traverse could in theory tack on a grade or two.
In light of all that complicated context, this would, in some dumb way, maybe make Gnar-Gnar America’s first V11 on record, if you discounted Gill choosing to static The Groove at V11. But I’m certain that other Americans before me had also probably already climbed what today would be V11 anyway. There were probably other Gnar-Gnars out there, other B2s at other obscure local areas like U-Mound, with dumb names like Harry’s Eliminate or Psycho Lunge or One-Armed Pinkytip Mantel.
What My Possibly Historic V11 Means to Me
It’s entertaining to consider that maybe Gnar-Gnar was America’s first standalone V11, or one of them, but it would be hubristic to insist. I was just some backwater kid on a backwater boulder—it wasn’t that important of an ascent, then or now. Plus it seems weird to call a problem the first V-something, when the V-Scale didn’t exist at the bloc’s inception anyway.
Moreover, I’m sure my “proud V11” likely wasn’t even the first V11 in New Mexico, let alone the United States. Around that time, the Southwest bouldering master Bob Murray was living in Albuquerque. A silent, reclusive type, lanky Murray would head out on his own, find some crimpy, hideous thing, and send it with zero fanfare or documentation. The many “Murray Problems” only came to light years later, when they were rediscovered by climbers on the hunt for new blocks. (Murray was also a driving force at Hueco Tanks. He put up the famous El Murray problems on the north face of the Mushroom Boulder.) I remember seeing him a few times at the overhanging Wash bouldering wall in Socorro, shirtless, wearing gray sweatpants and coke-bottle glasses. He would find the smallest pockets on the volcanic stone and deadpoint impossibly far to some tweaker, trying the move over and over until he got it, then moving on to the next eliminate. I have no idea how hard these problems were, but I’m sure at least V10.
This was just what bouldering was like back then, before V-Grades and pins and YouTube videos and huge nests of crashpads. In fact, we had no crashpads, which is about as shitty as it sounds. At U Mound and other areas in the Sandia foothills, the absence of crashpads led to many back-slapper falls onto the gravelly hardpan, and sometimes even into prickly-pear and cholla cactus.
Upon all this overanalysis, maybe it’s most accurate to say I put up one of U-Mound’s first B2s—but again, I’d have hesitated then, and even now, to give it B3. I’m no John Gill, nor will I ever be. I can’t do one-armed front levers or lock off six-millimeter crimps in hiking boots. I’m just the guy who put up Gnar-Gnar back when he was a clueless, pimply-faced 19-year-old kid with big dreams of someday climbing hard.
The post I Climbed America’s First V11 (Except Maybe I Didn’t) appeared first on Climbing.
]]>
We tied into 17 climbing ropes to find the best of the best. After lots of use and abuse on rock, ice, and at the gym, these came out on top.
The post The 6 Best Climbing Ropes of 2025 appeared first on Climbing.
]]>Climbing ropes are a tough category of gear to review because, these days, almost all are well made and perform great right out of the package. It’s only after hard wear—climbing pitch after pitch in rain, snow, and ice, coiling and uncoiling on dirt and sand, and taking some big whippers—that a rope reveals its true colors.
To test climbing ropes properly, you need to abuse them to see what they’re made of, which is precisely what we did over months of testing. This year’s crop of top-performing dynamic lead ropes spans genres—our picks include everything from a short gym rope, to a reliable workhorse, to light-and-skinny redpointers, to a safety-first cord, to an innovative, cut-resistant alpine beast.
Updated April 2025: After months of testing, we added six new climbing ropes to this list, including the Fixe Oliana 9.2—our new favorite all-rounder. We’ve also updated pricing and info on the ropes that we previously included and still highly recommend.
At a Glance
- Best Lightweight All-Rounder: Fixe Oliana 9.2 ($245)
- Best High-End Redpointer: Black Diamond 9.4 Dry Climbing Rope ($330)
- Most Durable: Mammut Alpine Core Protect ($218)
- Best Gym Rope: Metolius Monster Gym Rope ($102)
- Best Workhorse: Singing Rock Hero 9.6 ($200-240)
- Best Safety Feature: Trango Red Flag Agility 9.5 ($28o)
- Climbing Ropes 101
- Rope Specs
- Rope Care
- How We Test
- Meet Our Lead Testers
Don’t miss: The 12 Best Climbing Shoes of 2025
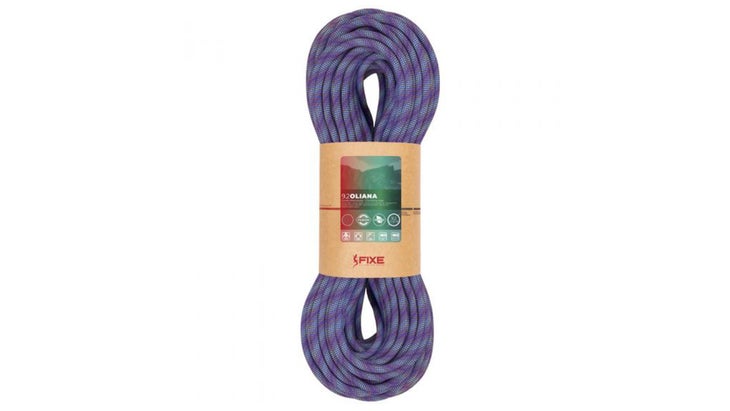
(Photo: Courtesy Fixe Hardware)
Best Lightweight All-rounder
Fixe Oliana 9.2
Impact force: 7.2 kN
Weight: 58 g/m
Sheath percentage: 40%
Dynamic elongation: 34%
Available lengths: 50, 60, 70, 80, 100 m
Dry Treatment: No
Pros and Cons
⊕ Light, fast-clipping feel in hand
⊕ Low initial kinking
⊕ Minimal rope drag
⊗ Fuzzed out fairly quickly in impact zones
⊗ One end had to be cut
Much can be said for having a “quiver of one” rope—a lightweight redpointer that can also cross over into heavier-duty usage like hangdogging and complex, wandering pitches. The Oliana 9.2 nails that niche: at 56 grams per meter (the lightest ratio in the test), the 70-meter version we tested weighed only 3.9 kilograms, but the sheath’s 1×1 braiding and reassuring fusion technology (in which a chemical component creates a firm union of the sheath and the core) held up to repeated use, including short, snappy whippers on the sandstone sport climbs of Jackson Falls, Illinois.
Iowa-based tester Mary Andino noted minimal kinking out of the package—she ran the rope through the first draw on a route once, and that was that. “We climbed on vert, overhang, and slab, and the Oliana never really got kinky, even on climbs with weirdly placed or spaced bolts or lots of drag,” she said. Andino loved how light in hand and agile the Oliana was. The crux of her current project involves clipping off “absolute trash credit-card crimps” in a strenuous, ticking-time-bomb position, and the rope’s nimbleness made it easy to tag the carabiner quickly. She also appreciated how the Oliana’s low profile and smooth sheath minimized drag, as on the arête climb Cheerio Bowl, where bolts switch sides of the edge.
Her biggest criticism was the appearance of scrapes along the sheath after a few trips to the compact sandstone of Jackson Falls (though she still felt the rope was reliable and fed well). And after taking the rope to the Red River Gorge and doing another 13 or so pitches—so 40 total pitches—Andino had to cut four feet off one end, as the Oliana had fuzzed out.
“I think it was getting rubbed against the arête on Cheerio Bowl at Jackson Falls, followed by some whips,” she said. “Nothing super extreme—the scraping on sandstone plus a handful of whips added up pretty fast.”
That said, the rest of the rope was fine, and she would absolutely recommend it for someone looking for a high-end, lightweight redpoint cord.
Best High-End Redpointer
Black Diamond 9.4 Dry Climbing Rope – Honnold Edition
$330 at REI $330 at Black Diamond
Impact force: 7.9 kN
Weight: 58 g/m
Sheath percentage: 36%
Dynamic elongation: 37%
Available lengths: 70 m
Dry Treatment: Yes
Pros and Cons
⊕ Resists kinks
⊕ Fast, easy clipping
⊕ Tight and light for the diameter
⊕ Dry treated
⊗ Grippy sheath made for slower lowering
⊗ Pricey
This rope’s balance of durability, sleekness, and light weight made it our go-to for projects in Boulder’s Flatirons, where we did our best to dish out the abuse. We took big whippers, found ourselves hangdogging on steel permadraws, didn’t obsess over the dirt that got into our rope, and ran the 9.4 Honnold Edition over grainy sandstone lips. After months of testing, the rope barely showed any wear, which is notable for a 9.4 that feels skinny in hand and climbs as smooth and airy as an ultra-light.
Boulder-based tester Brandon Fields has typically avoided Black Diamond cords, finding them to be overly bulky, stiff, and prone to wear. But after using this rope, he’s become a convert. He appreciated the Honnold Edition’s kink-free feeding and silky 1×1-weave sheathe—where each strand tightly interweaves with the next in a single-stand-over-single-strand pattern.
Even after all of our testing shenanigans, the sheath has held up very well and kept its slickness. I belayed primarily with a Petzl Neox, and was able to whip slack through at lightning speed. And on an especially heinous undercling clip on my 5.14 Flatirons project—one I’ve been leveling up my biceps curls for—I slapped this grippy rope in easily every time, enjoying the semi-stretchy catch that ensued when I (inevitably) fell a few moves higher.
Fields used the 9.4 Honnold Edition on his project on the same wall—a bouldery, traversing 5.13+ with a few fussy clips. “For high-end redpointing and projecting, this may very well be one of the smoothest ropes I’ve used,” he noted, while also calling out the rope’s hardiness. “Considering the extensive projecting abuse, the sheath remains in impeccable condition. There are a few dings and a small amount of fuzziness, but this is a small price to pay for the repeated grinding—no soft spots or areas of real concern.”
Of note: This is a fairly stiff rope, which led to a few short, sharp catches when we fell near a bolt. While its dynamic elongation (37%) is in line with similar ropes, belayers with a lighter climber would do well to jump up in a fall.
Most Durable Rope
Mammut 9.5 Alpine Core Protect
Impact force: 8.9 kN
Weight: 59 g/m
Sheath percentage: 36%
Dynamic elongation: 31%
Available lengths: 40, 50, 60, 70 m
Dry Treatment: Yes
Pros and Cons
⊕ Aramid sheath provides extra cut resistance
⊕ Highly hydrophobic
⊕ Long-lasting
⊗ Supple for an alpine rope
⊗ 9.5 may be too much diameter for light-and-fast alpinists
The alpine—where your rope is running over sharp edges, around gendarmes, and subject to rockfall, melting ice, and gravelly sand—is hard on ropes, and it’s here where the consequences of rope failure are nearly always fatal. For this reason, an alpine rope can never be too bomber, an idea Mammut took to heart with their Alpine Core Protect, which adds a second “internal” sheath of aramid (the generic name for Kevlar) between the outer polyamide sheath and the core. It was a safety feature and longevity-enhancer our alpine tester, Anthony Walsh, appreciated big-time in the Bugaboos and at Rogers Pass, both deep in British Columbia’s rugged Purcell Range.
“After several thousand feet of alpine rock, this rope is holding up admirably well,” he said. “I can’t emphasize enough how rough I’ve been on this rope.” This included climbing on rambly, gendarme-littered ridges—with the cord weaving around countless sharp edges, sometimes as a ‘terrain belay’; and climbing 2,000 feet using the ‘fix and follow’ method, in which the follower on a multi-pitch toprope-solos a pitch and where they, falling or working beta, may put repeated wear on the same spot.
And yet, Walsh noted no significant abrasion, even after punishing climbs like the steep, 900-meter, 5.8 quartzite of the Northwest Ridge of Mount MacDonald. On the descent, the rope’s dry treatment was also highly effective at keeping out water from isothermic snow, and the Alpine Core Protect “hardly took on weight at all.”
Some in the fast-and-light crowd may wish that this cord also came in a single-rope diameter skinnier than 9.5 millimeters. (It is, however, available as an 8.0 millimeter half rope, which Walsh loved for the WI5 Buddha Nature last autumn.) Walsh also noted that, while the Alpine Core Protect stretches just fine in a fall (the stiff aramid sheath does elongate tubelike), it was more supple than your standard alpine rope. It still clipped quickly to desperate RP placements and out-of-reach bolts on the techy 5.11+ Minotaur Direct in the Bugaboos, and never got tangled at stances or while belaying.
Really, Walsh had far more praise than criticism for this rope, and felt that its added peace of mind more than justified the extra weight and cost.
Read our longterm review here, after Walsh took the rope up Torre Egger, in Patagonia.
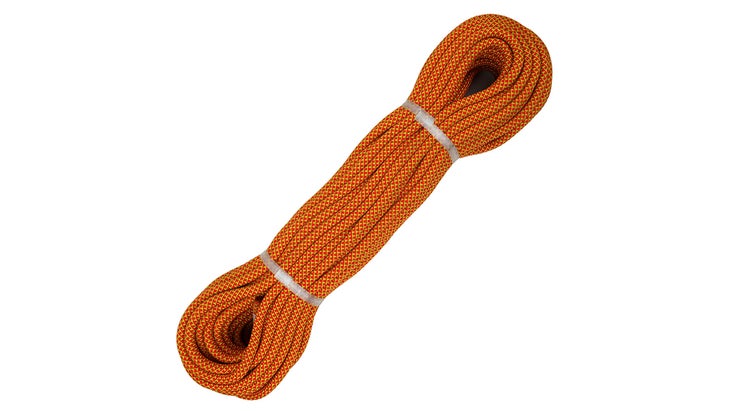
Best Gym Rope
Metolius Monster Gym Rope
Impact force: 7.8 kN
Weight: 68 g/m
Sheath percentage: 35.8%
Dynamic elongation: 36%
Available lengths: 35, 200m
Dry Treatment: No
Pros and Cons
⊕ Affordable and hard-wearing
⊕ Supple handling and soft catches
⊕ Sheath is the right amount of slick
⊗ 10.2 mm diameter felt sluggish in the Petzl Neox
⊗ 35m option is short
There’s a lot to be said for having your own gym rope, especially in an era when one major gym chain has asinine rules about not taking practice falls on their ropes. Plus, most battered gym ropes tend to be thick and fuzzy (and there’s no way of knowing whose mouth they’ve been in!), and, on busy days, you have to put your name on a waitlist to get a cord.
I’ve long loved Metolius’ Czech-made Monster ropes—they last forever, and yield the perfect blend of slick and supple. This 35-meter gym rope is no different, and partners and I noted chill handling and a noticeable lack of kinking from day one.
I tested the Monster Gym rope both in the gym and at a short Colorado granite crag called Gretel’s Rock, including on an overhanging 5.14 project with a key, tough clip; the cord felt reassuringly hefty in hand for fast clipping, whippers were cushy, and my belayer was easily able to feed slack using a Grigi. The thick-feeling 10.2 millimeter cord didn’t feed quite as seamlessly through a Petzl Neox, though that device is listed as compatible with ropes from 8.5 to 11 millimeters.
The Monster Gym Rope comes in a 35-meter length and 200-meter spools for industrial gym use. As I noticed with some of the slightly longer pitches at Gretel’s, a 40m would have been nice—though 35 meters was plenty long for every gym I visited on Colorado’s Front Range, including the ones that have outlawed practice whippers.

Best Workhorse
Singing Rock Hero 9.6
Impact force: 7.9 kN
Weight: 59 g/m
Sheath percentage: 40.9%
Dynamic elongation: 35%
Available lengths: 60, 70 m
Dry Treatment: No
Pros and Cons
⊕ Affordable introductory cragging rope
⊕ Semi-firm build made for smooth, easy clips
⊕ 9.6mm diameter is good for abrasion resistance
⊗ Initially very kinky
⊗ Fuzzed out a little near the ends
Singing Rock’s affordable Hero 9.6 is a blessed throwback to the 1980s, when sturdy, high-endurance 10-millimeter-plus workhorses were the standard—and you rarely had to worry about replacing your rope with too much frequency. Like those ropes, the fatter (by modern standards) Hero 9.6 offers solid, reliability utility—and not too many bells and whistles.
Testers liked using this 60-meter rope with its middle mark and ultrasonic rope ends (in which the sheath and core in the final 15 millimeters form a single unit to prevent separation/fraying) on the single-pitch sport climbs it’s intended for. Though tester Steve Potter had to flake the Hero 9.6 five times off the factory coil to get the kinks out, he reported that the semi-soft rope fed smoothly and reliably after that initial kinking on the sport climbs of Diablo Canyon, New Mexico.
As testing wore on, Potter and his fellow tester, Scottie Alexander, both noted some minor fraying near the ends and a little squishiness where you hangdog, but felt the Hero 9.6 was still in fine form and praised its abrasion resistance on the sharp basalt.
One one route, Potter kick-ran across the wall to a chain draw on an adjacent route to check out the crux. “But in the process, I managed to inadvertently make it so that the rope, angling down from the anchors to the chain draw, ran over a rather sharp edge,” said Potter. “So I lowered, then inspected the rope, and I saw no major signs of wear.”
Both testers also noted minimal static elongation, which made the Hero 9.6 friendly for toprope- hangdogging without losing ground. Overall, the Hero 9.6 is a great pick for single-pitch sportos, especially newbies who need a “quiver of one” for dogging, sends, and toproping.
Best Safety Feature
Trango Red Flag Agility 9.5
$280 at Backcountry $280 at Trango
Impact force: 8.5 kN
Weight: 61.5 g/m
Sheath percentage: 37%
Dynamic elongation: 32%
Available lengths: 60, 70, 80m
Dry Treatment: optional
Pros and Cons
⊕ Smooth feeding/clipping
⊕ Stiff feel good for stretchy clips and stick-clipping
⊕ Final 5 m of rope is colored red for safe lowering
⊗ Felt thick for a 9.5 mm
⊗ Rope felt heavy
Pure durability isn’t the only way a rope can make you safer; the smooth-feeding Red Flag Agility 9.5 incorporates Trango’s unique red-dyed banding system to alert climbers when they’ve reached the end of their rope. This color coding at the final 5 meters of the rope could potentially be a life saver, and I’m not sure why every rope doesn’t use this design.
Fellow tester Steve Potter agrees: “Ever since I rapped off the end of my rope a few years back, I’ve been fearful of the ends of my rope, so I really like the red ends.” By calling out those incoming ends in big red lights, you mitigate lowering and rapping accidents. Plus, having a contrasting rope-end color makes it much easier to find the ends in a rope bag.
I previously tested the skinner Agility 9.1 and noted that the red dye began to wear off after extensive use; this hasn’t been an issue with the thicker Agility 9.5. After dozens of pitches on rough, angular gneiss, the dye is still going strong, with only a few dings and muting of the initial texture change you could feel as the rope fed through the belay device.
At a thick-feeling 9.5 millimeters, this Agility is an all-arounder that promises increased longevity and durability for hangdogging. The downside to the thicker diameter is weight—at 61.5 grams per meter (the 70 m rope weighs 9.5 pounds), the Agility 9.5 starts to feel heavy and draggy near the end of a long pitch.
I noticed that weight on the zigzaggy 35-meter Deadwood route—at a secret crag off Colorado’s Peak to Peak Highway—with its pumpy 5.11+ climbing up high. But on the crux opening boulder problem lower on this same route, I loved the stiff hand, which made tagging the key, stretchy third clip a breeze. (It’s easier to extend up to a high clip with a cable!) And the sheath, with a tight 1×1 weave and notably slippery nylon, fed reliably through all devices used, though Potter noted some initial and ongoing mild kinking.
Frequently Asked Questions
What length climbing rope should I get?
From the late 1800s to the early 1900s, standard rope lengths were a mere 18 to 36 meters. Today’s ropes are most often sold in 60-, 70-, 80, or even 100-meter lengths, with some shorter options available, too (35 to 50 meters). Buyers should consider the crags they most often visit to determine the most suitable length, keeping in mind that as the rope wears, you will need to cut off abraded ends.
What’s the difference between a thin and a thick climbing rope?
Generally speaking, thicker ropes (above 9.4mm) will last longer than skinny ones (9.4mm on down). However, technological improvements such as sheath weave and rope treatment have certainly helped in fortifying skinny ropes, rendering them stronger and longer lasting. Since they’re lighter, skinny ropes are also ideal for optimizing redpoint goes or minimizing drag on complex, wandering pitches—like you find with multipitch and trad climbing.
Thicker ropes are still the preferred workhorses, as they can withstand more falls and more encounters with sharp rock. Generally speaking, 9.4 to 10.2 millimeters is considered the sweet spot for these; however, there are certainly good options below and above that range, depending on usage and need.
Single vs. half vs. twin climbing ropes
Ropes are available in single, half, and twin sizes. This review solely focuses on dynamic single ropes, which are used for single and multipitch climbing, where the risk of rope damage from sharp rock is minimal. Climbers opting to get on arêtes or trad climbs where protection may be placed to the either side of the climber might opt for half ropes (generally in the 7- to 9 mm range), each of which is strong enough to catch a fall by itself but light enough to use in conjunction with another rope. Twin ropes are typically 7 to 8 mm and are rated to be—and must be—used together. They are best suited for alpine and ice routes with rappel descents.
Do I need a rope with dry treatment?
Climbers looking to get out in wet or icy conditions should strongly consider splurging for a dry-treated rope. The uptick in price is occasionally significant, depending on the brand, but the upfront cost is worth it when you consider that ropes lose up to 30 percent of their energy-absorbing capabilities when wet.
It’s worth noting that the International Climbing and Mountaineering Federation (UIAA) has a standardized testing procedure for dry-treated ropes. In order to be UIAA Water Repellent Certified, a dry-treated rope must have absorbed less than 5 percent of its weight in water following a 15-minute test. Non-treated ropes will, on the other hand, absorb up to 50 percent of their weight in water.
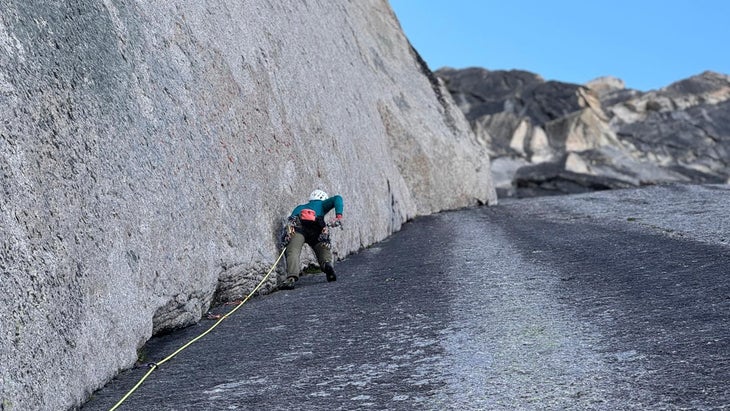
Climbing Rope Specs
Ropes come with a slew of technical specs. Here are the basics buyers should know.
Impact Force
This refers to the force your body feels upon impact in a fall, and is related to the rope’s elasticity and consequently its ability to absorb energy. A high impact force is particularly of concern for trad, ice, and alpine climbers, as it means more force will be relayed through the belay system and protection. Topropers, on the other hand, may want to be wary of ropes with low impact forces, as that is a good indication that the rope will stretch more, which can make toproping “sportier.” To meet UIAA standards, a single rope must have an impact force of less than 12kN.
Dynamic Elongation
This is closely related to impact force. A high dynamic elongation indicates more stretch in a fall, which translates to a softer catch—but also a longer whip. A higher dynamic elongation may be less desirable for heavier climbers or those cragging in areas with large ledges. According to UIAA standards, a single rope should have a dynamic elongation percentage that is less than 40 percent of the rope’s length during the first UIAA fall.
Sheath Percentage
Sheath percentage is the ratio of core to sheath, and is a good indicator of durability. A rope with a thicker sheath will likely last longer; however, other factors such as number of threads, weave type, and treatment will make sheath percentage a less reliable indicator. Also, a thicker sheath will make a rope feel stiffer in hand.
Rope Care
- Avoid stepping on your rope—this works dirt into the fibers.
- Avoid dirt, period; a 2010 study by the International Technical Rescue Symposium demonstrated that a rope can lose 20 percent of its strength after just one soiling, and 40 percent after eight soilings.
- Avoid storing your rope where it will be exposed to high heat or UV radiation, such as in the trunk or backseat of your car.
- Avoid storing your rope coiled—instead, keep it stacked in a neat pile, ideally within a rope bag, which also helps with steps 1 through 3.
- Regularly inspect your rope for signs of wear, and cut damaged ends off as needed.
- As you cut down your rope, it gets shorter! Always tie a stopper knot at the end of your rope.
Read Our Complete Rope Care Guide
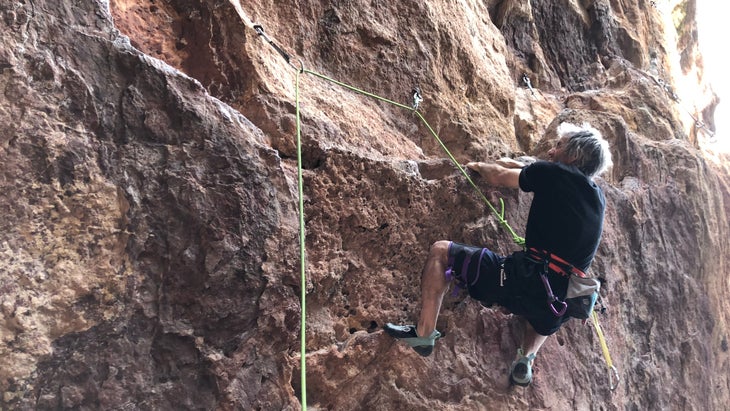
How We Test
- Number of testers: 6
- Number of products tested: 17
- Total number of vertical feet: 26,400
- Total number of years climbing: 103
- Least punishing testing venue: Boulder Rock Club, Boulder, Colorado
- Most punishing testing venue: Rogers Pass, British Columbia
- Worst weather: Ironically, a warm day in the high country—on an alpine descent, one cord needed to withstand the water from abundant snowmelt
- Scariest whipper: Steve Potter, jumping off the top slab of a 5.12d at the Solar Cave in Diablo Canyon, New Mexico, with the last clipped bolt a good six feet below him (and below the cave’s lip), at night, lit only by bouldering lights and a headlamp
Testers were asked to evaluate ropes using a few key criteria: how easily each rope flaked off the factory coil or whether kinking became an ongoing issue; how it fed through a device; how it held up to abrasion and other wear-and-tear; how softly or stiffly it caught falls; how it felt while climbing (Was it easy and speedy to clip? Was there rope drag or did the cord feel heavy on long pitches?); how often it needed to be cut (if at all); and, if it was dry treated, how well it held up against moisture.
Meet Our Lead Testers
Matt Samet
Matt Samet, a freelance writer and editor, has been an avid rock climber since the mid-1980s, an era when climbers still sometimes used goldline rope and no cords were longer than 50 meters. He lives in Boulder, Colorado, where he primarily sport climbs, boulders, and trains in the gym and on his garage wall. He has been testing climbing gear for the past 20-plus years.
Brandon Fields
Also contributing whippers and feedback to this review was Brandon Fields, a reformed gym boulderer and World of Warcraft superfan who is now a diehard sport climber. Fields also lives in Boulder, where he makes his living as a jewelry maker for Chrysalsim, an Etsy shop run by him and his wife.
Anthony Walsh
Anthony Walsh is a senior editor at Climbing and the magazine’s resident alpinist. Based in the Canadian Rockies, he is an occasional sport climber and an obsessive Type II advocate, where he obliterates an average of two ropes a year.
The post The 6 Best Climbing Ropes of 2025 appeared first on Climbing.
]]>
We tested 23 pairs on boulder problems, sport climbs, and trad routes. These were the top performers.
The post The 11 Best Climbing Shoes of 2025 appeared first on Climbing.
]]>There are now so many different lines of climbing shoes, it’s hard to believe that back in the day there were only a handful of options. But the sport has evolved massively since the crack-and-slab epoch, and we now need shoes for a wide range of specific applications: everything from garage spray walls and steep sport routes to multipitch climbing.
These days, brands are designing shoes and evolving tech for these and more specialized niches. This year’s crop of top performers has an emphasis on performance sport and bouldering, both indoors and out. We also focus on all-rounders for climbers who don’t want to stock a full quiver of shoes in their gear closet, as well as more beginner-friendly and intermediate-oriented shoes.
Related: A Beginner’s Guide to Climbing Shoes
This is a particularly exciting and creative year for shoes, with new offerings from the two big Italian shoemakers. La Sportiva and Scarpa have added more precise, semi-stiff shoes to each company’s softest lineup: the No Edge and Drago families, respectively.
We tested these new shoes and perennial favorites alike to find the top-performers of the bunch.
Updated April 2025: We added seven new shoes to this guide, including the Scrapa Arpia V, our favorite all-rounder for outdoors. We’ve also updated pricing as well as shoe specs and info throughout.
Best Climbing Shoes at a Glance
- Best Outdoor All-Rounder: Scarpa Arpia V ($169)
- Best Sport/Mixed Shoe: Unparallel Qubit ($186)
- Best Bouldering Shoe: Scarpa Drago XT ($229)
- Best for Beginners: Butora Rubicon ($150)
- Best Shoe for Steep Routes: La Sportiva Mandala ($209)
- Best Training Shoe: Scarpa Veloce L ($175)
- Best Pure Slipper: La Sportiva Mantra ($169)
- Best Long-Session Shoe: Ocun Diamond S ($135)
- Best Edging Shoe: Tenaya Iati ($205)
- Best Crack Shoe: Scarpa Generator Mid ($225)
- Best Tech Shoe: La Sportiva Miura VS ($199)
- How to Choose Climbing Shoes
- How We Test
- Meet Our Lead Testers
| Shoes | Price | Pros | Cons |
| Scarpa Arpia V | $169 | Precise edging; comfy | Rounded toe compromises precision |
| Unparallel Qubit | $186 | Stable edging; flexible toebox fit | Cumbersome on/off |
| Scarpa Drago XT ($229) | $229 | Very precise; insane torque | Baggy heel; almost too stiff |
| Butora Rubicon ($150) | $150 | Good intermediate shoe | Minor pinching |
| La Sportiva Mandala | $209 | Precise fit; plenty stiff | Baggy heel; not the most durable |
| Scarpa Veloce L | $175 | Extremely light; comfortable | Thin sole; rubber is fast-wearing |
| La Sportiva Mantra ($169) | $169 | Very light; stretchy fit | Tough to stand on edges and jibs |
| Ocun Diamond S | $135 | Powerful toe; comfy | Squishy edging on vert |
| Tenaya Iati | $205 | Big toe bite; breathable uppers | Pinchy fit |
| Scarpa Generator Mid | $225 | Stiff; breathable; comfy | Bulky toe box |
| La Sportiva Miura VS | $199 | Stiff, pointy toe box | Toe patch is too small |
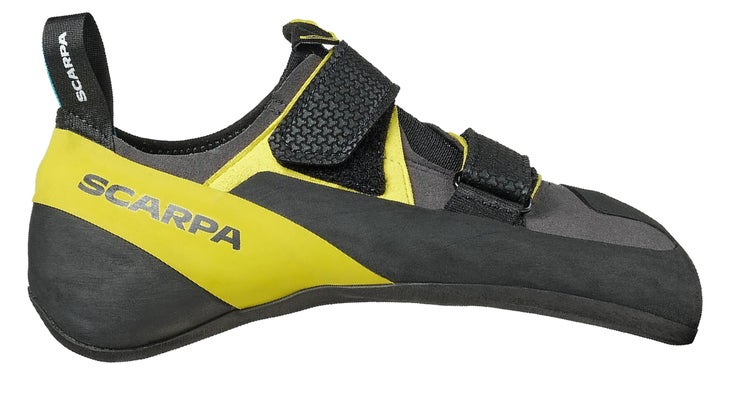
Best Outdoor All-Rounder
Scarpa Arpia V
$169 at REI $169 at Backcountry
Weight: 8.6 oz
Upper: Microsuede
Sole Rubber: 3.5 mm Vibram XS Grip 2
Pros and Cons
⊕ Precise edging
⊕ Comfier than similar all-rounders
⊕ Solid smearing and grabbing
⊗ Rounded toe compromises precision
⊗ Lower Velcro strap interferes with toe scumming
With a middling price point and a low-key build featuring subtle downturn and asymmetry, the Arpia V makes a great choice for intermediate and advanced climbers pushing the grades. It has a precise, pointy toe with a low profile that’s good for thin cracks, as well as a wide-foot-friendly last, a comfy footbed, and a low-key heel. This makes the Arpia V a versatile shoe—the cozy, microsuede-upper boot does its stated job just fine, but also, for an all-arounder, proved itself a surprising secret weapon on harder climbs.
To that point, tester Steve Potter used the Arpia V to send multiple 5.13s on limestone, granite, and basalt in New Mexico. For those sessions, Potter felt the shoe had the perfect mix of edging power, support, smearing capability, and grabbing agility. He reported that they worked just as well on gneiss on a stiff V10 with very small feet in Great Barrington, Massachusetts.
I would echo these sentiments. I used the Arpia V on climbs up to 5.13, with great results on all sorts of terrain: on a 30-degree-overhanging sandstone jug haul in Boulder’s Flatirons; on 35-meter, 20-degree-overhanging gneiss pitches with jamming, smearing, edging, and divot standing; and on volume-studded auto-belay routes at the Boulder Rock Club.
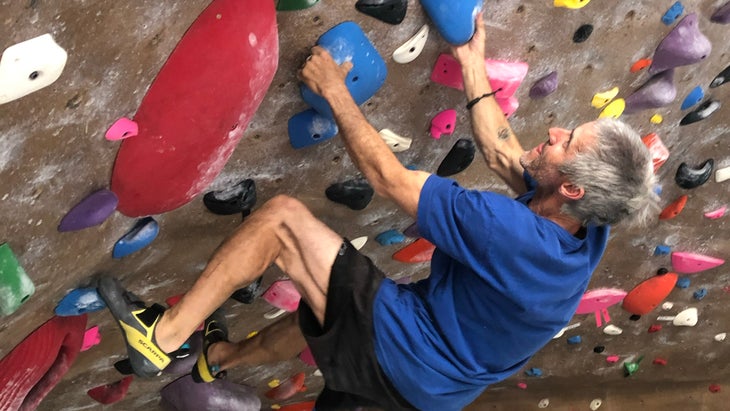
I did experience some initial skittering off smears during break-in, despite the soft XS Grip 2 outsole, but this was less of an issue once the shoes softened up with break-in. I’d compare the Arpia to La Sportiva’s pointier, more asymmetrical Miura VS, which has more big-toe power but less comfort; you can simply keep the Arpia V on longer, rendering it friendlier for long gym sessions and multipitch.
A note on durability: Potter reported that the midsole started to break down and the big-toe bite faded after about 20 sessions. However, he also noted that “for an intermediate climber demanding slightly less from their shoes, this might not be quite as big a problem.”
Plus, the softening edge isn’t without its silver lining: the shoes gain sensitivity and perform just fine on bigger footholds as they break in. Our take: the Arpia V would make an excellent shoe for mileage up to 5.13 in varied-angle and -terrain crags like the Red River Gorge, or for multipitch granite climbs with a mix of technical face and jamming, like in Yosemite.
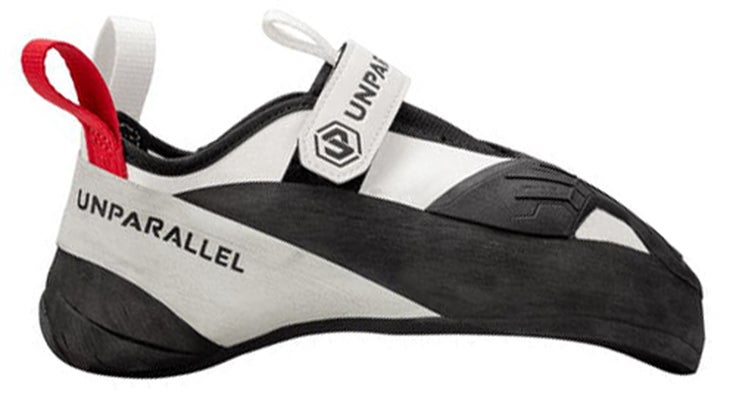
Best Sport/Mixed Shoe
Unparallel Qubit
$186 at Unparallel (High Volume) $186 at Unparallel (Low Volume)
Weight: 8.4 oz
Upper: Micro Synthetic
Sole Rubber: 4.2 mm RH rubber
Pros and Cons
⊕ Extremely stable edging and micro-edging
⊕ Top-notch toe scumming
⊕ Flexible toebox fit
⊕ RH rubber is grippy
⊕ Hard-wearing
⊗ 4.2 mm sole felt thick for smearing
⊗ On/off is onerous for bouldering
The Qubit may look like a bouldering shoe with its pared-down aesthetic and downturned, mildly asymmetrical last—and, yes, it does excel on techy, toe-focused boulders—but it also emerged as a sneaky, light-on-the-foot, top-notch all-arounder.
In the end, testers were pleasantly surprised to find that the Qubit shone most on technical sport. It was supportive and precise for long, facey pitches, but it also earned high marks for crack climbing, thanks to its toe- and side-rand coverage—we gave it an 8 out of 10 for jamming. With its massive, patterned, siped toe patch, it also earned a solid 10 out of 10 for toe scumming—better than any other shoe in the test.
With the Qubit’s unlined synthetic upper and stretchy elastic tongue, tester Anthony Walsh noted quick break-in, as the forefoot and upper spread out easily. “I loved that the toe patch’s siping let me aggressively size down and have curled toes, while providing those toe knuckles room to breathe,” he commented.
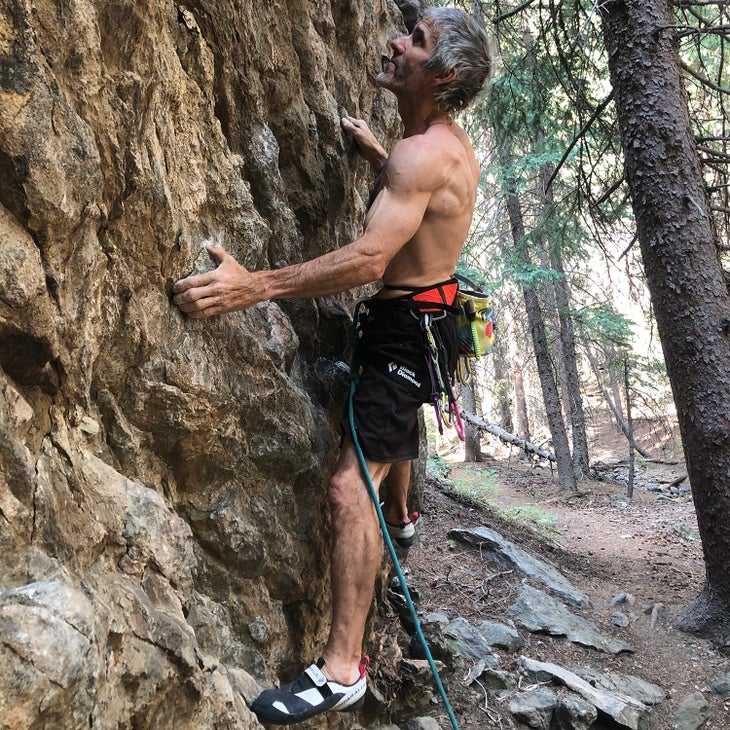
I wore my street-shoe size, 10, which felt perfect. This translated to comfortable wear on long pitches, like the undulating 35-meter gneiss routes in Colorado’s high country where I tested. It was on this vertical and just-past-vertical terrain where the Qubit, with its rigid midsole, excelled, withstanding massive foot pressure on edges, jibs, and micros, with minimal foot fatigue. And for Walsh, on vertical limestone at Nevada’s Mount Potosi, the sole also proved durable, even when standing tall on sharp micro divots.
The flip side of it being such a stiff, long-lasting shoe is that its thick sole mutes feedback. The other issue is break-in: the Qubit has held its shape so nicely that it’s still a struggle to get my heel in for the first pitch of each day.

Best Bouldering Shoe
Scarpa Drago XT
Weight: 7.1 oz
Upper: Microsuede
Sole Rubber: 3.5 mm Vibram XS Grip 2
Pros and Cons
⊕ Jaw-dropping precision
⊕ Prehensile toe scumming
⊕ Insane torque
⊗ Heel can feel baggy
⊗ Almost “too stiff” for board climbing
If you’re a diehard gym climber or boulderer who wants to stand on those barely visible screw-on plastic jibs on vert but still go full beast mode in the bouldering cave, then the Drago XT is your shoe. It’s one of the most precise, powerful but still fleet, grabby, and semi-soft shoes I’ve worn, and it absolutely destroyed on difficult indoor terrain.
On two V9 micro-foothold crimp boulders (rock-gym Tic Tacs) that my softer Veloce L’s punted on, I put the Drago XT on and sent both times right off the bat. And when I took the Drago XTs on some steep pitches—both on plastic and Flatirons sandstone—they dominated at grabbing with their major downturn and banana curve, yet still had enough versatility to see me up an outdoor 5.13c that climbs out a cave to a bulging V7 crimp boulder to a 5.12 slab.
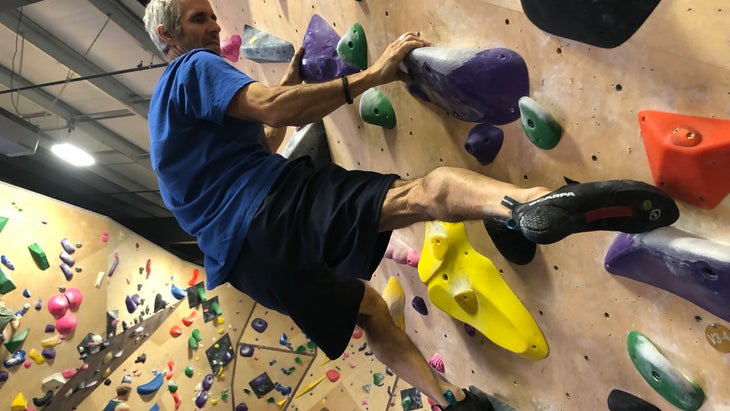
I also used them on a 5.14 project on the same wall with a key outward toe scum/drag on an undercling; with their huge, laser-etched patch of gummy M50 rubber, the Drago XT locked my foot in like a hand. If this sounds like over-exuberance, consider that I didn’t love the other shoes in the Drago family (Drago and Chimera) or Scarpa’s similarly soft offerings (like the Furia line). They were too soft, too banana-shaped, too flexy, and too rounded.
But the Drago XT uses a new last that’s 10 percent straighter than the other Drago models, making the toebox visibly pointier and lower volume, and features a second Velcro strap. The result is a Drago that’s stiffer and more built-up, with an upper that accommodates your foot like a glove. The only feature that might not appeal is the heel cup: it’s made of gummy, textured (“reptile skin”), laser-etched 3 millimeter rubber that locks on and rocks over big features like a champ, but can be baggy and imprecise on angular features on rock.
Ironically, the Drago XTs may be too stiff for board climbing, especially the smeary feet on a vert kicker panel: I had them pick off a few times while MoonBoarding. But these are minor dings on an otherwise near-perfect, high-octane shoe. For the gym, bouldering, and radical steeps, these are the best shoes I’ve tested in years and finally do “soft” right by, well, not being so soft after all.
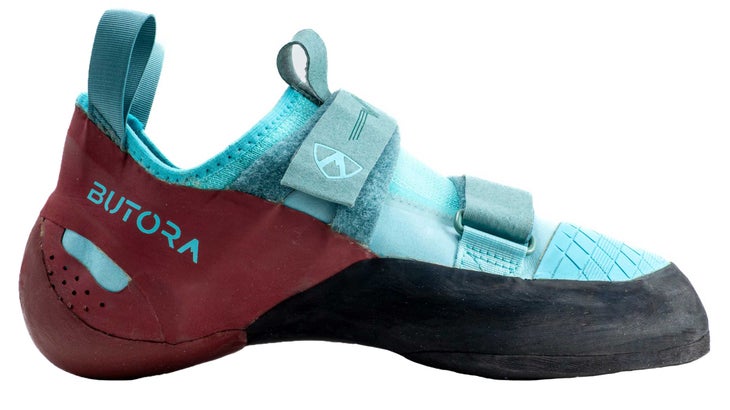
Best for Beginners
Butora Rubicon
$150 at REI $150 at Backcountry
Weight: 8.7 oz
Upper: Microsuede
Sole Rubber: 4 mm Butora NEO Fuse
Pros and Cons
⊕ Solid intermediate-to-advanced shoe
⊕ Remarkable performance for its niche
⊗ Minor pinching
I’m usually skeptical about beginner and intermediate shoes. Sure, they’re affordable, but they’re also typically blocky, boxy, and cheaply made facsimiles that teach newer climbers not to trust their feet. Bad climbing shoes slip, and thus ingrain poor footwork. The Rubicon, however, opened my mind to this genre by proving that well-designed intermediate shoes do exist.
This shoe provides the forefoot support (courtesy of a half-length ABS midsole) that novice climbers need as their feet strengthen, and marries it with a mild downturn, precise, semi-pointy toe box, supple, breathable, and comfy sock-style upper, and a scooped-out, 4-millimeter Neo Fuse rubber half sole. The result is a shoe that teaches you to properly feel and stand on small holds.
I used the Rubicon while warming up in the gym and appreciated their edging support and comfort on vert terrain. When I pushed them harder—just to see what they could do—on steeply slabby to slightly overhanging angles, I was able to climb up to 5.13- and V7/8, which is further than similar intermediate shoe models have allowed me to go.
The Rubicon might even be overkill for its target consumer, but climbers advancing through the grades will mature nicely into the shoe. The Rubicon also feels well-built, meaning it should take multiple resoles. On a final note, the toe-box area is all rubber, on the stiff side, and won’t stretch a lot, so come up a half size above your street shoe for smearing or long-term/multi-pitch wear.
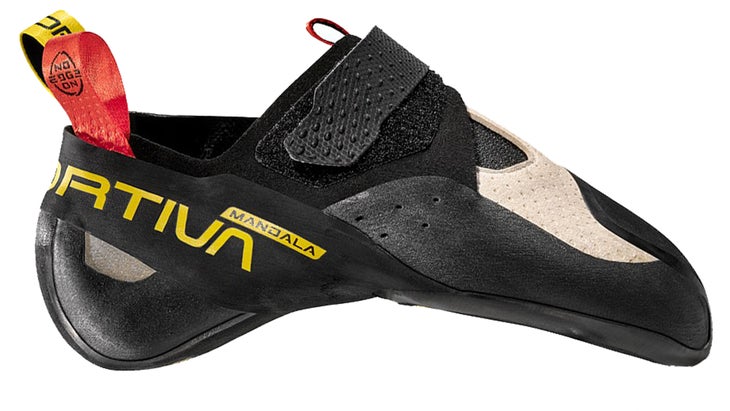
Best Shoe for Steep Routes
La Sportiva Mandala
$209 at REI $209 at Backcountry
Weight: 8.4 oz
Upper: Microfiber
Sole Rubber: 3mm Vibram XS Grip 2
Pros and Cons
⊕ Precise vacuum fit
⊕ Plenty stiff for most outdoor edging
⊕ Conforms into irregular footholds
⊕ Solid heel-hooking and toe-scumming
⊗ Too squishy for micro-edging
⊗ Heel cup can run baggy
⊗ Not the most durable
If you were on the fence about No Edge tech or wanted a stiffer, more precise No Edge shoe for outdoors, then check out the Mandala. It is one of the most proficient and versatile steep-rock beasts in recent memory, especially on “innie” footholds, and also holds its own on vertical terrain.
Until now, our testers considered La Sportiva’s soft No Edge shoes for gym use only. The Futura, Genius, and Mantra are fun shoes, but the unique, single-piece sole/rand that rounds up over the toebox was too squishy for most outdoor applications. Though the Mandala has the same 1.1 millimeter midsole as the other No Edge shoes save the Mantra, it somehow felt heftier—there was more weight, support, and precision in the toe, which also comes to a more marked front point than its siblings.
This extra structure and bite translated to fluency on both plastic and rock, with the Mandala going gangbusters on steep smearing, grabbing, edging, and especially concave/divot footholds (see: that front point) where you need to deform the rubber.
I used them religiously on a 30-degree overhanging local granite project, The Crenulator, that required just about every foot technique, with an emphasis on steep, powerful smears and precision divot stabs. Other testers also found themselves standing confidently on a variety of footholds in the Mandala. “While climbing blue-streaked limestone near Canmore, Alberta, I loved the shoe for onsighting 10- to 20-degree overhanging pitches,” reported Climbing Senior Editor, Anthony Walsh. He noted that he could paste the Mandala on just about any rugosity when in panic mode and still have it stick.
A couple of dings: Like all the No Edge shoes, the Mandala proved too squishy for true micro-edging, while durability was another factor—I slightly tore one heel cuff pulling them on, though it was about two months into testing. Still, these are relatively small issues on an otherwise alluring new beast of a rock shoe.

Best Training Shoe
Scarpa Veloce L
Weight: 6.9 oz
Upper: Microfiber
Sole Rubber: M50, S72
Pros and Cons
⊕ Extremely light on the feet
⊕ Soft, grippy, and sensitive
⊕ Comfortable for long gym sessions
⊗ Edging requires strong feet
⊗ Thin sole requires pain tolerance
⊗ Rubber is fast wearing
The original Veloce, first introduced in 2020, was comfy, light, squishy, and grippy, pairing Scarpa’s soft, in-house S-72 rubber outsole and subtle S-shaped midsole with a V-shaped tension rand to render a sensitive beast for smears and steeps. My OG pair is still a staple on my garage MoonBoard, even though I continue to struggle with the Velcro strap being too short and coming undone.
The Veloce L is the same shoe only better, fixing the strap problem with an offset lacing system that comes a good inch farther down the forefoot, giving you greater fit control—critical for ratcheting the shoe down for edging and as you move deeper into a long, sweaty session and the shoe expands.
The fit of the new model is intuitive, almost a “size it as you wear it” approach, though you may want to come down a half-size given how much they stretch. “It’s basically like wearing a performance sock,” noted Potter.
We both loved the Veloce L for everything from parkour-y slab, to cave bouldering, to long, overhanging 5.12/5.13 lead routes, and found them to be consistently responsive, comfy, and unshakeable. Potter especially appreciated how well they stood on irregular footholds, like the bulbous feet on the volcanic rock in his local Diablo Canyon, New Mexico, where the softer rubber molded to fill the complex grips. Their one weakness was vertical, technical terrain, though again, cranking down the laces ups the support. The Veloce L also comes in a women’s version.
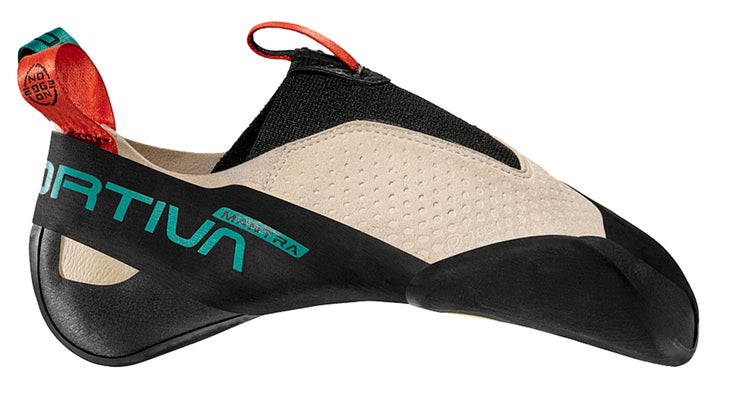
Best Pure Slipper
La Sportiva Mantra
$169 at Backcountry $169 at La Sportiva
Weight: 5.9 oz
Uppers: Microfiber
Sole Rubber: 1–2 mm Vibram XS Grip 2
Pros and Cons
⊕ Very light
⊕ Stretchy fit
⊕ Hyper-sensitive
⊗ Tough to stand on edges and jibs
With a big downcamber and mild asymmetry, the sensitive and pared-down Mantra is great for grabbing big, smeary holds. Credit La Sportiva’s “No Edge” technology—a construction method that rounds the sole up over the toebox as a single unit, instead of sole and rand being two distinct rubber sheets.
The new Mantra (version 3.0 at this point) differs from version 2.0 only in its colorway. It has the same soft microfiber upper, cushy leather insole, gummy 1–2mm XS Grip 2 half-sole, no midsole, and stretchy elastic tongue. My biggest beef with the last model was that, with no closure strap or midsole, the shoes got baggy quickly. The updated Mantra will have the same problem, but after sizing down from a 41 to a 40.5 for this round of testing, any bagginess was radically reduced, even after break-in. And thanks to the stretchy, elastic tongue, the Mandala offers an accommodating “every-foot” fit.
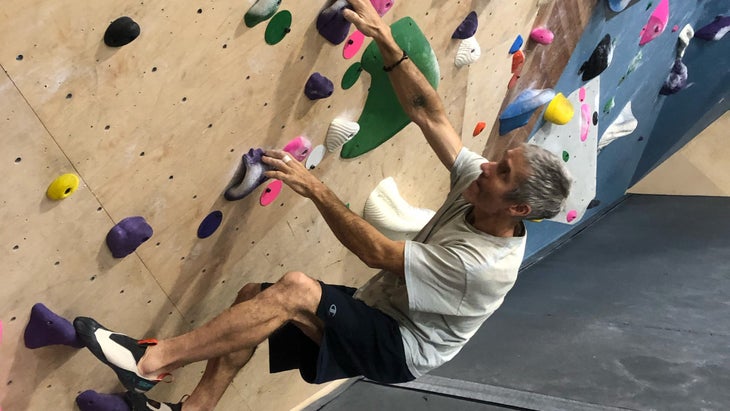
What makes the Mantra stand out is its incredible feedback and sensitivity (sometimes to a painful degree on sharper holds). The shoes deform nicely into innie and irregular holds, are great at grabbing on steeps (especially with larger, slicker holds), and are nimble on smears and volumes. “I loved these shoes while working a desperate, sloping V8 lip traverse at my local quartzite boulderfield,” said Walsh. “The Mantra is the closest thing I’ve come to climbing in a rubber sock, which helped me trust micro-divots as I reeled in heel hooks and smears.”
The Mantra’s weakness is precision and edging support, which left me cursing my choice of shoe on slabbier, roped gym terrain, where suddenly I lacked bite. Which is all to say, the Mantra really is a bouldering shoe, for indoors and caves and slopey venues like Fontainebleau and Horse Pens 40.
A couple years back, while I was testing the Mantra 2.0, the shoe blew out before I’d even worn through the sole—one heel tab tore and I wore a hole through my right toe. This time, however, I have not experienced these issues. Downsizing seems to have reduced any bagginess, the heel tabs have not torn, and all is well with the toe rubber too, so perhaps I just had a defective pair.
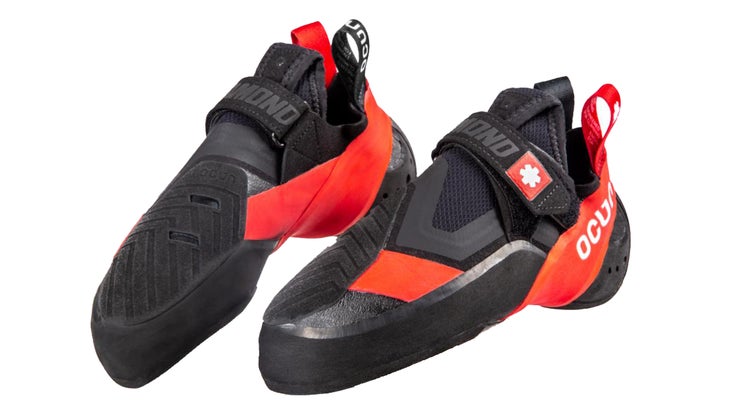
Best Long-Session Shoe
Ocun Diamond S
Weight: 8 oz
Upper: Microfiber
Sole Rubber: 4 mm CAT Rubber 1.5
Pros and Cons
⊕ Powerful, asymmetrical toe
⊕ Comfy, airy fit
⊕ Big, grippy toe-scumming patch
⊕ Soft, sensitive heel cup
⊗ Toebox asymmetry may not be for everybody
⊗ “Squishy” edging on jibs on vert
⊗ Toe-patch delamination
The Diamond S is a machine on boards. With a marked inward curve that’s noticeable right out of the box, this shoe lands squarely in the “very asymmetrical” category. Such shoes tend to be polarizing, but they offer a powerful position for climbers with strong toes who like articulating their foot toward and around a hold, grabbing to suck the hips in on jibs on steeps (especially on spray walls and boards).
I tested the Diamond S for two months on the 40° MoonBoard, while fellow tester Mary Andino wore it on the adjustable Tension Board. “I train a lot on the Tension Board, and this shoe excelled on the greater overhung angles,” she said. “I could use the downturned toe to dig in and hold the small crimps.”
The Diamond S has a barely-there midsole; this, coupled with the breathable mesh upper, makes it friendly for long-term wear and a great sessioning shoe. Andino reported that her feet stayed dry, cool, and comfy for five-minute bursts during her typical 20-minute blitzkriegs of 20 gym problems. She also dug the tight-fitting mid-shoe area, and found the cross straps effective at ratcheting fit.
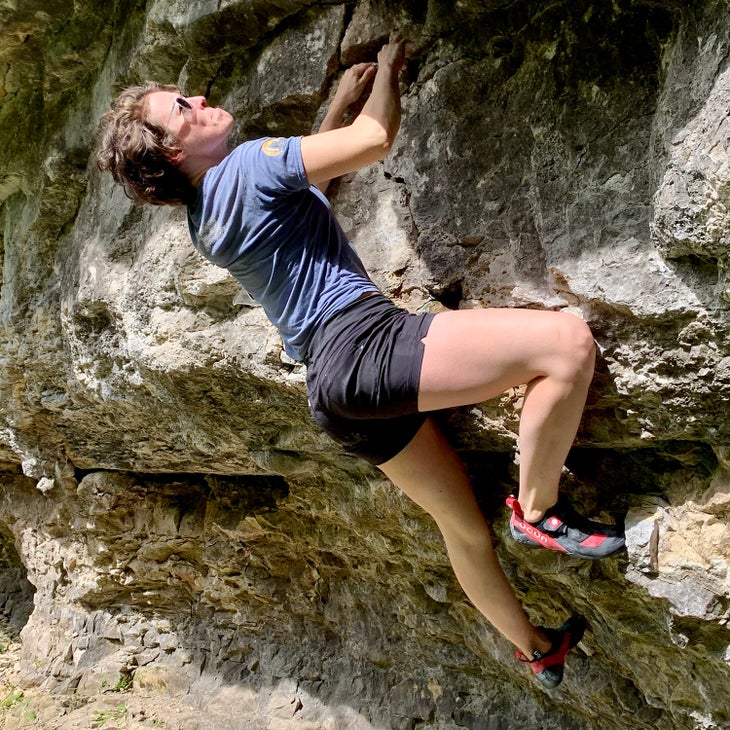
We diverged on the heel: Andino (narrow feet) found hooking insecure at her local limestone bouldering area, Sugar Bottom, and at Illinois’ sandstone Holy Boulders, with the heel rand too narrow to stay put. I (wide feet) felt that the soft heel fit me well and liked how it spread out, rendering good sensitivity and agility with volume-type rockovers.
But we agreed that this shoe is likely too soft and asymmetrical for most climbers on vert terrain (it uses Ocun’s CAT 1.5, their softest, stickiest compound). Especially for edging and precision work, I often found myself wishing for more support. On slab, I also found it required a concerted effort and major foot force to activate.
Still, for boulderers and comp climbers looking for a squishy, highly asymmetrical shoe, the Diamond S ticks the right boxes.
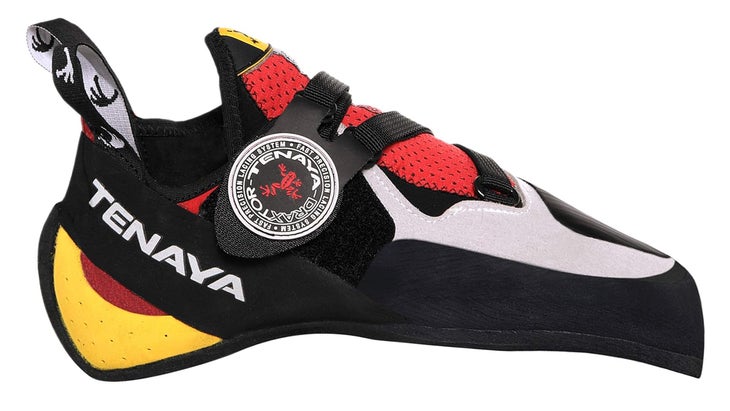
Best Edging Shoe
Tenaya Iati
$205 at Backcountry From $158 at Amazon
Weight: 6 oz
Upper: Leather and microfiber
Sole Rubber: 3.5 mm Vibram XS Grip
Pros and Cons
⊕ Astonishing stiffness, support, and precision
⊕ Pronounced big-toe bite
⊕ Soft and breathable uppers
⊗ Pinchy fit
⊗ Sole wore out quickly
The Iati has been out awhile (since 2015), but given that it’s Alex Megos’s go-to for facey rock routes and the comp lead wall, I figured it deserved another look—and I was right. Over the course of testing, the Iati proved the stiffest, most supportive, most precise shoe for its weight on the market, making it ideal for edging projects, especially out of the box.
It’s an interesting shoe full of seeming paradoxes: an aggressive asymmetry and downcamber paired with a full-length sole that rounds up to become the heel rand; a lot of fore-and-aft flex paired with a stiff, double, forefoot midsole; and a high, narrow, boxy-looking heel cup that ends up being surprisingly pliable. What’s more, the Iati looks overbuilt, but at 12 ounces, it feels like gossamer. This, married with the stiff, pointy toebox, rendered a lot of fleetness and power on micro-holds and pockets alike, making it great for limit climbing where you need to zero in quickly on miniscule footies
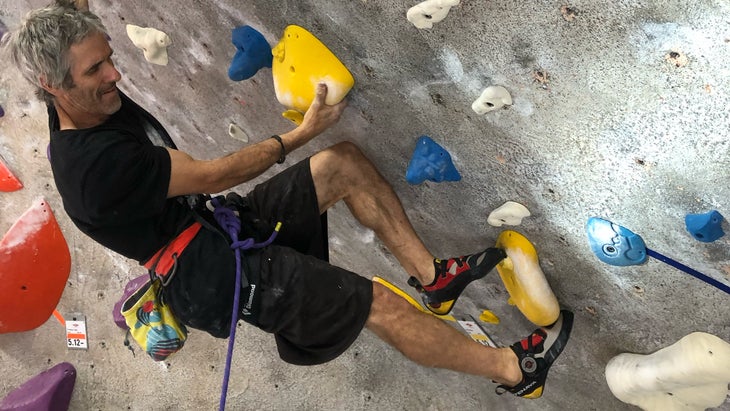
I tested mostly at a new Colorado gneiss area, with highly featured, overhanging stone studded with crisp, virgin footholds ranging from full-foot ledges to barely visible micro-wrinkles. While the stiff, lightly downturned Iati grabbed and smeared well enough on the area’s 30-plus-degree overhanging steeps and at my local gym’s bouldering cave, I found myself leaning into it more for edging routes from vertical to 20 degrees overhanging. It became my sending shoe on a sustained, eight-bolt, thin-edge 5.13a on the gneiss and on a complex 5.13b that involved smearing, hooks, smedging, and a crux Rose move that required confidently standing on dimes.
The Iati shone as a top-end, all-around sport shoe with a penchant for micro-edging. That said, its light weight means less structure, and I have noticed a tendency for the forefoot to flex, and that the 3.5 millimeter outsole has worn down quickly (perhaps a result of testing on sharp, new rock). Still, overall, the Iati is a technical edging beast, especially outside.
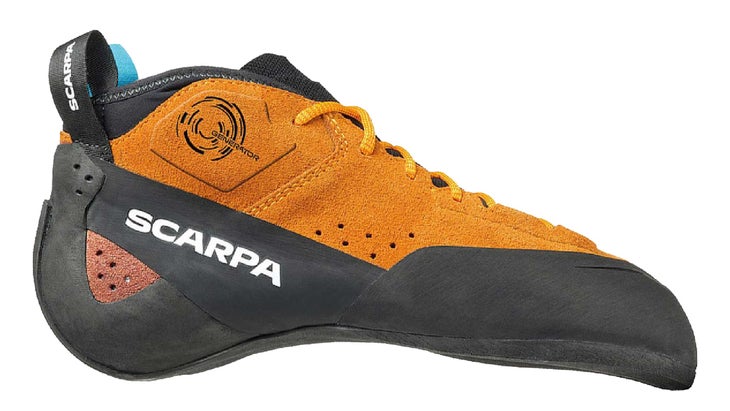
Best Crack Shoe
Scarpa Generator Mid
$225 at Backcountry $225 at Scarpa
Weight: 10.9 oz
Upper: Eco-suede (50% recycled), neoprene collar
Sole Rubber: Vibram XS Edge, M70
Pros and Cons
⊕ Pain-free jamming
⊕ Stiff
⊕ Breathable and comfy
⊗ Toe box is bulky
As a genre, performance trad is a moving target: Given the varied terrain on multi-pitch rock, these shoes need to do everything well—from finger, hand, and offwidth jams, to technical edging and tricky smears. Bring the wrong shoe, and suddenly that key pitch feels impossible.
With the Generator Mid, Scarpa has entered the space with a solidly built, über-stiff contender.
It’s a boot that excels at wide cracks thanks to its unyielding last, high toe rand, and well-padded tongue and side-heel areas. “Scarpa did an excellent job designing this shoe as a stiff, all-day crackmaster,” said Chris Weidner, who tested on Colorado’s slippery Boulder Canyon granite and in Yosemite. “For that, it’s awesome—among the best offwidth shoes I’ve used.”
The flip side of all that support is a toe box that can feel clunky on technical face, as Weidner found on the wrinkle-edges and divot smears of the bouldery first pitch of Country Club Crack, an iconic 5.11 in Boulder Canyon. However, on the glassy, straight-in hand crack of the second pitch, says Weidner, “My feet felt zero pain while jamming—for the first time ever on this pitch.”
Climbing editor Anthony Walsh came to a similar conclusion on the 700-foot 5.12 Guy Like You on Snowpatch Spire in the Bugaboos: “The Generator Mid’s big toe box was adept at rand smearing in a sustained corner crack and for the wide stuff, but boxy and insensitive in thin jams.” Weidner solved this issue by shoving the toes in as far as they would go and twisting. Perhaps not the most elegant solution, but a maneuver that worked well and didn’t cause any pain thanks to the shoe’s generous padding.
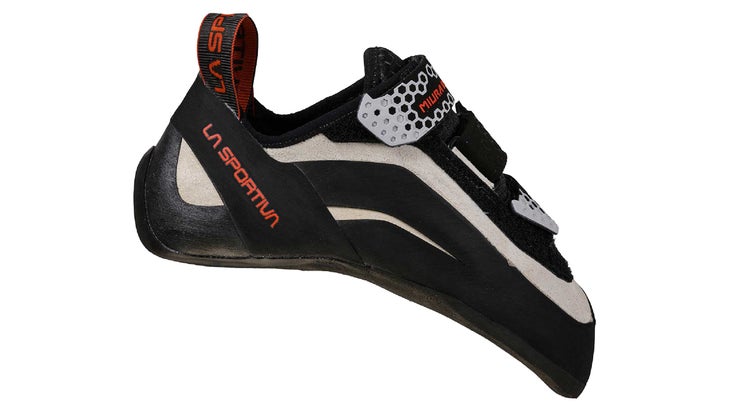
Best Powerful Tech Shoe
La Sportiva Miura VS
$199 at REI $199 at Backcountry
Weight: 9.1 oz
Upper: Leather/recycled textile/recycled rubber/Vibram rubber
Sole Rubber: 4 mm Vibram XS Grip 2
Pros and Cons
⊕ Stiff, pointy toe box
⊕ More accommodating fit than previous iteration
⊗ Smearing can be insensitive and clunky
⊗ Toe patch is too small
I was a diehard Miura lace guy in the 1990s, and a Miura VS guy in the Aughties, grooving on the pointy, powerful, feedback-focused big toe. This held especially true on routes from 80 to 120 degrees, particularly on limestone and granite where you dig into micros. For some reason (too much damned shoe testing?) I drifted away from the Miura, so I was curious to see the VS re-released for 2024, with a few subtle tweaks: a narrower heel cup, made with recycled Frixion Eco rubber; a new mesh tongue that uses 100 percent recycled fabric; and the relocation of the lowest hook-and-loop strap farther back, to protect against both wear and pinching.
The new VS felt decidedly more comfortable, especially across the top of the foot, where the inline tongue didn’t cut into my foot even when I ratcheted down the straps. Heel-hooking on both rock and plastic felt stable, as did heel-toes, thanks to Sportiva’s P3 midsole, which first appeared on the Solution back in 2007 and has a muscular torque that holds your foot in a power position.
The precision toe was as good as ever, and worked like a charm on a technical, gently overhanging granite 5.13a near Lyons, Colorado, with crimps and narrow slots for feet. Climbing’s Anthony Walsh noted the shoe’s otherworldly precision needed to be experienced to be believed, saying it let him stomp on tiny footholds on 70–120 degree granite.
A few dings: The shoes felt more asymmetrical (banana-like) than I recalled, which forced me to climb bowlegged and was distracting on lesser-angled terrain. The new VS also felt stiffer than the old model, which translated to middling smearing on rock, if not downright unreliability on gym volumes. That said, the Miura VS was fluent on both techy face and thin cracks, plus the shoe feels overbuilt and should withstand multiple resoles.
“Sliding into the updated Miura VS was like rediscovering an old friend,” said Potter—a friend that he hopes will be a key part of his sport quiver for years to come. The Miura VS also comes in a women’s version with a softer XS Grip 2 sole versus the XS Edge on the men’s.
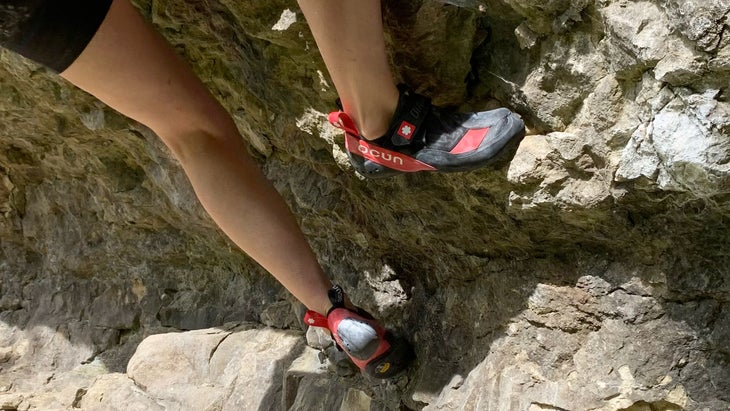
How to Choose Climbing Shoes
Many brands offer entire families of rock shoes, including a variety of closure styles (think: lace, Velcro, or slipper) for each model. All these choices can make it overwhelming to pick out a new pair. But really, there are no wrong answers—only the wrong fit or the wrong tool for the wrong job. Here are some parameters to help refine your search.
Intended Use
This is a big one, and it has two facets: Both your intended use with the rock shoe and the brand’s intended use when they designed it. These don’t necessarily need to match up, but it’s better when they do. So first consider what you want the shoes to do for you. Then, take a look at the shoe’s product information for any overlap. Aiming to do techy, vertical sport climbing? Make sure your shoe is designed for edging. Rock shoes are super-niche these days; shop accordingly.
Gym bouldering/board training: For gym bouldering or board sessions where you’re frequently removing the shoes, you want a slipper or a Velcro-closure shoe that makes for easy on/off. For versatility—meaning, facility on both radical steeps and with volume smearing on comp-style problems—look at soft shoes with only a mild downturn; you do need jib-standing power, but you’ll mainly be smearing, hooking, scumming, and glomming, whether it’s on the holds or the actual wall surface.
Gym lead climbing: It’s rare that I see people wearing lace-ups in the gym, as they’re often too stiff and tough to get off quickly between laps. Instead, you want a jack-of-all-trades that’s on the softer side, usually a slipper or Velcro shoe one notch up in stiffness from your gym-bouldering shoe.
A semi-stiff all-rounder gives you options on your gym’s lead terrain, which can vary from vertical to very overhanging. Some climbers like shoes they can keep on for the duration of their session, and there are now purpose-built shoes just for such long-term wear (e.g., the Scarpa Veloces).
Performance sport climbing: This is likely the largest category on the market, with each brand offering multiple options. Sport climbs come in all flavors, from radical, steep cave climbs to techy faces. Consider the venue—your local area or where you’ll be using them frequently.
What attributes do you need? Radical asymmetry and gummy rubber for grabbing on über-steep terrain? A pointy toe for micro-divots and pockets? Look for a shoe with a stiff outsole and a flat, neutral sole if you prefer to climb on vertical or slabby terrain. Look for a slight downturn and medium-sticky rubber for grabbing power on semi-steep routes. Look for a major downturn, asymmetry, and squishy rubber for cave climbs.
And look for a shoe that ticks most or all of these boxes to only a moderate degree if you’re looking for a quiver-of-one.
Bouldering: There are lots of high-end bouldering shoes on the market. Most are designed to encase the foot in rubber, for fluency with futuristic, non-big-toe-focused moves like heel-toe cams, toe scums, and so on. They tend to have an aggressive fit—an asymmetrical “banana” shape and a radical downturn—that helps you bite into small holds on overhanging terrain. They also tend to have a softer, gummier feel to them and, as such, are not meant for edging-intensive climbs or long-duration wear.
Trad climbing/all-around: In general, shoes designed for trad climbing and all-around wear are flat-lasted so your feet and toes sit in a neutral, less activated position. That makes them more comfortable on traditional and multi-pitch climbs. These shoes are meant to be stiff and supportive, so that the small muscles in your feet and calves don’t fatigue on long, vertical leads.
Trad shoes will often also have higher heel cuffs or ankle protection, for wider cracks. They can be very precise, but will typically lack flexibility and sensitivity that you’d find in a sport-climbing or bouldering shoe.
Fit and Break-In
Fit is personal, and varies from shoe to shoe and genre to genre. If you really love a particular shoe, you may even consider buying two different sizes: a looser, more forgiving fit for warming up, longer pitches, multipitch climbing, and gym sessions; and a tighter pair for sport climbs and boulder problems at your limit. A few rules of thumb:
Selecting for your foot shape: Some brands make shoes that favor wider feet, and some make shoes that favor narrower feet. So you may find some brands are perfect for you, while others suck. However, many shoes now come in regular and low-volume (LV) models, or may be labeled as men’s and women’s versions; it pays to try both options on.
There may also be a difference in midsole support between the two versions: a thinner or half midsole for lighter climbers (this is common in women’s shoes), and a stiffer, full-length one for heavier climbers (more common in men’s shoes).
General sizing guidelines: Some brands sell shoes meant to be worn more or less at your street-shoe size, and some sell shoes meant to be sized down—check the manufacturers’ websites for more information. Even better: go to a shoe demo or retail store before you commit.
For me, with wide, high-volume feet that are street-shoe size 10, I’ve figured out the following guidelines by brand, which may help you on your search:
- Black Diamond (9.5, a half size off my street shoe)
- Butora (9.5, a half size off my street shoe, though sometimes 10)
- Evolv (10, the same as my street shoe)
- Five Ten (10, the same as my street shoe)
- La Sportiva (40.5 or 41, roughly four European sizes off my street shoe)
- Mad Rock (9 or 9.5, one size off my street shoe)
- Red Chili (9.5, a half size off my street shoe)
- Scarpa (41–42, roughly two to four European sizes off my street shoe)
- Tenaya (41, roughly four European sizes off my street shoe)
- Unparallel (10, the same as my street shoe).
Again, these are just guidelines, but after intensive shoe testing for the past 20 or so years, they continue to serve me well.
Sizing down: You never want to size so tightly that you lose circulation, even during break-in. In a perfectly fit shoe, your big toe will sit flat or slightly curled—not taloned over—at the very tip of the shoe, and your heel will slide all the way into the heel cup. If your big toe or other toes are so curled you can barely weight the shoe and/or your heel doesn’t drop down fully, the shoes are too tight. With performance sport and bouldering shoes, you also want to hear a vacuum Whoosh when your heel drops into the heel cup. That signifies a conforming fit.
Shoe stretch: Neither do you want loose or baggy shoes, except maybe for warming up and long gym sessions. If they feel too comfortable out of the gate, they’re likely too big and will slip on smaller holds, especially as the shoes stretch. Most synthetic-upper shoes stretch only a little (a quarter size), while shoes with leather uppers can stretch up to a half size.
Break-in: Some models—especially the $200-plus-dollar high-performance shoes, with their many sewn upper panels, special materials, and tension rands—are meant to have a long break-in period. That’s why those plastic sheets come with the shoes: to facilitate sliding tight, new shoes on over your heels. (You can even climb with the plastic hanging out the back if you need to—hell, even Adam Ondra does it!)
With a tight-fitting pair, I’ll usually wear them at home, using the plastic sheets, for a night or two in front of the TV, then do a few gym sessions with the sheets in, as needed, and then finally take the shoes on the rock.
How We Test Climbing Shoes
- Number of testers: 4
- Number of products tested: 23
- Number of vertical feet: 34,800
- Lowest grades climbed in the rock shoes: V0 and 5.10
- Highest grades climbed in the rock shoes: V10 and 5.14
- Most accessible testing venue: The lead tester, Matt Samet’s, home climbing gym: circuit walls and a Grasshopper Wall with 40° MoonBoard; also The Campus, a new boards-and-bouldering gym a 10-minute walk from his house
- Least accessible testing venue: Stanley Headwall, Canadian Rockies
- Number of times our lead tester threw his shoes at the rock because he’d punted on his project again: This year, zero!
To test climbing shoes properly, you need to consider both a shoe’s stated niche—and test on the appropriate terrain—as well as take it outside its comfort zone to see if it has any surprises. It’s also critical to evaluate a shoe on as many climbs as possible, both for feedback and to break the shoe in to see how it really performs. (Any reviewer who offers an opinion after a few gym sessions is half-assing it.) I’ll also climb the same route or problem repeatedly in different pairs, to see how they stack up against each other on the same footholds.
Five testers—experienced climbers ranging in age from our 20s to our 50s—considered 23 rock shoes, narrowing our final selection down to 11. We tested on moderate terrain down to 5.5, and on difficult terrain up to V10 and 5.14; we tested on rock-gym routes and boulder problems, and light-up board walls; and we tested on trad climbs, sport climbs, and multi-pitch alpine rock climbs. We pretty much covered all rock types—sandstone, limestone, granite, basalt, quartzite—as well as all angles, from slabby to caves, on cliffs from Colorado, to Washington, to New Mexico, to Nevada, to Illinois, to Iowa, to Massachusetts, to the Bugaboos, to Kentucky.
The main factors considered were fit, break-in, and comfort, as well as performance attributes like precision, edging, smearing, hooking, scumming, and jamming—wherever the rubber meets rock. We also considered durability, i.e., how well a shoe holds its structure after heavy use. Does it stay pointy, precise, and sharp, or does it “slop out” as it breaks in? Are the uppers and other components still intact? How much does it stretch?
We didn’t test any pure beginner shoes; most of the shoes tested start around $170 and run into the $200s, so would be considered intermediate-to-advanced offerings for climbers of some experience—and with the trained-up foot muscles to show for it.
Meet Our Lead Testers
Matt Samet
Matt Samet, a freelance writer and editor, has been an avid rock climber since the mid-1980s, the era of high-top Firé rock shoes. He lives in Boulder, Colorado, where he primarily sport climbs, boulders, and trains on his home wall, and has been testing climbing gear for the past twenty-plus years.
Mary Andino
Mary Andino, PhD, is an editor and writer whose residence in Iowa dictates that she regularly travels across the Midwest to backpack and climb. Primarily a sport climber who loves technical sequences on vert, she cites Jackson Falls in Southern Illinois as her favorite local crag.
Anthony Walsh
Anthony Walsh is a senior editor at Climbing Magazine. Based in the infamously chossy Canadian Rockies, he generally tries to spend his rock season elsewhere, pulling on premium Squamish granite and Okanagan gneiss.
Steven Potter
Steven Potter is a former digital editor at Climbing Magazine. He’s been flailing on rocks since 2004, holds an MFA in creative writing from New York University, and has contributed hundreds of stories to Climbing, Outside, and Ascent.
More Gear Reviews
The Best Ice Climbing Gear
The Best Ropes
The Best Harnesses
The post The 11 Best Climbing Shoes of 2025 appeared first on Climbing.
]]>